


Below is the uncorrected machine-read text of this chapter, intended to provide our own search engines and external engines with highly rich, chapter-representative searchable text of each book. Because it is UNCORRECTED material, please consider the following text as a useful but insufficient proxy for the authoritative book pages.
6-i Chapter 6âSpecial Trackwork Table of Contents 6.1 INTRODUCTION 6-1Â 6.2 DEFINITION OF SPECIAL TRACKWORK 6-1Â 6.2.1 Basic Special Trackwork Components 6-2Â 6.2.1.1 Switches 6-2Â 6.2.1.2 Frogs 6-3Â 6.2.1.3 Other Turnout Components 6-5Â 6.2.1.4 Special Trackwork Layouts 6-6Â 6.2.1.5 Non-Symmetrical Special Trackwork Layouts 6-11Â 6.3 LOCATION OF TURNOUTS AND CROSSOVERS 6-12Â 6.3.1 Horizontal Track Geometry Restrictions 6-12Â 6.3.1.1 Track Geometry in the Vicinity of a Switch 6-12Â 6.3.1.2 Turnouts on Horizontal Curves 6-13Â 6.3.1.3 Track Crossings on Curves 6-13Â 6.3.1.4 Superelevation in Special Trackwork 6-14Â 6.3.2 Vertical Track Geometry Restrictions 6-14Â 6.3.3 Track Design Restrictions on Location of Special Trackwork 6-15Â 6.3.4 Interdisciplinary Restrictions on Location of Special Trackwork 6-15Â 6.3.4.1 Overhead Contact System (Catenary) Interface 6-16Â 6.3.4.2 Train Control/Signaling Interface 6-16Â 6.3.5 Miscellaneous Restrictions on Location of Special Trackwork 6-17Â 6.3.5.1 Construction Restrictions 6-17Â 6.3.5.2 Clearance Restrictions 6-17Â 6.3.5.3 High Volume of Diverging or Converging Movements 6-18Â 6.3.5.4 Track Stiffness 6-18Â 6.3.5.5 Noise and Vibration Issues 6-19Â 6.4 TURNOUT SIZE SELECTION 6-19Â 6.4.1 Diverging Speed Criteria 6-19Â 6.4.2 Turnout Size Selection Guidelines 6-24Â 6.4.3 Sharp Frog Angle/Tight Radius Turnouts 6-25Â 6.4.4 Equilateral Turnouts 6-27Â 6.4.5 Curved Frogs 6-27Â 6.4.6 Slip Switches and Lapped Turnouts 6-29Â 6.4.7 Track Crossings (Diamonds) 6-29Â 6.5 SWITCH DESIGN 6-29Â 6.5.1 Conventional Tee Rail Split Switches 6-29Â 6.5.2 Uniform and Graduated Risers 6-30Â 6.5.3 Tangential Geometry Switches 6-32Â 6.5.4 Switches for Embedded Track 6-33Â 6.5.4.1 North American Tongue Switch Designs 6-34Â 6.5.4.2 Double Tongue Flexive Embedded Switches 6-37Â
Track Design Handbook for Light Rail Transit, Second Edition 6-ii 6.5.4.3 AREMA-Style Split Switches in Embedded Track 6-38Â 6.5.4.4 Design Guidelines for Embedded Switches 6-39Â 6.5.4.5 Switch Tongue Operation and Control 6-39Â 6.5.4.6 Embedded Switch Drainage 6-40Â 6.5.4.7 Embedded Switch Heaters 6-40Â 6.5.5 Fully Guarded Tee Rail Switch DesignsâBallasted Track 6-41Â 6.5.6 Switch Point Detail 6-43Â 6.6 FROGS 6-44Â 6.6.1 AREMA Frog Design 6-44Â 6.6.2 Monoblock Frogs 6-46Â 6.6.3 Flange-Bearing Frogs 6-47Â 6.6.3.1 Flangeway Depth 6-48Â 6.6.3.2 Flangeway Ramping 6-48Â 6.6.3.3 Flange-Bearing Frog Construction 6-49Â 6.6.3.4 Speed Considerations at Flange-Bearing Frogs 6-50Â 6.6.3.5 Wheel/Flange Interface 6-50Â 6.6.4 Improved Design for Solid and Railbound Manganese Frogs 6-51Â 6.6.5 Spring and Movable Point Frogs 6-51Â 6.6.6 Lift Over (âJumpâ) Frogs 6-51Â 6.6.7 Frog Running Surface Hardness 6-54Â 6.7 FROG GUARD RAILS 6-54Â 6.8 WHEEL TREAD CLEARANCE 6-55Â 6.9 SWITCH TIES 6-55Â 6.10 RESTRAINING RAIL FOR GUARDED TRACK 6-56Â 6.11 PRECURVING/SHOP CURVING OF RAIL 6-56Â 6.11.1 Shop Curving Rail Horizontally 6-56Â 6.11.2 Shop Curving Rail Vertically for Special Trackwork 6-60Â 6.12 LIMITED SOURCES OF SUPPLY FOR SPECIAL TRACKWORK 6-60Â 6.13 SHOP ASSEMBLY 6-60Â 6.14 REFERENCES 6-61Â List of Figures Figure 6.2.1 Turnout layout 6-3Â Figure 6.2.2 Frog on a horseâs hoof 6-4Â Figure 6.2.3 Frog angleâNorth American practice 6-4Â Figure 6.2.4 Single crossover (right hand) 6-7Â Figure 6.2.5 Double crossover 6-8Â Figure 6.2.6 Single-track and double-track crossings 6-8Â
Special Trackwork iii-6 Figure 6.2.7 Single slip switch 9-6 Figure 6.2.8 Double switch lapped turnoutâthree frogs 01-6 Figure 6.2.9 Full grand union 01-6 Figure 6.2.10 Double wye [3] 11-6 Figure 6.3.1 Right-hand turnout with a left-hand switch 81-6 Figure 6.4.1 Turnout and crossover data 02-6 Figure 6.4.2 No. 6 turnoutâballasted timber ties with 13â curved switch 6-21 Figure 6.4.3 No. 8 turnoutâballasted timber ties with 19â6â curved switch 6-22 Figure 6.4.4 No. 10 turnoutâballasted timber ties with 19â6â curved switch 6-23 Figure 6.4.5 Typical curved frog turnout 82-6 Figure 6.4.6 Ladder track with double curved frogs 82-6 Figure 6.5.1 60E1A1 (formerly Zu1-60) rail section for a switch point 6-33 Figure 6.5.2 ATEA tongue switch and mate turnout (shop assembly) 6-35 Figure 6.5.3 ATEA 75â radius solid manganese tongue switch 63-6 Figure 6.5.4 Flexive double tongue switch 73-6 Figure 6.5.5 Embedded tee rail switch 93-6 Figure 6.5.6 Fully guarded house top switch 24-6 Figure 6.5.7 Fully guarded switch with house top and double point 6-42 Figure 6.5.8 Switch point and stock rail details 44-6 Figure 6.6.1 Plan view at frog area with 1 ¾-inch (45-mm) flangeway 6-46 Figure 6.6.2 Section at ½-inch (15-mm) frog point 64-6 Figure 6.6.3 Monoblock frogâgeneral arrangement 74-6 Figure 6.6.4 Section at ½-inch frog point, flange bearing 94-6 Figure 6.6.5 Contoured welded monoblock frog 25-6 Figure 6.6.6 Lift over, âjumpâ frog 35-6 Figure 6.9.1 No. 6 turnoutâconcrete ties with 13â curved switch 75-6 Figure 6.9.2 No. 8 turnoutâconcrete ties with 19â6â curved switch 6-58 Figure 6.9.3 No. 10 turnoutâconcrete ties with 19â6â curved switch 6-59
6-1 CHAPTER 6âSPECIAL TRACKWORK 6.1 INTRODUCTION Light rail vehicles, like all steel-flange-wheeled railway equipment, need to be able to transfer from one track to another or to cross intersecting tracks. The fabricated track components and accessories needed to support and direct the rail car at these locations are collectively called special trackwork. It is presumed that most readers of this chapter are generally familiar with the layout and use of common special trackwork terms. Readers who are new to the topic can find a brief primer on basic concepts and terminology in Article 6.2.1. The standard North American references for special trackwork are Chapter 5 of the Manual for Railway Engineering [1] and the Portfolio of Trackwork Plans [2], both published by the American Railway Engineering & Maintenance-of-Way Association (AREMA). While the Portfolio of Trackwork Plans currently (2010) includes some details for special trackwork on heavy rail metro transit systems, there are pronounced differences between requirements for special trackwork for light rail transit (LRT) systems and those AREMA details. In general, designers can expect to find that special trackwork design requirements on a light rail system will be more numerous and more complex than those encountered on freight railroads. In addition, there are fewer experienced vendors for transit special trackwork than for freight railroad turnouts and crossovers. Most turnouts that are available for tangent track are standardized for simplified manufacture and installation, both for original equipment and replacing worn components. These turnouts are intended for installation in tangent track, without any vertical curvature. One of the most common track design deficiencies is the placement of turnouts within horizontal or vertical curves. Construction and maintenance of curved track is difficult and expensive. Superimposed special trackwork only exacerbates those problems. It is therefore recommended that standardized trackwork be used on horizontally and vertically tangent track whenever possible. Light rail systems that are located in urban streets, particularly those with narrow rights-of-way, often have extremely sharp curves. This constraint often requires light rail special trackwork to be designed for a specific location, with unique parts. 6.2 DEFINITION OF SPECIAL TRACKWORK Special trackwork is customarily defined as âall rails, track structures and fittings, other than plain unguarded track, that is neither curved nor fabricated before laying.â[1] Hence, any track can be considered special trackwork that is built in whole or part using rails that are machined, bent, or otherwise modified from their as-rolled condition. This includes any additional track components that may take the place of rails in supporting and guiding the wheels, as well as miscellaneous components that may be attached to the rails to fulfill the functions required. The term is often contracted and called simply ââspecialwork.ââ In general, the following items are customarily included in special trackwork:
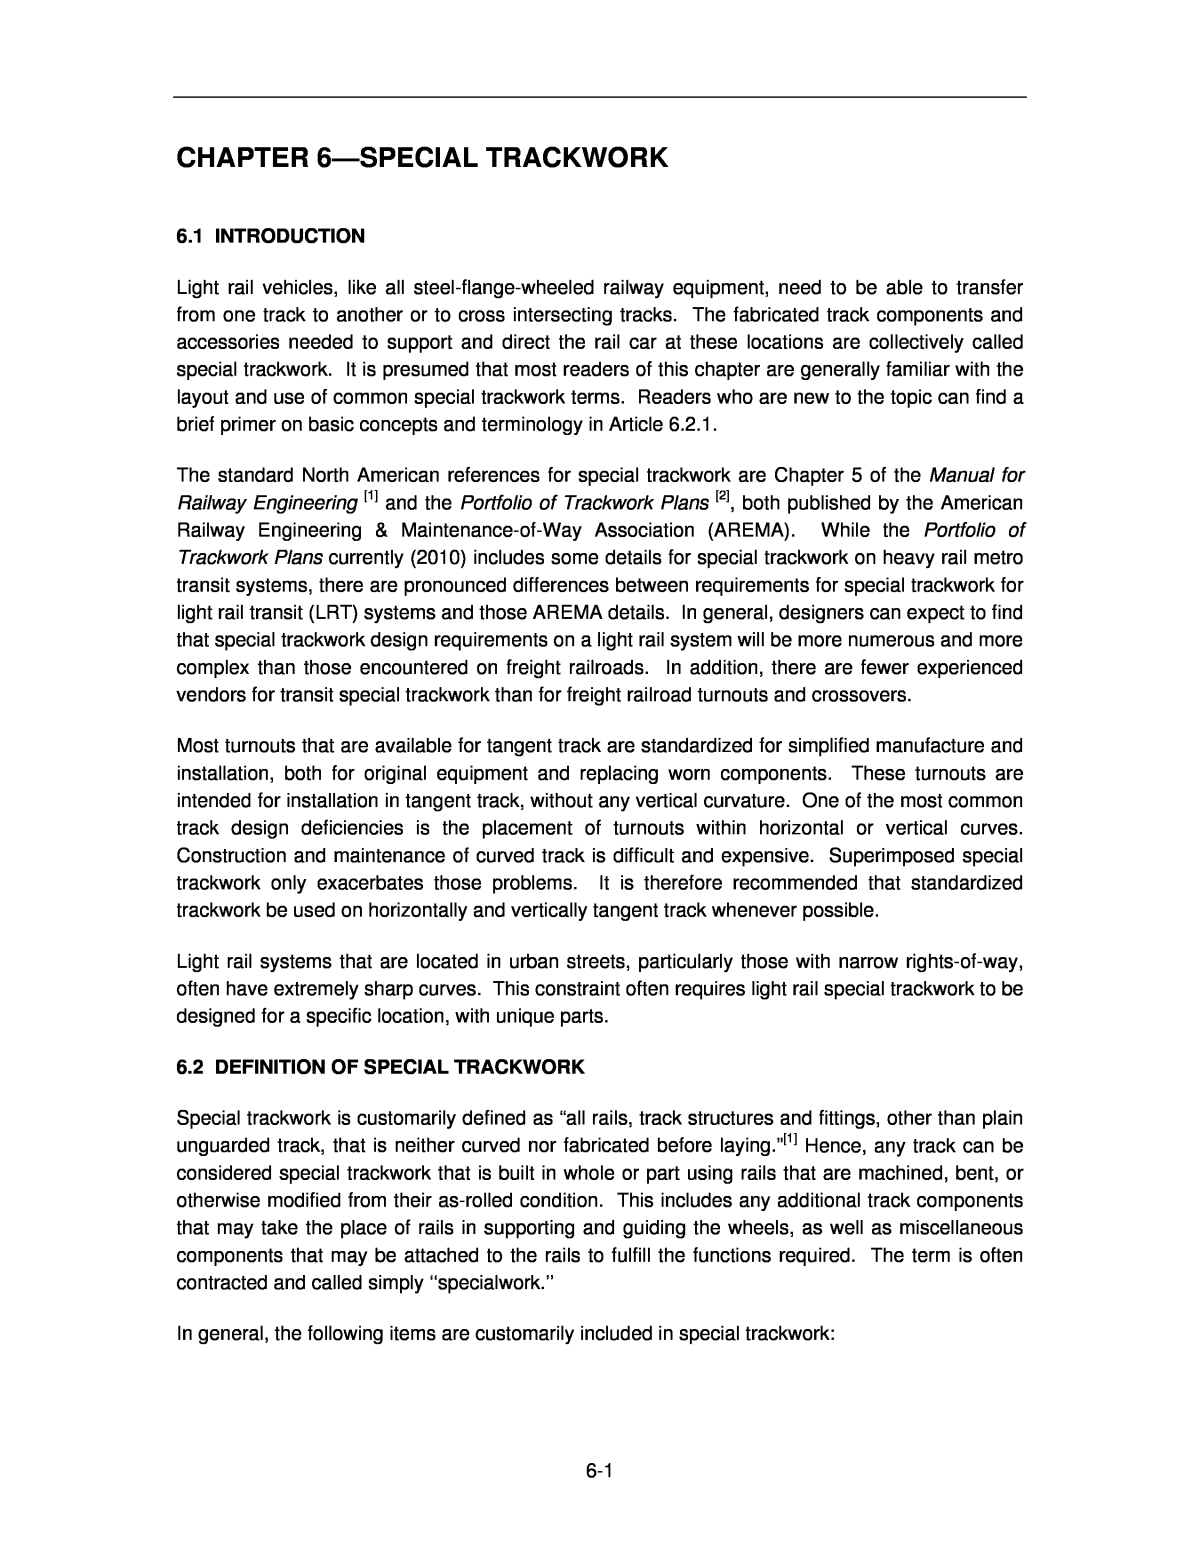
Track Design Handbook for Light Rail Transit, Second Edition 6-2 ⢠Turnouts and crossovers, including switches, frogs, guard rails, stock rails, and closure rails; rail fastening assemblies unique to turnouts; and miscellaneous components associated with turnouts, including switch rods and gauge plates. Crossover tracks, double crossovers including the central crossing frogs or diamond area, and single and double slip switches are included in this category. The cross ties to support turnouts and crossovers can also be considered part of special trackwork, especially concrete switch ties, which require far more design and fabrication effort than ordinary timber switch ties. ⢠Track crossings that permit one track to cross another at grade. Such crossings can be designed as a rigid block or can include movable center points. By definition, slip switches include a track crossing. ⢠Ladder track layouts where a series of turnouts are closely grouped to form a continuous entry/exit layout together with adjoining connecting closure curves into parallel tracks. Oftentimes, such layouts on transit projects will occur in areas of constrained right-of-way and will require curved frogs. ⢠Split switch derails (single- or double-point rail). ⢠Restraining rail, either bolted to a parallel running rail or supported independent of the running rail. ⢠Shop-curved rail of any type, including rails that are precurved in the horizontal plane, the vertical orientation, or both. ⢠Compromise rails for transitioning from one rail section to another, such as when a project uses both 115RE tee rail and a groove rail section. Turnouts, crossovers, and track crossings will be addressed directly in this chapter. Information on restraining rail and shop-curved rail can be found in Chapters 4 and 5. 6.2.1 Basic Special Trackwork Components The most common form of special trackwork is the turnout, which is an assembly of track components that collectively permit two tracks to merge with each other. A simplified layout of a turnout is illustrated in Figure 6.2.1. The turnout itself consists of several fundamental component elements as discussed below. 6.2.1.1 Switches The switch point rails (often called either the switch points or the point rails) are the movable rails that flex back and forth and intercept the wheel flanges to direct them to the appropriate track. In its usual form, a switch point rail consists of a plain tee rail that has been pre-bent and then machined into a tapered shape that is sharp at the switch point end. This pointed end is known as the âpoint of switch.â The opposite end is known as the âheel of switch.â Switches come in various lengths and can be either straight or curved. In general, the longer the switch point rail, the more gradual the angle of divergence from the main track and the faster the rail vehicle can travel through it. The switch point rails, together with the stock rails (described below) and associated fastenings and mechanisms, are collectively called âthe switch.â In ordinary conversation, it is common to use the word âswitchâ when referring to a âturnout,â which is
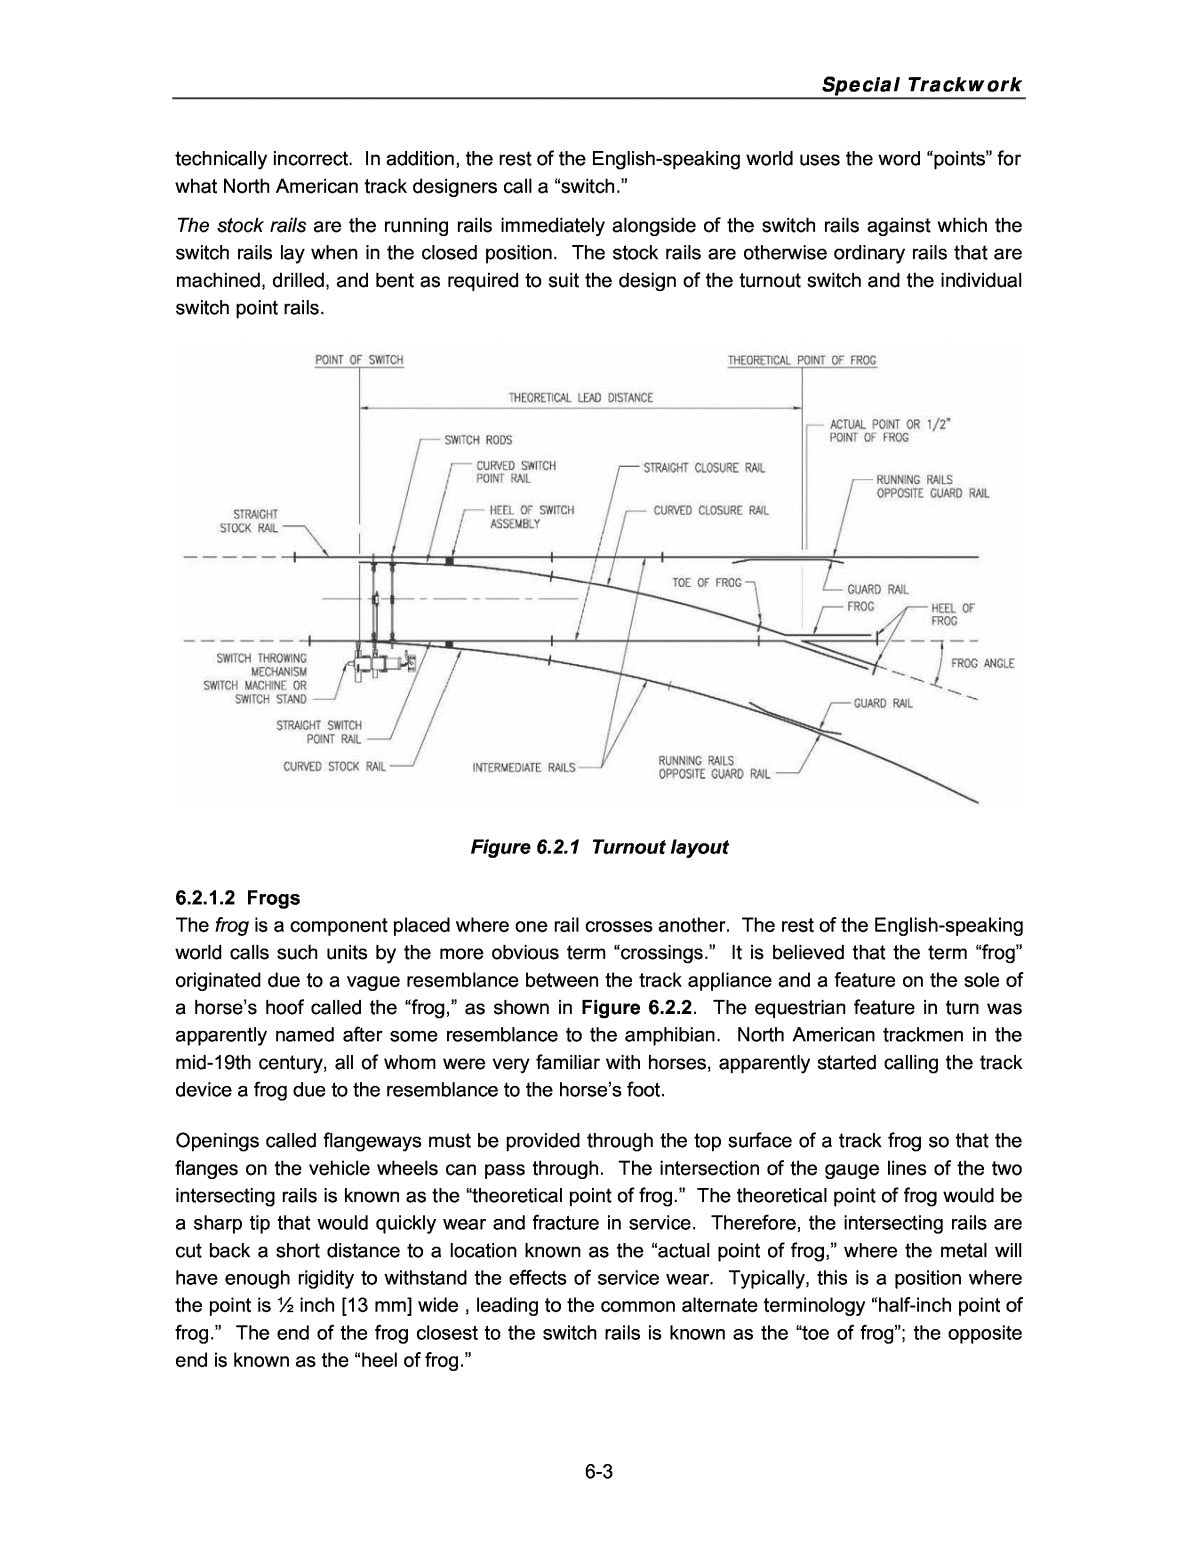
Special Trackwork 6-3 technically incorrect. In addition, the rest of the English-speaking world uses the word âpointsâ for what North American track designers call a âswitch.â The stock rails are the running rails immediately alongside of the switch rails against which the switch rails lay when in the closed position. The stock rails are otherwise ordinary rails that are machined, drilled, and bent as required to suit the design of the turnout switch and the individual switch point rails. Figure 6.2.1 Turnout layout 6.2.1.2 Frogs The frog is a component placed where one rail crosses another. The rest of the English-speaking world calls such units by the more obvious term âcrossings.â It is believed that the term âfrogâ originated due to a vague resemblance between the track appliance and a feature on the sole of a horseâs hoof called the âfrog,â as shown in Figure 6.2.2. The equestrian feature in turn was apparently named after some resemblance to the amphibian. North American trackmen in the mid-19th century, all of whom were very familiar with horses, apparently started calling the track device a frog due to the resemblance to the horseâs foot. Openings called flangeways must be provided through the top surface of a track frog so that the flanges on the vehicle wheels can pass through. The intersection of the gauge lines of the two intersecting rails is known as the âtheoretical point of frog.â The theoretical point of frog would be a sharp tip that would quickly wear and fracture in service. Therefore, the intersecting rails are cut back a short distance to a location known as the âactual point of frog,â where the metal will have enough rigidity to withstand the effects of service wear. Typically, this is a position where the point is ½ inch [13 mm] wide , leading to the common alternate terminology âhalf-inch point of frog.â The end of the frog closest to the switch rails is known as the âtoe of frogâ; the opposite end is known as the âheel of frog.â
Track Design Handbook for Light Rail Transit, Second Edition 6-4 Figure 6.2.2 Frog on a horseâs hoof Typically, both rails passing through a frog are straight, although it is possible for one or both rails to be curved. In North America, straight frogs are commonly designated by a number that indicates the ratio of divergence of both rails from a common frog centerline, as illustrated in Figure 6.2.3. In a No. 6 frog, the two rails will diverge at a ratio of one unit laterally for every six units of frog length. In a No. 8 frog, the divergence ratio will be one to eight, etc. The higher the frog number, the more acute the angle of divergence of both it and the turnout and the faster the rail vehicle will be able to travel through it. Mathematically, the frog number is one-half the cotangent of one-half the frog angle. Figure 6.2.3 Frog angleâNorth American practice In most of the rest of the world, the number associated with a turnout varies with the angle of divergence of the branching track from the main line track. Essentially, the number associated with a turnout is based on the tangent of the angle of the crossing while in North America itâs based on the tangent of one-half of the angle of the frog. So, while in North America, a No. 6 frog has an angle of 9o31â38â, the crossing associated with a European-style 1:6 turnout has an angle of 9o27â44â instead. In addition, much of the rest of the world often utilizes grads (a full circle has 400 grads), not degrees (a full circle has 300 degrees), for angular measurement. Therefore,
Special Trackwork 6-5 when using information from sources outside of North America, it is critical to understand the dimensional units being employed. Itâs not always obvious. While straight angle (tangent) frog legs are customary in railroad work, there are often times in rail transit work when it is desirable and occasionally mandatory that one leg of the frog be curved. This happens most often in embedded track in urban areas, but having one leg of the frog be curved can also be advantageous when developing yard track ladder layouts on a constrained maintenance facility and storage site. Due to the requirement for the wheel to pass through the open flangeway at the point of frog, the wheel tread and frog wing rail surface locations produce high impact forces, noise, and vibration. To avoid such problems, it is very important that the wheel be properly supported during its passage through the open throat area at the point of frog. The width of the wheel tread is critical in this regard. Wide flangeways combined with narrow wheel tread widths could result in loss of wheel tread contact with the top of frog, allowing the wheel to drop into the open flangeway. These design concerns are the reason for the many variations of frogs, including spring frogs, movable point frogs, flange-bearing frogs, and âlift overâ or âjumpâ frogs. These designs are described later in this chapter. 6.2.1.3 Other Turnout Components Other turnout components include the following: ⢠Closure rails are the straight or curved rails that are positioned in between the heel of switch and the toe of frog. The length and radius of the turnoutâs curved closure rails are dictated by the angles at the heel of switch and the frog. Combinations of short switches with large angles and large angle frogs will result in a sharp radius curve through the closure rail area, limiting vehicle speed. The distance between the point of switch (PS) and the actual point of the frog (PF) measured along the straight or main track closure rail is known as the turnout lead distance. (The distance to the theoretical point of frog typically appears only in calculations and is not always included on construction drawings.) ⢠Guard rails are supplemental rails, placed inboard of the main running rails, which provide supplemental guidance to the back face of the rail vehicle wheels. Guard rails form a narrow flangeway to steer and control the path of the flanged wheel. Guard rails are typically positioned opposite the frogs so as to ensure that the wheel flange does not strike the point of frog or jump to the âwrongâ flangeway. ⢠Heel block assemblies are units placed at the heel of the switch that provide a splice with the contiguous closure rail and a location for the switch point rail to pivot at a fixed spread distance from the stock rail. Elaborate designs of switch heels have been introduced based on CWR installations and are described later in this chapter. ⢠Switch point rail stops act as spacers between the switch point rail and the stock rail. Stops laterally support the switch point from flexing laterally under a lateral wheel load and thereby possibly exposing the open end of switch point rail to head-on contact from the next wheel. ⢠A switch operating device moves switch rails. Switch rails can be thrown (moved) from one orientation to another by either a hand-operated (manual) switch stand or a mechanically or electro-mechanically (power-operated) switch machine. In both cases, the operating
Track Design Handbook for Light Rail Transit, Second Edition 6-6 devices are positioned at the beginning of the turnout opposite the switch-connecting rods near the point of the switch rails. 6.2.1.4 Special Trackwork Layouts Arrangements of individual turnouts can create a variety of track layouts, thereby permitting many alternative train-operating scenarios beyond the simple divergence offered by a simple turnout: ⢠A single crossover (see Figure 6.2.4) consists of two turnouts positioned in two tracks that allow the vehicle to go from one track to another. The two tracks are usually, but not always, parallel, and the turnouts are usually identical. A pair of single crossoversâone right hand and one left handâthat are arranged sequentially along the tracks is called a universal crossover. This provides the maximum operational flexibility at the least cost for both trackwork and the overhead contact wire system. ⢠A double crossover (see Figure 6.2.5)âsometimes called a scissors crossoverâconsists of two crossovers of opposite hand orientation superimposed upon each other. In addition to the four turnouts involved, a track crossing diamond is needed between the two main tracks. A double crossover is typically used only when it is necessary to be able to switch from both tracks to the other in either direction, but there is insufficient space to install a universal crossover as described above. A double crossover is appreciably more expensive than a universal crossover because of the crossing diamond and the additional catenary system hardware required. Double crossovers on tight track centers can create a great deal of difficulty for the OCS designers. Maintenance expense and the downtime associated with maintenance activities are also greater for a double crossover than for a universal crossover. Nevertheless, many rail operations personnel prefer a double crossover to a universal crossover because the overall interlocking area is shorter; hence, trains will clear the interlocking area a few seconds faster. It is arguable whether, in most locations, the few seconds is worth the extra expense. Double crossovers between parallel tracks at a track center spacing in the range of 13 feet 6 inches to 14 feet 6 inches [4.0 to 4.3 meters] will typically have the end frogs of the diamond positioned directly opposite the turnout frogs. In some situations, the open throat area ahead of the points of frog may be completely unguarded. Should a double crossover be required, it is best to avoid track centers in the aforementioned range. ⢠Track crossings, as the name implies, permit two tracks to cross each other. Track crossings are often called either crossing diamonds or simply diamonds, due to their plan view shape (see Figure 6.2.6). The intersecting angle between the two tracks can be 90 degrees or less, but rigid crossings under approximately 10 degrees are rarely encountered. In its simplest form, a track crossing is simply four frogs arranged in a square or parallelogram. The tracks through a crossing can be either straight or curved. Straight tracks are preferred since it makes the unit symmetrical, thereby simplifying design, fabrication, and maintenance. If the crossing angle between straight tracks is 90°, then the four frogs will be identical. If the angle is not 90o, then the crossing will be elongated along
Special Trackwork 6-7 one diagonal axis called the âlong diagonalâ and the âend frogsâ will be different from the âcenter frogs.â If the angle of the intersecting tracks is less than that in a No. 6 frog (9o 31â 38â), it is usually necessary to use a movable point crossing. Movable point crossings incorporate movable rails in the two frogs closest to the center of the crossing. Depending on the position of these movable rails, a flangeway will be provided for one track or the other, but not both simultaneously. Movable point frogs are needed on flat-angle crossings since it is otherwise impossible to ensure that the wheel flange will follow the correct flangeway path through the center frogs of the crossing diamond. The moving point rails in a movable point crossing open and close against bent rails called knuckle rails and are usually operated by the same type of machines that are used to operate switches. If it is necessary to be able to switch from one track to another at a flat-angle crossing, and space constraints make it impossible to provide separate turnouts outside of the limits of the diamond, a slip switch can be installed. A slip switch superimposes two switches and curved closure rails on top of an elongated track crossing, as shown in Figure 6.2.7. A double slip switch provides that same routing capability along both sides of a track crossing, as shown in phantom line on the figure. Slip switches are expensive to fabricate and install and difficult to maintain and their use should be considered only as a last resort. Lapped turnouts can be used to achieve a more compact track layout in constrained locations. In a lapped turnout, as seen in Figure 6.2.8, the switch rails for a second turnout will be placed between the switch and the frog of the initial turnout. This introduces a third frog where a closure rail of the first turnout crosses a closure rail of the second turnout. Figure 6.2.4 Single crossover (right hand)
Track Design Handbook for Light Rail Transit, Second Edition 6-8 Figure 6.2.5 Double crossover Figure 6.2.6. Single-track and double-track crossings Combinations of turnouts and track crossings are used to produce route junctions. A common junction between two double-track routes will consist of two turnouts and a crossing diamond, the latter allowing the inbound track of one branch to cross the outbound track of the other. The most complex junctions occur in urban areas when two double-track light rail lines intersect. Figure 6.2.9 illustrates a full âgrand union,â an extremely complex arrangement that permits a rail
6-9 vehicle entering a junction from any direction to exit it on any of the other three legs. Such layouts were common on legacy streetcar systems, but are rarely seen on modern LRT. A more common LRT junction resembles a âTâ intersection and would require a âdouble wyeâ (see Figure 6.2.10) to provide the same routing flexibility. Such layouts are often called âhalf grand unions,â but reference to trackwork catalogs from the early 20th century[3] reveals that terminology to be incorrect as a true half grand union would actually have two additional turnouts plus four 90- degree crossing diamonds. Complex intersections, such as grand unions, require equally complex overhead contact system wire layouts with additional poles and a spider web of pull-off wires. Beyond the expense of constructing and maintaining such complex OCS layouts is the fact that their complexity makes them visually intrusive and arguably objectionable. If a junction must occur in an area, such as a central business district, where visual aesthetics are an issue, it may be preferable or less objectionable to configure the tracks in a manner that divides the tracks and the junction turnouts over an area of several city blocks. Note this would disperse the noise and vibration generated at the special trackwork, which would otherwise be concentrated at a single intersection, and that could be perceived as either desirable or undesirable. Any such alignment alternatives should be evaluated in the early stages of the project, when the environmental impact assessments are being performed on optional route alignments, so as to be included in that analysis. Lapped turnouts, double crossovers, movable point crossings, slip switches, and double slip switches are all very costly to design, fabricate, install, and maintain. A more economical track system is achieved when the special trackwork consists only of turnouts, single crossovers and simple track crossings. Figure 6.2.7 Single slip switch
Track Design Handbook for Light Rail Transit, Second Edition 6-10 Figure 6.2.8 Double switch lapped turnoutâthree frogs Figure 6.2.9 Full grand union
Special Trackwork 6-11 Figure 6.2.10 Double wye [3] 6.2.1.5 Non-Symmetrical Special Trackwork Layouts Track alignment engineers, often rightfully, consider their work to be an art and are therefore fond of smooth alignments and symmetry. In the case of special trackwork, symmetry is generally preferred so as to avoid non-standard configurations that include one-of-a-kind components, thereby increasing initial procurement costs and requiring the stocking of unique spare parts. However, there are often instances in which complete symmetry is not possible. Non- symmetrical and unconventional arrangements of individual turnouts can create a variety of track layouts, thereby permitting alternative train-operating scenarios that might not otherwise be possible. Some examples include the following: If a crossover is required between two tracks that are not parallel, there are two options. The first option would be to configure the layout with two equal turnouts, but to insert a curve between the two turnout frogs with a central angle equal to the difference in the main track bearings. This curve should be designed with as large a radius as possible, yet not interfere with the heel end of the turnout frogs. The second option would be to use two different turnouts, such as a No. 6 and a No. 8. This can be advantageous if the angle of divergence of the main tracks is, or can be, made identical to the difference in the frog angles. However, the design speed for the crossover movement will be restricted to that of the smaller turnout. In both options, the design is greatly simplified if both tracks are on
Track Design Handbook for Light Rail Transit, Second Edition 6-12 identical, parallel tangent track grades; otherwise, a vertical curve may be required to compensate. ⢠Double crossovers are usually designed with symmetrical layout along the centerline of the alignment. However, there may be occasions where the layout design is not symmetrical, where it is beneficial to offset the points of switch in one track relative to the other, thereby laterally offsetting the crossing diamond location relative to the two tracks. Typically, this might be considered in situations where the track centers are narrow, with the result that there is insufficient space for the switch machines to be directly across from each other. Another example that is seen somewhat often is symmetrical configuration of the crossing diamond of a double crossover, but with one or more of the turnouts being the opposite hand of the usual arrangement, thereby creating a divergence equal to the turnout frog angle. Judicious use of non-symmetrical layouts can sometimes resolve a seemingly intractable alignment problem and thereby make it possible to meet the requirements of the operating plan. 6.3 LOCATION OF TURNOUTS AND CROSSOVERS The ideal design locations for turnouts, crossings, and crossovers are flat and straight sections of track. If special trackwork is installed in track with horizontal curves, superelevation, or vertical curves, the ability of the trackwork to perform in a satisfactory manner is compromised. Trackwork designers should work closely with their counterparts who are defining transit operations requirements and setting route geometry so that turnouts and crossovers are not placed in difficult locations and the overall requirements for special trackwork are minimized. 6.3.1 Horizontal Track Geometry Restrictions As switches and frogs unavoidably create discontinuities in the running surface of the track structure, a disproportionate number of derailments occur at or near special trackwork. It is therefore extremely important to carefully consider the track geometrics approaching, passing through, and departing from special trackwork. 6.3.1.1 Track Geometry in the Vicinity of a Switch Switch point rails direct vehicle wheelsets in an abrupt change of direction, making it highly desirable that wheels be rolling smoothly as they approach the switch. To best ensure that wheel flanges can be smoothly intercepted by switch point rails, tangent track should be placed immediately in front of the switch. The absolute minimum length of tangent track in advance of the point of the switch should be no less than 10 feet [3 meters], and much greater distancesâ33 to 50 feet [10 to 15 meters]âare desirable. If a guarded curve is located in advance of the switch, the turnout should be positioned with the point of switch beyond the limits of the restraining rail. In situations where this is not possible, the restraining rail can be extended into the switch by use of a device variously known as a âcover guardâ or âhouse top.â In such designs, the turnout is generally designed as a âfully guarded turnout.â See Article 6.5.5. for additional discussion of fully guarded turnouts.
Special Trackwork 6-13 Horizontal curves beyond the heel of the frog should generally be positioned beyond the last long tie of the turnout. In constrained sites, horizontal curves may begin on the long switch ties, but no closer than 20 inches [0.5 meters] from the heel joint of the frog. This distance allows room for tangent joint bars in bolted rail track or the thermite weld in all-welded installations. However, special, angled, rail seat tie plates may be required on timber switch ties. Custom concrete switch ties would definitely be required. In either case, the curve cannot have any superelevation. If the following curve is guarded, and the restraining rail is on the frog side of the alignment, the curve should preferably be located so that the restraining rail terminates prior to the heel joint of the frog. If this is not possible without truncating the guarding to close to the curve, the restraining rail should extend into the frog and be continuous with the frog wing rail to provide continuous guarding action. Similarly, if the restraining rail is on the same side as the frog guard rail, the designer should consider extending the restraining rail all the way past the frog. The non-standard layouts described should be avoided if possible; however, they will often be necessary within constrained areas, such as light rail vehicle (LRV) storage yards, so that adjoining curves need not be at (or below) the desirable minimum radius. While customized special trackwork will cost more, a life cycle analysis will often demonstrate that such trackwork will reduce the maintenance costs for the adjoining curved track appreciably. 6.3.1.2 Turnouts on Horizontal Curves Turnouts can be constructed within curved track in difficult alignment conditions. Railroad operating personnel will state, however, that turnouts on curves provide a poor-quality ride. Track maintenance personnel contend that the curved turnouts consume a disproportionate amount of their maintenance budgets. Therefore, turnouts and crossovers should only be located in horizontally tangent track, except under the most unusual and constrained conditions. This will ensure that the track geometry through the special trackwork unit will be as uniform as possible, thereby improving wheel tracking and extending the life of both the special trackwork unit and the vehicle that operates over it. Note that if the main track curve is superelevated, the diverging track must also be superelevated. In the case of a turnout to the outside of a curve, this would create negative actual superelevation in the turnout curve, an undesirable condition that would actually be prohibited under a proposed (2010) revision to the FRA Track Safety Standards. A turnout on a curve must be custom designed, and both the switch and the frog will be non- standard items. The design objective should be to provide an alignment that is as smooth and uniform as possible. Designers should note that the turnout geometry will differ appreciably from ordinary lateral turnouts located along tangent track. Parameters such as turnout lead distance and closure rail offsets will be distinctly different from those of a standard lateral turnout with the same frog number. Several good books exist on the subject, including Allenâs Railroad Curves & Earthwork.[4] 6.3.1.3 Track Crossings on Curves Either one or both tracks of a crossing (diamond) may be located in horizontally curved track if required by the selected alignment. This is often a requirement at a route junction. At such locations, it is typically allowable to have one or both sides of the track crossing on a curved alignment. In general, however, curved crossings should be avoided because they are typically
Track Design Handbook for Light Rail Transit, Second Edition 6-14 one-of-a-kind units and hence very expensive to procure, maintain, and ultimately replace. In addition, depending on the gradients of the intersecting tracks, the curved track may have adverse superelevation. This has a detrimental impact on the operation of trains over curved track. 6.3.1.4 Superelevation in Special Trackwork In general, superelevation should not be used within any turnout, crossover, or track crossing, even if the main track is located on a curve. The correct amount of superelevation for one hand of the turnout will be incorrect for the other and an excessive underbalance or overbalance could result. A particularly dangerous situation occurs with a turnout to the outside of the curve, where a severe negative superelevation situation could be created on the diverging track. In ballasted track, normal deterioration of the track surface could quickly result in the diverging track becoming operationally unsafe. When a superelevated curve is required beyond the frog of a ballasted track turnout, the superelevation should begin beyond the last long tie. In an otherwise intractable situation, superelevation could begin on the long ties by utilizing special plates or concrete switch ties to elevate one rail and rotate both rails; however, this is not recommended. In a direct fixation or embedded track turnout, superelevation can physically begin earlier, although typically not within 20 inches [500 millimeters] of the heel joint of the frog. 6.3.2 Vertical Track Geometry Restrictions Turnouts, crossovers, and track crossings should be located on tangent profile grades whenever possible. This is because the critical portions of a turnoutâthe switch and the frogâare too rigid to conform to a vertical curve, which will cause the switch points to bind. The area between the switch and the frog can theoretically be curved vertically, but this practice is discouraged since ordinary construction tolerances make it difficult to confine the curvature to the closure rail area. Vertical track curvature outside of the turnout area should also be restricted; the absolute minimum distance from the switch and frog will depend on the type of track structure. In the case of ballasted track, for example, it is not practical to introduce any vertical curvature until after the last long tie of the turnout. In difficult alignment conditions, vertical curvature at or near a turnout location may be necessary. If it is not possible to avoid a vertical curve within a turnout, every effort should be made to avoid non-standard track components, such as switch point rails or frogs, which must be shop- fabricated with a vertical curve. Generally, special designs can be avoided only if the middle ordinate of the vertical curve in the length of any switch point rail or frog is less than about 1/16 inch [1 mm]. Careful consideration must be given to track gradients at track crossings. The four frogs of the diamond must sit in a plane surface. If the profile of one track is on a significant grade, that will fix the elevations of the frogs and hence dictate the profile of the other track. Because of this, coordinating only the track centerline profiles of the intersecting tracks can be very misleading. The track alignment designer must instead analyze the gradients of each of the intersecting rails through to at least the ends of the frog arms and thereby verify that the diamond special trackwork is actually possible to fabricate and install. If the track gradients involved are steep,
Special Trackwork 6-15 one or both tracks may be significantly out of cross-level and that must be considered with respect to operating speed and track twist. 6.3.3 Track Design Restrictions on Location of Special Trackwork While special trackwork can be required in ballasted, direct fixation, and embedded track sections, ballasted track turnouts are generally the most economical to procure and construct. Alignment design should minimize special trackwork requirements in direct fixation and embedded track environments because these elements are more expensive to procure and construct. Exceptions can be made, for example, when route geometry forces a particularly complex special trackwork layout with multiple turnouts and track crossings. It is often particularly difficult to design a satisfactory switch tie layout under such complex layouts and even more difficult to renew defective switch ties during subsequent maintenance cycles. In such special circumstances, the use of direct fixation special trackwork track may be preferable to a ballasted configuration. On the other hand, direct fixation and embedded turnouts, once installed, generally require less maintenance than ballasted track specialwork. However, when embedded turnouts are life expired and require replacement, their renewal will generally be much more disruptive of transit operations than ballasted track renewal. Renewal of direct fixation specialwork can be comparatively simple, provided the plinth concrete is sound and the rail fastener anchorage locations do not need to be changed. Yard trackage, which is usually ballasted, often requires that successive turnouts be constructed close to each other. The track designer should verify that turnouts are sufficiently spaced to permit standard switch ties to be installed and to permit maintenance personnel to renew individual switch ties. When special switch tie arrangements are required, the track designer should either detail the tie layout or require the track fabricator to provide a submittal of the proposed layout. In the latter case, the track designers should be certain ahead of time that a workable tie layout is possible. It is absolutely essential that switch ties supporting switches are perpendicular to the straight track. This is a problem when switches are placed immediately beyond a frog on the curved side of a turnout. Special trackwork in embedded track can be particularly complicated and should be minimized. Route intersections within street intersections can be phenomenally complex and require intricate designs. When special trackwork must be located in embedded track, it should be positioned so that pedestrians are not exposed to switch point rails, and switch operating mechanisms and frogs are not positioned in pedestrian paths. See Chapter 12 for additional discussion on this topic. Switch operating mechanisms for embedded track turnouts are also difficult to procure and maintain, as noted in Article 6.3.4.2. 6.3.4 Interdisciplinary Restrictions on Location of Special Trackwork Special trackwork should be located so as to minimize requirements for a special overhead contact system (OCS), sometimes referred to as a catenary system, or train control/signaling system structures and devices.
Track Design Handbook for Light Rail Transit, Second Edition 6-16 6.3.4.1 Overhead Contact System (Catenary) Interface The installation of the overhead contact wire system (OCS) is complicated by the presence of turnouts and crossovers. Additional wires, pull-off poles, and insulating sections are needed to provide a smooth contact for the current collection device, regardless of whether it is a pantograph, trolley pole, or bow collector. Electrically isolating the opposite-bound main tracks is particularly difficult at double crossovers if the adjacent tracks are close together. These conditions should be discussed with the OCS designer to ensure that the catenary can be economically constructed and does not result in an unacceptable, visually intrusive installation in sensitive areas. 6.3.4.2 Train Control/Signaling Interface Power switch machines for ordinary open track turnouts (ballasted or direct fixation) will typically be the same as those on freight railroad track and will usually fully comply with AREMA requirements. Interface details for these situations are available from vendors, and, once the train control system designers have identified the specific equipment they will be using, the track designer should have no particular design issues with the track side of the interface. Special attention is required to the configuration of the headblock ties in ballasted track and the plinth layouts for direct fixation special trackwork so as to match the selected switch machine and associated train control accessories. Embedded turnouts are a different situation. As of this writing, there are only three vendors of power switch machines offering switch machines for embedded track turnouts in North America. None of these machines fully comply with AREMA requirements for switch machines. The principal problem is that switch locking is required by AREMA to allow automatic routing at design track speed so as to prevent any chance that the switch might be thrown under a train. However, presently available embedded switch machines do not provide locking as that term is defined by AREMA. Because of this shortcoming, many rail transit systems require train operators to stop at any turnout that is not equipped with a locking switch device, visually confirm switch point position, and only then proceed at a restricted speed. This causes delays and, for this reason alone, designers are strongly encouraged to avoid embedded turnouts whenever possible. In addition, when embedded track switches are located in a lane shared with motor vehicles, inspection and maintenance is made appreciably more difficult since a flagman is absolutely necessary. The maintenance issue on embedded switches is compounded by being exposed to storm water runoff that washes street dirt into the track flangeways that eventually flows to the innards of the switch, requiring more frequent cleaning and repair than open track switches. Signal system track circuits that are needed to determine track occupancy are more difficult to install and maintain in embedded track since the embedment material will restrict access to key areas where unintended shunts can cause signals to drop. Train movements through embedded track turnouts, particularly those in mixed traffic lanes, will often be governed by traffic signals that are controlling not only rail movements but also motor vehicles running on rubber tires. Since the latter cannot be detected by track circuits, the LRT operator must be visually alert for motor vehicles (and pedestrians) that may be on conflicting paths even when he or she has a clear signal. It therefore should be possible for him to be visually alert for conflicting train movements as well, such as an LRV on an intersecting path that
Special Trackwork 6-17 began its movement on a clear traffic signal but which, for whatever reason, had not completed its movement prior to the traffic signal cycling. This is, of course identical to how any traffic intersection functions in the absence of LRT and how in-street junctions are handled on legacy streetcar lines. Implementing a similar procedure on new LRT routes could significantly simplify requirements for track circuits and associated insulated joints in embedded track. Insulated rail joints in special trackwork can be especially complicated, particularly if they must be located in guarded track, in and around crossing diamonds, or within embedded track. Insulated rail joints in embedded track can be particularly problematic since the dirt and grime inherent in any pavement surface can result in shunting of signal current around the joint. The trackwork designer should coordinate with the signal designers to verify that a workable insulated joint layout is possible. In many cases, a workable track plan cannot be properly signaled, and the route geometry must be redesigned. 6.3.5 Miscellaneous Restrictions on Location of Special Trackwork 6.3.5.1 Construction Restrictions The construction or contract limits of any trackwork contract should not be located within any special trackwork unit or in a segment of curved track. This will ensure that one contractor will be responsible for the uniformity of the horizontal and vertical track alignment through the special trackwork unit. (For similar reasons, neither contract limits nor limits-of-work should occur within a segment of horizontally or vertically curved track.) Often times such work limits are set by project administrative personnel without any understanding of the technical issues involved. The track designer should review those limits as early as possible in the project and request revisions if appropriate. Whichever track constructor arrives at the interface second will generally need to cross the nominal âcontract limitâ so as to continue, complete, and confirm the final connections. This is customary and presents no particular issues provided the geographic limit of the work and the interface responsibilities are clearly spelled out in the construction contract documents. Often, a staging drawing clearly defining the designerâs intentions will be included in the bid documents. Construction staging is sometimes a discussion point in a project Basis of Design Report (BODR) but those discussions will not be binding on the contractors unless the BODR is included in the contract documents; something that rarely occurs. It is not uncommon to have an elevation bust between the two contracts based on benchmark discrepancies or survey misunderstandings. This type of interface understanding must be confirmed early in the design stage and then early in the construction stage by both contractors. 6.3.5.2 Clearance Restrictions Special trackwork should be located with adequate clearances from fixed trackside obstructions. For example, unless the vehicles are equipped with automatic bridge plates for passenger access, tangent track or track with a large curve radius is required alongside station platforms to meet the tight (platform to vehicle floor gap) tolerances required by ADAAG. If a station platform is located ahead of a point of switch, the minimum tangent track distance between the end of the platform and the point of switch should be equal to the truck center length of the light rail vehicle (LRV) plus the car body end overhang. The lateral position of switch stands and the height of
Track Design Handbook for Light Rail Transit, Second Edition 6-18 switch machines above the top of rail are also considered in clearances of trackside obstructions. Refer to Chapter 3 for additional design guidance on special trackwork clearances. 6.3.5.3 High Volume of Diverging or Converging Movements Track designers should be very cautious whenever the route geometry results in a preponderance of the traffic passing through the curved side of a turnout. High traffic volumes through the curved side of a switch will result in accelerated wear of the switch point rail and the adjacent stock rail. Whenever possible, turnouts at junctions should be oriented to guide the branch with the more frequent or heavier traffic over the straight part of the turnout. If the traffic is (or will eventually be) approximately equal, consideration should be given to an equilateral turnout design as discussed in Article 6.4.4. This will reduce wear and associated maintenance of the switch points. Other non-conventional turnout layouts can be used to give the diverging movement the straight side of the switch. Figure 6.3.1 illustrates such a turnout on a European LRT system. Selective use of such non-standard special trackwork details can often resolve a problematic alignment issue at relatively low cost. Figure 6.3.1 Right-hand turnout with a left-hand switch Turnouts at the end of a double-track segment should be oriented to guide the facing point movement over the straight side of the turnout. If this orientation results in an unsatisfactory operating speed for the trailing movement, the designer should consider using either an equilateral turnout design or a turnout with a flatter divergence angle and curve than might ordinarily be provided. Ordinarily, facing point diverging movements should be limited to situations where the single-track section is temporary and the double-track section is to be extended. 6.3.5.4 Track Stiffness Ballasted turnouts, crossovers, and crossing diamonds have a considerably higher track modulus than ordinary ballasted track due to their mass and the frequent interconnections between rails. Nevertheless, ballasted specialwork with conventional rail fastenings of limited resilience is somewhat more resilient than either direct fixation or embedded specialwork layouts. Because of this differential, ballasted track turnouts located close to interfaces with stiffer track structures will provide a poor-quality ride and require more frequent track surfacing, particularly if vehicle speeds are relatively high. To avoid these circumstances, main tracks where vehicles operate at speeds greater than 45 mph [70 km/h] should not have specialwork units located within 250 feet [75 meters] of a transition zone between ballasted track and a more rigid track structure. As a
Special Trackwork 6-19 guideline, this distance can be reduced in areas where modest operating speeds are contemplated. A minimum travel time of 3 to 5 seconds between the special trackwork unit and a more rigid structure is recommended. Design exceptions will require stiffening of the ballasted track or retrofitting of the adjoining track to be more resilient. 6.3.5.5 Noise and Vibration Issues Even well-designed special trackwork will be a source of noise and vibration. As such, special trackwork installations are undesirable in the vicinity of residential buildings, schools, hospitals, concert halls, and other sensitive noise and vibration receptors. If special trackwork must be located in such areas, investigation of possible noise and vibration mitigation measures should be undertaken. Such investigations should also include the ramifications of repositioning the special trackwork away from the area of concern. 6.4 TURNOUT SIZE SELECTION Track designers have a wide array of standard turnout geometric configurations to choose from when considering route alignment. While not all transit systems can use the same menu of turnouts and crossovers, the designer can usually achieve an acceptable route alignment without resorting to special turnout designs. Using standard, off-the-shelf, and service-proven materials will reduce the probability that future maintenance will be complicated by the need to purchase expensive one-of-a-kind products. Using standard materials also prevents a situation in which essential replacement parts may not be available when needed. Figures 6.4.1 to 6.4.4 show the common sizes of turnouts and crossovers on timber ties with railbound manganese frogs. See Figures 6.9.1 through 6.9.3 for illustrations of similar turnouts on concrete ties and with solid manganese steel frogs. Situations will arise when a non-standard turnout design is needed. In such cases, justification should be documented. This validation should include the reasons why a particular turnout size is required; what alternatives were investigated; why standard options were unacceptable; and the ramifications of using a smaller turnout, including its effect on vehicle operations, signaling systems, and OCS systems. Consideration should also be given to procurement of a spare assembly along with the original unit, so as to save the design and tooling costs that would be incurred to purchase a replacement unit at a later date. This provides an immediate replacement part if one is needed in an emergency situation. 6.4.1 Diverging Speed Criteria Turnout size (by either frog number or radius) should be selected to provide the highest diverging movement speed possible that is consistent with adjoining track geometry. A high speed turnout is not needed if the adjoining track geometry restricts operating speed. Similarly, a sharp turnout should generally not be used in a track segment that has no restrictions on operating speed.
Track Design Handbook for Light Rail Transit, Second Edition 6-20 Figure 6.4.1 Turnout and crossover data
Special Trackwork 6-21 Figure 6.4.2 No. 6 turnoutâballasted timber ties with 13â curved switch
Track Design Handbook for Light Rail Transit, Second Edition 6-22 Figure 6.4.3 No. 8 turnoutâballasted timber ties with 19â6â curved switch
Special Trackwork 6-23 Figure 6.4.4 No. 10 turnoutâballasted timber ties with 19â6â curved switch
Track Design Handbook for Light Rail Transit, Second Edition 6-24 Limits on operating speeds through the curved side of turnouts are typically based on the turnout geometry and the maximum unbalanced superelevation criteria adopted for the system. In many cases, the closure rail radius zone will impose a greater restriction on operating speed than the switch radius, particularly if tangential switch geometry is not used. There are typically no operating speed restrictions on the straight through side of a turnout; however, if the turnout is a lower number, but the operating speed through the straight side is high, it may be appropriate to use a longer frog guard rail on the straight side of the frog than might ordinarily be called for. While higher number/radius turnouts will generally have higher initial costs, they will incur less wear and tear and can be more economical in the long run. There are reasonable limits to this rule, of courseâit makes little sense, for example, to install a No. 20 turnout that will never be traversed at more than 25 mph [40 km/hr]. In general, trackwork designers will find that No. 8, No. 10, and possibly No. 15 turnouts will be the most economical choices for main line track on virtually any light rail system. When selecting turnout sizes, other issues may dictate the choices. The menu of turnouts need not use all even-numbered or all odd-numbered frog angles; these can be mixed for project- specific reasons. In the case of a project that will share track with a freight railroad that uses odd-numbered turnouts, such as No. 9 and No. 11 sizes, it would make little sense for LRT-only turnouts on the same project to be even-numbered frogs. In such cases, the standards of the organization that will actually own and maintain the tracks should be given precedence. 6.4.2 Turnout Size Selection Guidelines The following criteria recommend various turnout sizes for various track applications. The typical conditions and operating speed objectives are based on an old ârule of thumbâ that stated that the frog number should be about one-half of the desired diverging movement operating speed in miles per hour [roughly one-third of the desired speed in kilometers per hour]. Handbook users should keep in mind that operating speed objectives vary among light rail operations, as well as from one portion of an LRT system to another. âHigh speedâ on one LRT system may be considered âlowâ on another. Streetcar projects often need to vary radically from these guidelines. Accordingly, the recommendations that follow should be modified to suit project- specific requirements: ⢠Route junctions between primary tracks should use No. 15 turnouts. An even larger number turnout might be considered if the route geometry in proximity to the turnout does not restrict higher speed operations. When sufficient space is not available for a No. 15 turnout, or if there are nearby speed restrictions (such as station stops or an at-grade roadway crossing), a sharper turnout, such as a No. 10, may be considered. ⢠No. 10 turnouts should typically be used for terminal station crossover tracks and connections between primary main line tracks and slower speed yard and secondary tracks, including center pocket tracks used for turnbacks at intermediate points. When design space for a No. 10 turnout is not available, a No. 8 turnout may be sufficient. If the LRT line is likely to be extended beyond some initial terminal station in the not-too-distant future, but the crossovers will remain for emergency use, it may be satisfactory to use lower numbered turnouts at the interim terminal.
Special Trackwork 6-25 ⢠Seldom-used crossover tracks that are provided for emergency and maintenance use only should use No. 8 turnouts. When sufficient design space for a No. 8 turnout is not available, a No. 6 turnout may be considered. ⢠Turnouts within maintenance facilities and storage yards should use either No. 8 or No. 6 turnouts. If turnouts sharper than a No. 6 are required because of a constrained site, consideration should be given to use of a curved frog turnout. Main line connections to the maintenance facility and storage yard should generally use No. 8 or No 10 turnouts, the choice being somewhat dependent on any curve speed restrictions that might occur beyond the turnout on the yard lead track wye arrangements. ⢠Turnouts that are located in embedded track are often in odd geometric layouts and thus must be sized in accordance with the use and function of the turnout. Alternatives to the use of an embedded turnout should always be investigated. The recommendations provided above are based on the use of even-numbered frogs for turnouts sharper than a No. 15 turnout. There is nothing inherently superior about the use of even- numbered frogs. Virtually all railroads west of the Mississippi River long ago standardized odd- numbered frogs with No. 7, No. 9, and No. 11 turnouts being common. The use of odd-numbered turnouts on LRT is perfectly legitimate and may have some advantage on projects that share track with a western freight carrier. However, note that the freight railroadâs standard rail section is very likely heavier than an LRTâs standard rail section, so interchangeability of parts will be very limited. In general, it is highly desirable to use no more than three or four sizes of turnout on an LRT system so as to limit maintenance inventory and simplify the job of the track maintenance staff. If there is a perceived âneedâ for only one or two of a particular turnout size, it is usually better to redesign the track geometry so as to use some other turnout that is used elsewhere on the project in greater numbers. Systems that include joint track operation with a freight railroad should closely consider the turnout standards of the freight carrier, but not necessarily let that dictate the size of turnouts to industrial sidetracks. The governing factor should be the preferences of the entity who will actually maintain the turnout. For example, if the freight railroadâs preference for an industrial sidetrack is a No. 9 turnout, but the LRT project standards include No. 8 turnouts and No. 10 turnouts and the turnout in the shared main track will be maintained by the LRT agency, the turnout should conform to the agencyâs standards. Turnouts that are not in the LRT route main track and will be used only by the freight railroad and maintained by their forces should conform to the railroadâs standards, including rail section. 6.4.3 Sharp Frog Angle/Tight Radius Turnouts Many light rail systems, particularly legacy streetcar operations, use turnouts that are sharper than those discussed above. No. 4 and No. 5 straight angle frogs are not uncommon. Many difficult alignment conditions may be resolved using turnouts that have a continuous curve through both the switch and the frog. Operationally, these turnouts will typically give much more satisfactory service than straight angle No. 5 or No. 4 turnouts because the closure curve radius will be continuous through the frog. This makes it possible to achieve greater angles of divergence in a shorter lead distance while using a larger radius than would be possible with a
Track Design Handbook for Light Rail Transit, Second Edition 6-26 straight angle frog. The elimination of the short tangent through the frog will also eliminate the associated lateral jerk and provide a smoother ride. Note that the radius of the curve can vary through the length of the turnout. Legacy streetcar systems often have embedded track turnouts where the switch has a relatively broad radius, such as 200 feet [61 meters]. Then, through a sequence of short compound curves, the radius is decreased to some much smaller value to match the main body of the curve. The curves through such turnouts are essentially a Searles spiral. The former ATEA had a set of standard spirals used for both curves and âbranch-offsâ (their term for a turnout) that effectively duplicated each other, making it relatively easy to add a switch at a street intersection.[5] Some transit agencies have curved frog turnouts with radii as sharp as 50 feet [15.2 meters]. In virtually all cases, these sharp turnouts were required due to unique site conditions and the particular requirements of the system. While such sharp turnouts are not recommended for general application, there is nothing inherently wrong with their use provided that they meet the requirements of the transit operation, and the transit agency understands and accepts the limitations that sharp turnouts impose. Some of the restrictions imposed by sharp turnouts are the following: ⢠Vehicle fleet must be designed to be able to negotiate them. This may reduce the number of candidate light rail vehicles that can be considered for the system. ⢠Operations will be slower. Operating personnel must be made aware of the speed restrictions that the sharp turnouts impose and speed controls (signal systems, operating rules, or both) must be in place to restrict speeds to the allowable limit. This can be a significant problem on a system, or portion of a system, where vehicle speed is entirely under the operatorâs control. Most vehicle storage yard tracks, which are the most likely location for sharp turnouts, do not have signal systems that provide speed control. This makes it highly probable that sharp turnouts will be negotiated at higher-than-design speeds, leading to excessive wear, more frequent maintenance, and an increased risk of derailments. A common problem in this regard, known as âcracking the whip,â is a distressingly common operating practice on many systems where the LRV operator may enter the turnout at the posted speed limit but then accelerate. The result is that the rear truck of the LRV enters the curve and travels through the turnout at a much higher speed than intended. High rail and wheel wear will occur, resulting in derailments of rear trucks. The problem can be even more severe when the trailing LRVs in a multi-car train travel even faster through the turnout. Cab signaling systems, which prevent the train operator from exceeding a signal speed command, can alleviate this problem. ⢠Maintenance expenses will be higher. Even if vehicle speed is controlled, either through the signal system or by strict enforcement of operating rules, sharp turnouts will incur more wear than flatter turnouts. If the associated maintenance expense is preferable to the additional first cost of procuring enough right-of-way to permit the use of flatter turnouts, then sharp turnouts may be a prudent choice. If, on the other hand, a life cycle cost analysis shows that procuring additional right-of-way that allows flatter turnouts will reduce the overall expense, then that course should be pursued.
Special Trackwork 6-27 6.4.4 Equilateral Turnouts Equilateral turnouts split the frog angle in half between both sides of the turnout, producing two lateral diverging routes. Both sides of the turnout are curved. Equilateral turnouts are occasionally suggested for the end of double-track locations and for locations where a turnout must be installed on a curve. The track designer should consider the following characteristics: ⢠A perfectly symmetrical equilateral turnout will evenly divide the frog angle and the switch angle. The division of the switch angle will require a custom set of stock rails, each with half the normal stock rail bend. This arrangement is preferred when both hands are used in the facing point direction, such as the diverging turnout at a route junction. ⢠An alternative to customized stock rails is to configure the switch as if it would be in an ordinary lateral turnout, giving one movement the straight route through the switch and the other movement the lateral route. The frog does not need to be oriented symmetrically, and the optimum alignment for each route may be achieved by rotating it by an amount equal to the switch angle. This switch and frog orientation would be preferred for an end-of-double- track location where extension of the double track is not expected to occur in the near future. ⢠If the switch angle is to be split equally, curved switch point rails will need to be specially designed and fabricated since each point rail must not only have a concave curve on its gauge face, but also a concave vertical surface on its back face. Such switch point rails are not off-the-shelf items, and the transit system will have to procure and inventory spare switch point rails for future replacement. Straight switch point rails on the other hand, such as the AREMA 16â-6â [5,029-millimeter] design, can be obtained off the shelf although they still must be matched to custom stock rails. If the switch is oriented as in an ordinary lateral turnout, standard switch point rails can be used. ⢠The lead distance of the equilateral turnout need not have any direct correlation to the customary lead for a lateral turnout utilizing the same size of frog. The closure curves between the switch and frog can be configured to any geometry that is suitable to meet the speed objectives of the turnout. Using an equilateral turnout to provide a turnout to the outside of a curve usually does not provide satisfactory ride quality and is, therefore, not recommended. 6.4.5 Curved Frogs A straight frog is standard for most turnouts, for both normal and diverging train movements. Straight frogs generally provide satisfactory ride quality and have the advantage of being usable in both left- and right-hand turnouts, thereby reducing maintenance inventory. However, when the turnout is immediately followed by a curve in the same direction, the straight frog creates a âbroken back curveâ alignment. In lower numbered (sharp radius) turnouts, this condition will provide an undesirable ride quality. If a system will have a large number of low numbered turnouts, as is often the case for yard tracks, it may be beneficial to consider curved frogs that allow a uniform curve through the turnout and the track beyond. A better yard layout may be possible using curved frog turnouts, as shown in Figure 6.4.5, without incurring excessive costs. Curved frogs may be the only way a yard of sufficient capacity can be created on a constrained site.
Track Design Handbook for Light Rail Transit, Second Edition 6-28 Figure 6.4.5 Typical curved frog turnout A common yard track layout on streetcar projects is a ladder track that requires double curved frogs with both curves in the same direction, as shown in Figure 6.4.6. The flangeways and track gauges of such layouts must be carefully evaluated using Nytram plots so that wheels are not misdirected at the point of frog. Achieving exact gauge during construction is critical. (Photo courtesy of Progress Rail Services) Figure 6.4.6 Ladder track with double curved frogs
Special Trackwork 6-29 6.4.6 Slip Switches and Lapped Turnouts Slip switches and lapped turnouts are often suggested as a means of concentrating a large number of train movements into a constrained site. Such components are very expensive to procure and maintain and are seldom justifiable in a life cycle cost analysis. They should only be considered in cases, such as yard tracks, where extremely restrictive rights-of-way leave no other design options. 6.4.7 Track Crossings (Diamonds) Whenever possible, track crossings (diamonds) should have angles that do not require movable point design. Movable point crossings have high initial costs, require more frequent maintenance, and require a separate set of switch machines; therefore, these crossings should be used only as a last resort. To provide for the use of rigid crossings only, the route alignment engineer will be required to configure the tracks so that crossing tracks intersect at an angle at least equal to that of a No. 6 frog (9o31â38â). Some systems have successfully used crossings with flatter angles, but these crossings are not recommended because of the increased potential of derailment at the unguarded center frog points. If a flat-angle movable point crossing appears to be required at a location such as a route junction, a detailed investigation of alternatives should be conducted before trackwork final design commences. These alternatives could include spreading track centers to permit one track to cross the other at a sharper angle or substituting a crossover track in advance of the junction for the crossing diamond. Simulations may be required to determine if the operational scenarios resulting from an alternative track plan are acceptable. The maintenance requirements of the baseline movable point crossing should be included in the analysis, including the operational restrictions that may be enforced during such maintenance. 6.5 SWITCH DESIGN The switch area is the most critical portion of any turnout. Most turnout maintenance is switch related, requiring both trackwork and signal maintenance. Most derailments occur at and are caused by unmaintained or neglected switches. As such, switches are one of the most important locations at which to examine the interaction between the wheel and the rail. The following articles discuss the various types of switch designs that can be used on light rail systems and provide guidelines for selecting a design to implement. 6.5.1 Conventional Tee Rail Split Switches Most rail transit systems in North America use switch point rails that are identical or similar to designs used by North American freight railroads. Such switches, known as split switches, generally conform to designs promulgated by the American Railway Engineering & Maintenance- of-Way Association (AREMA). Split switches are produced by first bending and then machine planing a piece of standard tee rail to create a knife edge point on one end. The sharpened point then lays up against a section of standard rail (the stock rail) and diverts the flanged wheel from one track to another. Split switches are relatively inexpensive to produce and provide satisfactory service under most operating scenarios.
Track Design Handbook for Light Rail Transit, Second Edition 6-30 For an ordinary lateral turnout, both split switch point rails can be straight or one can be straight and the other one curved. Straight switch point rails can be used universally with either right- or left-hand turnouts, but are almost always an inferior choice for a diverging route. As a guideline, curved switch point rails are recommended for all transit designs so as to provide a smooth transition into a turnout. With the standardization of CWR and the elimination of high-maintenance rail joints, the conventional design of bolted heel blocks has been replaced with floating heel blocks. The floating heel block design eliminates the bolted connection at the heel of the switch rail. Instead, the switch rail extends beyond the nominal heel location and into the turnoutâs closure rail area. This makes it possible to thermite weld the switch point rail to the closure rails. This design appears to function best when the switch point rails are long enough to flex rather than pivot as with conventional bolted heel blocks. The floating heel block is connected only to the switch point rail and acts as a spacer or separation block when bearing against the web of the stock rail, thereby providing the designed heel of switch spread. Switch point stops provide the proper spread between the point rail and the stock rail. The switch point stop supports the switch point rail against lateral wheel forces. If the stops do not bear against the stock rail web when the switch point rail is closed, lateral loads from the wheels will result in flexing of the point, possibly opening the switch point if sufficient slack is available in the throw rod connections. This opening could result in the next wheel âpickingâ the point, leading to a broken switch point or, possibly, an actual derailment. Short switch rails, such as the AREMA 13â [3,962 mm] curved point design, cannot take full advantage of a floating heel block because the short length available for flexure would require excessive switch machine force to throw the switch. There are two options for relieving this issue: ⢠The flexive zone can be extended beyond the nominal length of the switch. For the nominal 13â-switch [3,962-meter] above, the flexive length might actually be 16 to 20 feet [5 to 6 meters]. As such, the spread dimension at the end of the actual flexive zone would be much greater than the customary 6 ¼ inches [159 mm] that will still exist at the nominal heel of the switch. ⢠A portion of the base of the switch rail straddling the nominal heel can be machined away on both sides, making the rail more flexible in that zone. So as the ensure point rail movement with a minimum of throw force and also for simplicity of point rail change out, switches of 13 feet in length may best be detailed for jointed heel block design. As of 2010, AREMA had no floating heel standard although AREMA Committee 5, which is responsible for the Portfolio of Trackwork Plans, has it under discussion. 6.5.2 Uniform and Graduated Risers Split switch designs, whether using conventional AREMA geometry or tangential alignment, typically elevate the top of the switch point rail approximately ¼ inch [6 millimeters] above the top of the stock rail. This prevents false flanges on worn wheels from contacting the top of the stock
13-6 rail and possibly lifting the wheel off the top of the switch rail. This raised point rail design is developed by having a lower stock rail seat elevation at each switch plate. This additional elevation can be eliminated once the switch rail has diverged sufficiently from the stock rail to eliminate the risk. The two design details that achieve this vertical transition are called âuniform risersâ and âgraduated risers.â Uniform riser design switch point railsâwhich are the preferred design for transit workâuse a series of elevation runoff switch plates located immediately beyond the heel of switch area. The runoff plates are designed to gradually lower the raised point rail to the elevation of the surrounding rails. The gradual decrease is obtained by incrementally lowering the base of the closure rail over a series of machined plates at 1/16 inch [1.5 millimeters] per plate for three plates. If a more gradual decrease is desired, the incremental steps can be reduced to 1/32 inch [1 millimeter], requiring seven runoff plates. This design requires no vertical bends in the switch point; hence, the bottom of the switch point is level and all of the riser plates beneath the switch point are the same elevation (i.e., âuniformâ). Graduated riser design switch point rails permit the decrease in switch point height to occur within the switch point length so the two rails are at the same level at the switch heel. This design requires somewhat abrupt reversed vertical bends to be applied near the heel of the switch point rail. In the vicinity of these bends, the thickness of the underlying switch plates are gradually reduced, hence the name âgraduated riser.â For conventional railroad specialwork, graduated risers permitted the use of cheaper and simpler âhook twin platesâ to fasten the rails beyond the heel block instead of the series of more expensive machined runoff plates. The vertical bends in a graduated riser switch point are somewhat of a ride quality issue, especially for the straight movements through the turnout. In addition, the mating of the base of the switch rail to the base of the stock rail requires extra machining. Nonetheless, for freight railroads, the lower first cost of the hook twin plates made the graduated risers attractive for low- speed operations. However, hook twin plates are not used in transit work because it would be difficult to provide insulating elements for stray current isolation. Therefore, it is necessary to provide machined plates beyond the heel of the switch anyway. The extra machining necessary for running off the elevation of uniform riser switch rails is more economical than the vertical bends and additional milling required on a graduated riser switch point. As a guideline, uniform risers will usually provide the best and most economical service for turnouts in main tracks and any turnout where insulation is required. Uniformity of maintenance suggests that switches in yard and secondary tracks on the same transit system should also use uniform risers even if they are not insulated. Graduated risers should only be considered for use in tracks where stray current isolation is not required and then only if the system does not include any uniform riser switches of the same length. The differences between a uniform riser switch point and a graduated riser switch point are not obvious at first glance. Stocking both designs in inventory raises the possibility that maintainers may inadvertently install the wrong design at a given location, resulting in poor performance and possible derailments. Regardless of the switch point design selected, all switches perform best if there is a regular program of wheel truing maintenance to eliminate false flanges and the resultant battering of the stock rails. The standards for vehicle wheel maintenance play an important part in the switch Special Trackwork
Track Design Handbook for Light Rail Transit, Second Edition 6-32 point design and must be considered when contemplating the interface between the wheel and switch point. 6.5.3 Tangential Geometry Switches Conventional North American switch points require that wheels make a somewhat abrupt change of direction near the point of switch. The actual angle at the point rail will vary depending on the length from the switch point to the heel of switch, but it typically ranges between 1 and 3 degrees. Even if the diverging switch point is curved, it still intersects the gauge line of the straight stock rail at an angle that, while reduced from the angle at the switch heel, is still noticeable. (Such switches are known as secant switches, after the trigonometric terminology.) Depending on the speed of the transit vehicle through the switch, this change in direction can produce an uncomfortable ride since the jerk rate is effectively infinite for a very brief period. In addition, a switch point used for diverging movement will frequently incur a much greater amount of wear due to the abrasive impact associated with redirecting the vehicle wheels. In the case of switches used for a converging movement, the straight stock rail will often incur severe lateral wear in the area immediately ahead of the point of switch where the truck in the steering position uses the stock rail to straighten out. Experience has shown that trucks with severe skewing will also wear the bent stock rail face before the truck attempts to align with the tangent track. This is a serious concern, as the gauge face of the stock rails provides the required protection for the switch point during facing movements. If the gauge face of the stock rail is worn back, the end of the switch point could be exposed to possible wheel impact. To improve switch performance and service life, European track designers developed âtangential geometryâ switches. In a tangential geometry switch, the switch point that deflects the diverging movement is not only curved but also oriented so that the curve is tangential to the stock rail. The wheel is not required to make an abrupt change of direction; instead, it encounters a flatter circular curve that gradually redirects the wheel. European tangential geometry switch point rails are usually manufactured from special rolled rail sections that are not symmetrical about their vertical axes. These asymmetrical switch point rail sections are also shorter in height than switch stock rails, thereby permitting the switch slide plate to bear down on the base of the stock rail so as to resist rollover. The CEN 60E1A1 (formerly Zu1-60) section (see Figure 6.5.1) is a typical asymmetrical point rail section that has been used with 115 RE tee rail. (Some manufacturers prefer to instead use the somewhat shorter 54E1A1 section with 115 RE as it permits the risers to be somewhat more robust.) The difference in rail cross sectional configuration and height requires a shop-forged connection between the asymmetrical switch point rail and the common tee rail used in the turnout closure curve. Accordingly, these tangential design switches employ a floating heel design by default. Tangential geometry switches have an extended zone within the switch point zone where the top of the switch point rail is very thin. This zone can experience accelerated wear, and the point rail may require buildup welding repairs or replacement far earlier than an AREMA-design switch point rail. Also, the lead distance for a tangential geometry turnout is typically much longer than for an ordinary secant switch turnout with the same frog number; hence, tangential geometry turnouts may not fit in areas of constrained track geometry.
Special Trackwork 6-33 Figure 6.5.1 60E1A1 (formerly Zu1-60) rail section for a switch point A few North American manufacturers are now producing proprietary tangential geometry switch point rail designs. These may be appropriate for some applications on a light rail transit system but are not generally warranted. As a guideline, tangential geometry turnouts should be considered whenever high speeds or a large number of movements must be made through the diverging side of a turnout. 6.5.4 Switches for Embedded Track Turnouts in embedded track are a signature characteristic of light rail transit systems. Whenever rail transit track must be paved or embedded to permit either rubber-tired vehicles or pedestrians to travel along or across the track area, conventional ballasted track split switchesâeither conventional or tangential designâare generally impractical. The switch point âthrow,â the distance the switch point rail needs to move from one orientation to another, results in an unacceptably large void in the pavement surface. This void is dangerous to roadway vehicles and pedestrians. Voids also tend to collect debris and dirt, which impair switch operations. To deal with these difficulties, trackwork designers long ago developed what are known as âtongue switches.â A tongue switch consists of a housing that incorporates the three rails that converge at any switch. The switch rail (typically called the âswitch tongueâ or simply âtongueâ) is usually located in a roughly triangular opening in the center of the housing. The switch tongue is often grooved on its top surface to create a flangeway and either pivots or flexes on its heel end. This movement directs the wheel flange to either the straight track or the diverging track. Tongue switches can be used in pairs (a âdouble tongueâ switch), or a single tongue switch can be paired with a âmate.â A mate is a rigid assembly, somewhat similar to a frog, which is typically placed on the outside of the switch curve. A mate has no moving parts; it has two intersecting flangeways. The mate ordinarily does not steer the wheels; it only provides a path for the wheel flange. All guidance must therefore come from the companion tongue switch. Traditional North
Track Design Handbook for Light Rail Transit, Second Edition 6-34 American street railway operations used tongue switches and mates almost exclusively until very recently. Because the mate provides no wheel guidance, it is generally considered a poor choice for transit lines that contemplate operating low-floor LRVs that have independently rotating wheels. If, as is common, the mate is a flange-bearing design and the LRVs have solid axles, the larger rolling radius of the outside wheel on the mate compared to the inside wheel on the inside tongue switch, will steer the truck in the direction of the turnout curve. This obviously does not apply to trucks with independently rotating wheels (IRWs). Note also that this steering action would occur regardless of whether the LRV is negotiating the straight or the curved side of the switch. In a street environment, tongue switches and mates are much easier to keep clean than the conventional tee rail split switches. The mate component, having no moving parts, is especially well suited to a street environment because the flangeways are no deeper than those in the adjoining track and are thus relatively easy to keep clean. 6.5.4.1 North American Tongue Switch Designs North American tongue switches are typically constructed of solid manganese steel and are generally designed as illustrated in the 980 series of drawings in the AREMA Portfolio of Trackwork Plans. Those drawings show double tongue switches and a tongue switch/mate design. While these examples are conveniently available, a detailed examination is required to appreciate the differences between the AREMA designs and the configurations used by traditional street railway operations. Figure 6.5.2 illustrates a typical tongue switch and mate turnout designed in accordance with the practices of the former American Transit Engineering Association (ATEA).[6] Characteristics of the ATEA tongue switch design include the following: ⢠Traditional street railways (transit systems) in North America typically employed tongue switches and mates rather than double tongue switches, which were more common for railroad service. This was probably due to a desire to reduce the number of moving parts to be maintained, a key factor on large streetcar systems that could have hundreds of switches in embedded track. ⢠Tongue switch and mate designs for street railway service, as well as modern flexible double tongue switches, are typically curved throughout their length, with the point of the tongue recessed into the switch housing so that both the gauge face and the guard face of the tongue provide a smooth transition to the guarded rail immediately ahead of the tongue. The nearly tangential geometry results in turnout lead distances that are much shorter than those for straight tongue switches. Tongue switches with radii as short as about 50 feet [15 meters] were not uncommon. ⢠The flangeway widths in traditional street railway tongue switches and mates were narrower than those for railroad service. Track gauge was also usually unchanged from tangent track. The AREMA designs, on the other hand, have extremely wide flangeways and widened track gauge to accommodate steam locomotives with longer trucks, multiple axles, and large-diameter driving wheels. These factors make railroad tongue switch designs ill-suited for light rail vehicles that have shorter trucks, dual axles, narrower wheel treads, and almost
6-35 always appreciably smaller wheel diameters. The wide flangeways in the trackwork are also hazardous to pedestrians. (Photo courtesy of Irwin Transportation Products) Figure 6.5.2 ATEA tongue switch and mate turnout (shop assembly) Typically, the switch tongue is placed on the inside rail leading to the diverging curve, so that truck steering action is provided by the interaction between the back side of the wheel flange and the tongue. This produces reliable steering of the truck due to the curved tongue providing a continuous guard. Some tongue switch designs amplify this guarding by depressing the wheel tread level of the diverging movement immediately beyond the point of switch, as shown in Section B of Figure 6.5.3. This causes the tongue to become an even more effective guard because it is higher than the wheel tread. Switch tongues and, more importantly, the switch housing cavity require frequent maintenance to keep them clean and tight. Traffic riding on top of a rigid tongue tends to loosen and rattle it. For that reason, many properties positioned tongue switches on the outside of the curve for turnouts that were used either infrequently or only for converging movements. With the tongue positioned on the outside of the curve and the mate on the inside, straight through LRV wheel movements do not ride on the tongue, providing a quieter street environment. Note, however, that with the mate on the inside of the curve, outside tongue switch turnouts are not fully guarded. The deletion of a continuous guard through the critical switch area can result in derailments under some circumstances. Accordingly, outside tongue switches were typically not employed on switches with radii of less than about 100 feet [30 meters]. The old AREMA switch tongue design pivots on an integral cylinder that is positioned beneath the heel of the tongue. This cylinder is held in place by wedges on either side that are tightened by large-diameter bolts. These wedges tend to work loose as both they and the cylinder wear, causing the tongue to rattle and rock, which leads to noise and accelerated wear. Tightening the Special Trackwork
Track Design Handbook for Light Rail Transit, Second Edition 6-36 wedges will only temporarily correct the problem, and over-tightening can make the switch difficult to throw. Figure 6.5.3 ATEA 75â radius solid manganese tongue switch The ATEA standard tongue switch included a pivoting heel design that could be locked down by lever action. American special trackwork fabricators produced several other proprietary heel designs. These alternative heel designs generally required less maintenance and performed better in street railway use than the AREMA designs, but may have been ill-suited to the heavy axle load demands of railroad service. Manufacturers of these alternative designs are no longer in the transit industry, and the patents on their designs have very likely lapsed, placing them in the public arena. Standard American designs of tongue switches and mates were typically fabricated as manganese steel castings, similar to solid manganese steel frogs. Some alternative designs were partially fabricated from either rolled steel girder or tee rail sections. Tongue switches and mates have always been expensive items because it is difficult to produce large castings to precise tolerances. Transit experience suggests that low-floor LRVs that incorporate independently rotating wheels (IRWs) do not have reliable steering through tongue and mate turnouts and that double tongue turnouts are preferred. The researchers have not been able to confirm that this is actually the case. Notably, the specifications for Torontoâs pending (as of 2010) purchase of new streetcars for their legacy system stipulate that they must work reliably with single tongue switches. How closely the manufacturer will meet that goal is unknown. Prudence suggests that any new LRT
Special Trackwork 6-37 system that will be using LRVs with IRWs or might use such articulated car designs in the foreseeable future, should likely specify double tongue switches. However, that choice has significant capital, operations, and maintenance cost ramifications. The success or failure of the Toronto vehicle procurement is thus of great interest. 6.5.4.2 Double Tongue Flexive Embedded Switches European light rail manufacturers developed flexible tongue switches in the post-WWII era, and these are virtually universal on European tramways and in-street LRT operations. A typical flexive double tongue switch is illustrated in Figure 6.5.4. The only locations where European LRT systems use a rigid mate in lieu of a second switch tongue is in complex layouts where overlapping turnouts make it impossible to provide the second tongue. In nearly all cases the tongues are rigidly fastened at their heel and flex, rather than pivot as is the case with North American designs. (Photo courtesy of VAE Nortrak) Figure 6.5.4 Flexive double tongue switch European design flexive tongue switches are typically fabricated from special sections of rolled rails (CEN âconstruction railâ sections) and flat steel plate sections that are machined and arc welded to produce the switch fabrications. These fabricated designs are considerably less expensive to manufacture than the solid manganese steel castings typically used in North American tongue switches and mates but also may be less robust in service. Perhaps in response to that issue, some special trackwork fabricators now produce flexive double tongue switches in cast manganese steel that can then be hardened by an explosive hardening process. The tongue switches shown in Figure 6.5.4 are cast manganese steel. Many North American light rail operators, both legacy systems and newer LRT operations have procured flexive double tongue switches. In-track performance of these installations has varied. Legacy street railway operations, in particular, often rate fabricated flexible tongue switches as
Track Design Handbook for Light Rail Transit, Second Edition 6-38 inferior to the robust design of the cast manganese steel tongue switches and mates, particularly with respect to wear. The number of issues with these designs has diminished with increased experience and the incorporation of better materials. Special surface hardening treatments can be incorporated into the design of flexible tongue switches to provide enhanced protection against wear. Refer to Chapter 5, Article 5.2.5. 6.5.4.3 AREMA-Style Split Switches in Embedded Track Several LRT projects have elected to take ordinary AREMA-style split switches of open track design and use them in embedded track. Figure 6.5.5 illustrates a typical installation. The switch assembly has been enclosed in a steel box that is equipped with bolted down but removable covers. The rail fastening systems within the boxes are functionally identical to the switch plates used in an ordinary open track installation, and the anchorage of the boxes to an underlying track slab effectively takes the place of the switch ties in an open track installation. The switch machine is mounted beneath the covers in the center of the track. The entire installation has then been insulated from the surrounding pavement, typically in a âbathtubâ configuration. There are two major issues associated with designs such as the one shown in Figure 6.5.5; both are associated with the large number of wide openings around the switch components: ⢠It is virtually impossible to exclude water, debris, snow, and ice from entering the switch boxes and affecting the operation of the switch. These units require an extensive amount of maintenance attention just for cleaning, and each such session requires removal and reinstallation of the cover plates. ⢠The wide openings are inconsistent with ordinary pedestrian traffic and are even more difficult negotiate for those with mobility impairments. Even though pedestrians should be excluded from the vicinity of any type of embedded switch, it is inevitable that they will occasionally be there. There is no way that a switch of this type can comply with ADAAG. Some projects that have embedded split switches of this type have gone to great effort to reduce the switch throw to a small dimension, seemingly in an effort to comply with ADAAG, but have done nothing about the much larger openings elsewhere around the switch. In addition, reducing the switch throw to a small dimension can actually create a flangeway pinch point on the back side of the switch rail where the side planing ends. Repeated impacts to that location by the back face of the LRV wheel are transmitted throughout the entire switch assembly. One LRT operator had a major derailment when the repeated wheel impacts to the back of the switch rail finally loosened the connections between the switch rails and the switch machine, resulting in the switch point being gapped open. It is therefore strongly recommended that reducing the throw in any AREMA-design split switch, embedded or not, below the dimensions recommended by AREMA not be done without close scrutiny of the resulting flangeway clearances.
Special Trackwork 6-39 Figure 6.5.5 Embedded tee rail switch 6.5.4.4 Design Guidelines for Embedded Switches If pedestrians cannot be reliably excluded from the vicinity of an embedded turnout-âwhich is usually the caseâembedded switches should use either traditional North American street railway tongue switches and mates or European design flexive double tongue switches. AREMA tongue switch and mate and double tongue switch designs should not be used, as the flangeway openings are too large for areas where the general public has access. Embedded switch flangeway design must conform with the vehicle wheel gauge and specifically to wheel flange widths. The design must consider flangeway openings and clearances in both switch tongue positions. If the embedded switch machine is designed for transit type switch point rail movements (typically a 2- ½-inch [64-mm] throw) the corresponding wheel gauge must also be within transit limits. 6.5.4.5 Switch Tongue Operation and Control The switch throw of a tongue switch must be extremely short to preserve the switch tongueâs ability to perform as an effective guard and to keep the open point flangeway as narrow as possible. The ATEA switch throw distance was only 2.5 inches (64 millimeters); a steel company designed an even shorter throw of 2.25 inches (57 millimeters). Such small switch throws are completely outside of the adjustment range of any standard railroad power switch machine of North American design. Instead, traditional North American street railway properties employed switch machines that were essentially a large solenoid. Depending on the current flow direction in the solenoid field, the switch would either be thrown to the opposite orientation or remain in its present position. Once thrown, the tongue was held in place by a spring-loaded toggle. The toggle kept the tongue in place until the solenoid was activated to throw the switch in the opposite direction. It also made
Track Design Handbook for Light Rail Transit, Second Edition 6-40 the switch trailable without having to first throw the switch. The most common design, which is still in production, was known as a âCheathamâ switch, after its original manufacturer. A major drawback of the solenoid design is that the spring toggle neither locks the switch tongue(s) in place nor confirms that the tongue has actually thrown completely. This makes it possible for a switch tongue to accidentally throw under a rail car. Some North American operators equipped Cheatham switches with point detection relays that verify electronically that the switch tongue has been completely thrown. European suppliers developed more modern switch machines for tongue switches that provide a greater throw force, detector rods, and a modified form of internal point locking. However, their design philosophy does not fully comply with conventional North American signal practice such as the AREMA Signal Manual. In addition, some transit properties have found it very difficult to maintain these machines. The current manufacturer of the Cheatham switch has made significant changes to its design so as to incorporate point detection and some degree of point locking. This situation is fluid, and readers are encouraged to confer with vendors for current product information. See Chapter 10 for additional discussion on switch machines. 6.5.4.6 Embedded Switch Drainage Embedded switch and enclosure housings, regardless of design, create an opening in the street surface that will inevitably fill with storm water runoff and miscellaneous debris that is blown or washed into the openings. A positive drainage system of adequate capacity must be provided. It should permit solid debris to be flushed away. The switch design should promote free drainage at each end of the housing (as may be necessary to compensate for direction of track grade) or any cavity. A tongue switch installation could easily have half a dozen discrete separate locations where storm water could accumulate and hence must be drained. The design should also allow access into all cavities to enable cleaning out any solid material that may accumulate. Leaving such debris in place can interfere with the operation of the switch, promote corrosion, and facilitate stray currents. If the design includes cavities that are not essential to operation of the switch, but are likely to cause problems if they become filled with water or debris, the designers should consider filling such areas with a non-conductive material, such as an epoxy grout, prior to installation in track. The maintenance program should include sweeping, vacuuming, flushing, or blowing out embedded switch housings on a regular schedule plus as-needed cleaning after a major storm event, as well as routine scheduled inspections to verify that the drainage systems are clear and functional. Some LRT systems have had a related problem from an unlikely sourceâmunicipal street sweepers that unintentionally sweep debris into the embedded switches, compounding maintenance issues. Corrosion of threaded fastenings in embedded switches can make them impossible to adjust. All threaded fastenings in embedded switches should be made of corrosion-resistant materials, such as bronze or stainless steel, to avoid such problems. 6.5.4.7 Embedded Switch Heaters Switch cavity drainage is especially important in northern climates that must contend with snow and freezing conditions. Even a well-designed switch drainage system can be foiled by freezing slush and runoff that accumulates in switch cavities, interfering with switch machine operations
Special Trackwork 6-41 and the closure of switch tongues or point rails. LRT systems located in places where snow and ice are even occasionally a problem would be well advised to incorporate heaters into each switch. These could assume various forms, but embedded switch heating systems must be provided with access points that permit inspection and, if necessary, replacement of the heating element without extracting the entire switch housing from the embedding pavement. The switch heater system must be configured so that insulating elements, such as the elastomeric grout commonly used, are not damaged or compromised by overheating. 6.5.5 Fully Guarded Tee Rail Switch DesignsâBallasted Track The preponderance of special trackwork derailments occur at switches. Providing a guard in the switch area can be very beneficial, particularly if the turnout curve immediately beyond the switch is sharp and protected with a restraining rail. Readers may have noted that embedded tongue switch and mate and double tongue turnouts can provide a continuous restraining rail through the entire turnout. This includes the critical switch area, where the vehicle trucks must first make a change of direction. Rail transit systems that have extremely sharp turnouts in open track often employ what are variously known as either âhouse topâ or âcover guardâ switches. These switch designs are the signature component of âfully guardedâ turnouts. A typical house top double-point switch is illustrated in Figures 6.5.6 and Figure 6.5.7. As the name implies, a fully guarded turnout is one in which the diverging movement through the turnout includes continuous guarding from ahead of the point of switch to beyond the zone normally occupied by the frog guard rail. The switch area provides most of the unique characteristics of a fully guarded turnout, including the following: ⢠The house top guard piece, which is positioned above the straight switch point, protects the critical first 12 to 18 inches [300 to 450 millimeters] of the diverging switch point by pulling the wheel set away from it. Because the house top is rigidly fixed and must allow the passage of a wheel that is traveling on the straight switch rail, it does not provide any guarding action for lateral moves beyond the immediate vicinity of the point of the switch. The house top is usually a continuation of a conventionally designed restraining rail that is placed in the tangent track ahead of the switch point. In addition to providing guidance for a facing point movement, this extended guard will protect the straight stock rail from wear during trailing point movements. ⢠The straight switch rail is a âdouble pointâ and provides a continuation of the restraining rail along the curved stock rail from the house top through to and including the heel of the switch. Note that the spread at the heel of the switch is much larger than in conventional AREMA split switch design. This facilitates a robust connection between the double-point switch and the restraining rail. In order for the double point to act as an effective restraining rail, the switch throw must be as short as possible. A throw distance no greater than 3 ½ inches [89 mm] is required, and a shorter throw dimension would be preferred. The normal throw distance for a powered switch in accordance with standard North American railroad practice is approximately 4 ¾ inches [121 mm]. Most conventional North American power switch machine designs allow for an adjustment
Track Design Handbook for Light Rail Transit, Second Edition 6-42 Figure 6.5.6 Fully guarded house top switch Figure 6.5.7 Fully guarded switch with house top and double point of 3 ½ to 5 ½ inches [89 to 140 millimeters]. If the machines were set to the smaller dimension, they would have no adjustment left for wear. Hence, a power switch machine for a house top switch must be custom designed. North American signal equipment manufacturers can provide machines with short throws; however, the locking rod design cannot be as robust as those provided with ordinary switch machines. In addition, since the switch rail is acting as a restraining rail, lateral forces applied to it by the wheels are transferred via the switch rods to the switch machines. This makes switch machines and connecting rods high-maintenance items that can require frequent adjustment.
Special Trackwork 6-43 A large amount of freeplay between wheel gauge and track gauge is essential for a house top to be an effective guard and to protect an appreciable portion of the curved switch rail. Therefore, house tops are most effective when used with railroad standard wheel gauges. If conventional transit wheel gauge is used as the standard on a light rail system, track gauge will need to be widened through the switch area. Some transit agencies have installed house tops without a double point, thereby protecting the point of the switch and the stock rails but not the remainder of the diverging switch rail. If such turnouts also have restraining rail on the diverging curve, the switch heel block is sometimes detailed to incorporate the flare that would otherwise be found on the end of the restraining rail. Fully guarded turnouts with house top switches are rarely justified and should be used only as a last resort in cases where sufficient right-of-way cannot be acquired to permit the use of flatter turnouts. 6.5.6 Switch Point Detail Very nearly all new LRT systems use switch point details identical or similar to the AREMA undercut 5100 detail shown in Figure 6.5.8. These are often called âSamsonâ points because Samson was the trade name of a now defunct special trackwork manufacturer who first marketed the design. Careful attention must be given to the cross section of the switch point rail at the point of the switch, particularly if the wheel contour is not a standard railroad design. If the transit system includes a street railway wheel profile with a narrow or short wheel flangeâgenerally less than 1 inch [25 mm] in either dimensionâthere is a real danger that the wheel will either âpickâ or ride up on the switch point. This is a particular problem in facing point diverging movements. In general, at the tip of the switch point, its top surface should be at least â to ½ inch [8 to 13 millimeters] above the bottom of the wheel flange and should rise to the full height of the flange as rapidly as possible. Special attention must be given if the wheel flange is short (by design or when at the maximum-wear âcondemning limitâ condition) or if it has either a flat bottom or a sharp bottom corner radius. Such wheels can readily ride up the flat surface provided by the second machined top cut in the AREMA 5100 switch point detail. If the light rail system employs such wheels, it may be necessary to use switch point details other than the AREMA 5100 detail. In some cases, the deletion of the second top cut of the AREMA detail has proven to be sufficient; however, the thin cross section of the switch point that remains may be subject to accelerated wear. The ATEA had a switch point standard for use with obsolete tee rail designs, such as ASCE and ARA sections, that placed the top of the switch a mere ¼ inch [6 millimeters] below the top of the stock rail, as shown in Figure 6.5.8. These dimensions are not achievable with modern rails that have larger gauge corner radii. Some light rail operations have reduced the distance between the wheel tread and the top of the switch point by machining away a portion of the head of the stock rail for a distance of approximately 12 inches [300 millimeters] ahead of and beyond the point of the switch and transitioning back up to the full height of the rail head over an additional length of several feet. This âstock rail tread depressionâ lowers the relative position of the tip of the wheel flange so that it cannot easily climb on top of the point. The gauge corner radius of the stock rail is reduced to approximately 9/16 inch [15 millimeters] through the depressed area. While the stock
Track Design Handbook for Light Rail Transit, Second Edition 6-44 rails with the depressed tread must be custom fabricated, this technique enables the use of off- the-shelf AREMA 5100 detail switch points. However, the depressed tread stock rail results in a rough ride through the switch for both straight and diverging movements. Wheels with a slight hollow tread profile would have an even more pronounced rough ride. Figure 6.5.8 Switch point and stock rail details Because of these issues, trackwork designers on new systems should strongly encourage the adoption of wheel profiles with flange contours that are no less than 1 inch (25 millimeters) high. LRT systems that evolved from legacy streetcar operations and therefore still use a shorter flange, could consider implementation of a program that will, over time, permit the use of taller flanges. Since such a program would require renewal of both wheels and flange-bearing special trackwork, it could take a decade or more to implement. In addition to the above-mentioned problems with switch points, short wheel flanges also concentrate the lateral component of the wheel-to-rail loading onto a narrower band than taller flanges do. This higher contact pressure leads to accelerated wear on both wheels and rails. Refer to Chapter 2 for additional discussion on this topic. 6.6 FROGS Track and vehicle design teams must carefully consider frog design in conjunction with the selection of a preferred wheel profile. 6.6.1 AREMA Frog Design If the light rail vehicle wheel is generally similar to the AAR 1-B wheel, including the tread width, AAR wheel gauge is used, and the frogs are located in areas where noise and vibration due to impacts are not an issue. Frog designs can generally conform to AREMA standards as cited in the Portfolio of Trackwork Plans. Such frogs should comply with the following recommendations:
Special Trackwork 6-45 ⢠Frogs in primary track can ordinarily be railbound manganese steel (usually abbreviated as RBM), heavy wall design, generally conforming to details given in the AREMA Portfolio of Trackwork Plans. ⢠Frogs in secondary track can be either railbound manganese steel or solid manganese steel generally conforming to the details given in the AREMA Portfolio of Trackwork Plans. The following issues should be factored in when considering the use of AREMA frog designs: ⢠RBM frogs require additional rail bond cables to carry traction power through the frog; however, large rail bonds can be difficult to install and maintain. Unless application procedures are rigorously followed, exothermic bonds for large cables can result in metallurgical damage at the point of application, leading to fractured rails. ⢠AREMA design for the running surfaces of frogs in no way matches the head and gauge corner profile of AREMA rails. This can result in poor vehicle tracking through the frogs as well as increased noise and vibration. Modifying the contours of the manganese steel insert so as to match 115 RE rail should be considered. ⢠Bolted joints on the heels of solid manganese frogs can also be a source of acoustic issues, and welded joints are recommended for most installations. Even the gaps between railbound manganese frog inserts and their wing and heel rails can contribute to the noise environment. ⢠RBM frog arms should be longer than the current AREMA standard dimensions so that the toe and heel spreads are wide enough to permit field thermite welding. Also, because grinding the underside of a thermite weld to a smooth profile is difficult at best, the weld locations should be positioned between the switch ties. Additional length may be required to make it possible to crop off a failed thermite weld and make a second weld. Note that the extra length on the toe end might need to be shop curved to match the closure curve. If the curve offset is substantial, it may result in a requirement for right- and left-hand frogs. Field curving of short frog arms is usually not practical. ⢠If the light rail vehicle wheel has a tread that is less than 4 inches [100 millimeters] wide, it may not have continuous support while passing over the opposite flangeway of the frog. Excessive impacts can occur if the wheel tread has less than 1 inch [25 millimeters] of support width as it passes over the open flangeway, particularly if the operating speed is relatively high. If tight control can be maintained on both track gauge and wheel gauge, it is usually possible to correct this situation by narrowing the flangeway widths from the AREMA standard of 1 â inches [48 millimeters] to about 1 9/16 inches [40 millimeters] as shown in Figures 6.6.1 and 6.6.2. If open point frogs are not possible, then either flange-bearing frogs, spring frogs, or movable point frogs are needed.
Track Design Handbook for Light Rail Transit, Second Edition 6-46 Figure 6.6.1 Plan view at frog area with 1¾-inch (45-mm) flangeway Figure 6.6.2 Section at ½-inch (15-mm) frog point 6.6.2 Monoblock Frogs Although railbound manganese (RBM) frogs have long been the standard for main track use on railroads and transit systems in North America, there are alternatives that can be very attractive. First among these are monoblock welded frogs. The monoblock welded frog design is extremely popular in Europe and has seen increased use in North America. Monoblock frogs normally have a central portion that is machined from a block of either rolled steel or cast steel that is metallurgically consistent with normal rail steel. Rolled steel rails are then flash butt welded to the central block to form the frog arms. Flangeways are then machined into the central block to match the adjoining rails or other requirements, such as a flange-bearing design. At least one manufacturer has perfected a proprietary process that allows rolled steel, head-hardened rails to be flash butt welded as frog arms to a central block made of
Special Trackwork 6-47 manganese steel, which can be explosive hardened to match the adjoining rail. The completed frog can be installed in track by the thermite welding process, resulting in a structurally continuous track structure. In addition to the mechanical advantage of eliminating all bolted connections, the monoblock frog does not require any rail bonding for signals or traction power. This type of frog has a proven performance in both rail transit and heavy haul freight railroads. The monoblock design can be particularly advantageous for production of small quantities of frogs or one-of-a-kind frogs, such as those required for crossing diamonds. See Figure 6.6.3 for the arrangement of a typical monoblock frog. Continuous monoblock welded frogs eliminate the noisy wheel interface hammering at the rail steel to manganese steel where the tightly bent wing rail steel mates with the manganese outline. However, while monoblock frogs are much preferable from the perspective of noise and vibration, not all turnouts are located in acoustically sensitive areas. For example, if the LRT system yard is either distant from or well shielded from sensitive noise receptors, the expense of an alternative frog design may exceed the benefits. A life cycle cost analysis would be appropriate. (Images courtesy of MRT Track & Services Co., Inc.) Figure 6.6.3 Monoblock frogâgeneral arrangement A major benefit of a continuous, solid, welded frog design is that the elimination of rail joints and mating surfaces between frog castings and rolled rails provides superior electrical conductivity. Rail bonding cables to carry traction power through the frog area can be eliminated. This is no small advantage since large rail bonding cables can be difficult to install and maintain. Further, exothermic welds for large bonding cables can result in metallurgical damage at the point of application and lead to structural failures of the rail. 6.6.3 Flange-Bearing Frogs Figure 6.6.4 illustrates a cross section of a typical flange-bearing frog. Flange-bearing frogs are typically provided whenever continuous wheel support cannot be provided by the wheel tread. This condition is most prevalent on light rail systems that employ a narrow wheel tread but also can occur on a transit system with wider wheels. Inadequate support often occurs in sharp angle frogs and crossing diamonds and is a universal problem as crossing frog angles approach 90 degrees. It can also occur at the mate opposite a tongue switch.
Track Design Handbook for Light Rail Transit, Second Edition 6-48 Flange-bearing design can also reduce impact noise that happens when the wheel tread passes over the open flangeway, and some projects have therefore specified flange-bearing specialwork as a noise control measure. This can be effective provided the transit system also has a rigorous program of wheel truing so as to keep wheel flange height as uniform as possible. If flange height varies (increases), usually due to wheel tread surface wear, higher impacts can result. With the use of flange-bearing frogs, the overall wheel width can be substantially reduced. Many legacy streetcar systems with flange-bearing specialwork use wheels with overall widths in the range of 3 ½ to 4 inches [89 to 102 mm], which can eliminate a substantial amount of unsprung mass compared to wheels of customary railroad width. As noted in Chapter 2, the selection of wheel profile, including tread width and overall width, should be a joint decision involving both the vehicle and the track designers. Designers should carefully consider the overall costs, benefits, and drawbacks of flange-bearing design before electing it as a project standard. 6.6.3.1 Flangeway Depth Flange-bearing design carries the wheel load past the point of inadequate wheel tread support by transferring the load from the wheel tread to the wheel flange tip, as shown in Figure 6.6.2. Typically, the flangeway floor elevation is set so that the wheel tread is elevated about â inch [3 mm] above the normal top of rail elevation. As the flangeway floor wears from wheel flange contact, equilibrium of both flange and tread bearing may be achieved. This may or may not be acceptable depending on how uniformly the systemâs vehicle wheels are maintained. Ordinarily, the inherent variability of wheel maintenance means that the depth of the flange-bearing portion of the frog should be maintained at about â inch [3 millimeters] less than the nominal height of the LRV wheel flange. The flange-bearing section should extend longitudinally from about 12 inches [30 cm] ahead of the theoretical frog point to a location 8 inches [20 cm] beyond the actual frog point to ensure that the wheel is carried well past the point of non-tread support. 6.6.3.2 Flangeway Ramping In order for a flange-bearing frog to accommodate normal maintenance tolerances in wheel flange height yet still provide smooth running, there must be a transition ramp from the ordinary flangeway depthâtypically about 1 â inches [50 millimeters]âup to the elevated flange-bearing depth. The slope of this ramp should be varied depending on the desired vehicle speed so as to minimize the impact. A taper as flat as 1:60 is not unusual in situations where a flange-bearing frog is used in a main line track, and an even flatter taper is preferable. Note that the design speed in this case is usually for the straight movement through the turnout, not the diverging move. Note also that the wheel flanges on most rail systems tend to get taller as the wheels wear since the wheel tread experiences virtually all of the wear. Hence, not all wheels will intercept the ramp at the same location.
6-49 Figure 6.6.4 Section at ½-inch frog point, flange bearing As a guideline, the ramp ratio should be no steeper than 1 divided by twice the design speed in kilometers per hour. Hence, if the design speed is 30 mph [48 km/h] the ramp ratio should be 1:98, which would logically be rounded to 1:100. The ramp does not have to maintain that slope until the full depth flangeway is reached. Instead, the flatter ramp slope length can be shortened to a length consistent with a depth inch [9 millimeters] greater than the flange-bearing depth. The remaining height difference can be on a steeper slope as it will not usually contact the wheel flange during the ordinary service life of the frog. At some point, the ramping may begin to dictate the overall length of the frog. Monoblock design frogs are particularly well adapted to long ramps. Conversely, the manganese steel insert in RBM frogs is often too short to achieve the desired ramp length. 6.6.3.3 Flange-Bearing Frog Construction Flange-bearing frogs are typically fabricated as solid manganese steel castings or welded monoblocks. Hardened steel inserts have also been used in bolted rail frog construction. The center manganese steel insert in a railbound manganese (RBM) frog may not be long enough to obtain ramps of appropriate length for typical transit operating speeds. Monoblock design frogs are particularly well adapted to long ramps, especially when the frog arms are fabricated from a construction rail section such as CEN section 76C1, as illustrated in Chapter 5. Note that Special Trackwork
Track Design Handbook for Light Rail Transit, Second Edition 6-50 ramping length on a monoblock frog will be limited to only the central block if the arms are made of tee rail. Flange-bearing frogs tend to develop a wheel wear groove in the floor of the flangeway that can steer the wheels. If one side of the frog is only used rarely, this groove can become deep enough to possibly cause wheel-tracking problems when a vehicle passes through the rarely used flangeway. Flange-bearing frogs may therefore require additional flangeway floor maintenance, including grinding away sharp edges and occasional welding to build up the groove wear. 6.6.3.4 Speed Considerations at Flange-Bearing Frogs The support between the wheel flange and the flangeway floor can cause moderately disagreeable noise and vibration. For this reason, flange-bearing design is usually limited to relatively slow speed operations (less than 15 mph [25 km/h] is common), although higher speeds have been common on legacy street car systems for over a century. The 1998 revisions to the Track Safety Standards of the U.S. Federal Railroad Administration (FRA) recognized flange- bearing design for the first time, but limits operation over such frogs to FRA Class 1 railroad speeds of 10 mph [16 km/h] freight and 15 mph [24 km/h] passenger. While the FRA standards do not apply to most rail transit operations, they will apply in segments of light rail systems where railroad freight operations are permitted. If any flange-bearing construction is considered for joint use areas, system designers should be aware that, as of 2010, the operating speed of both freight and light rail passenger equipment will be restricted by federal mandate. If such speed restrictions compromise the transit systemâs operations plan, it may be necessary to forgo flange- bearing design and adopt other approaches to provide wheel support. Note, however, that the FRA regulations undergo nearly continuous review on many topics, and flange-bearing design is one such area. Practitioners should therefore consult the most recent edition of 49 CFR 213 before making decisions concerning flange-bearing design. 6.6.3.5 Wheel/Flange Interface A light rail system with a minor amount of flange-bearing special trackwork can typically use a conventional wheel contour with a rounded flange. On the other hand, if there is a significant amount of flange-bearing special trackwork, a rounded flange tip tends to flatten due to wear and metal flow under impact. This results in flanges that are shorter than design, which in turn could cause problems at switch points. If a large amount of flange-bearing specialwork is expected, consideration should be given to a wheel flange design that is flat or nearly flat on the bottom. This will minimize the likelihood that wheel flanges will either âwear shortâ or experience damaging metal flow from traversing flange-bearing frogs. Refer to Chapter 2 for additional discussion on wheel profiles suitable for use with flange-bearing special trackwork. It is important for track designers to recognize that when an LRV wheel is running on a flange tip, its forward velocity is slightly greater than when it is operating on the wheel tread even though the rotational velocity in terms of revolutions per unit time is unchanged. Thus, if one wheel is running on its flange and the other fixed wheel on the same axle is rolling on the tread surface, the flange-bearing wheel will attempt to travel slightly further ahead. This condition cannot persist for long before wheel slip will force both wheels to resume their normal orientation opposite each other. This is rarely a problem when each axle is independently powered.
Special Trackwork 6-51 However, some older models of light rail vehicles power both axles from a single motor (âmonomotorâ truck design). Because all four wheels must therefore have the same rotational velocity, flange-bearing design can highly stress mechanical portions of the LRV drive train as one wheel attempts to travel further than the other three to which it is rigidly connected. Failures of gearbox connections between the axles and the monomotors have been common, and vehicle manufacturers in part blame flange-bearing special trackwork. While monomotor trucks have fallen out of favor for new vehicle procurements, some transit systems are likely to have such vehicles in their fleets for years to come. To minimize stress on the LRV drive train, some track designers include a flange-bearing grooved head rail opposite any flange-bearing frog. In tee rail construction, a continuous flange-bearing filler can be inserted between the running rail and the frog guard rail. 6.6.4 Improved Design for Solid and Railbound Manganese Frogs An improved frog design for rail transit use, in part based on the legacy ATEA standards and the latest innovation of welding manganese steel to common carbon rail steel, is illustrated in Figure 6.6.5. Features include the following: ⢠Similar to monoblock frogs, the heart of the frog can be a weldable manganese casting with four 115RE rail section arms extending out from the heart of the casting. ⢠To improve wheel/rail contact, the frog running surfaces are contoured to match the 115RE rail head profile, providing a continuous and consistent running surface for the wheel. If flange-bearing design is selected, it can be incorporated into the design described above; Figure 6.6.4 shows the contoured frog in a flange-bearing design. 6.6.5 Spring and Movable Point Frogs When continuous wheel support is required and flange-bearing design is not appropriate due to operating speed or other conditions, either spring frogs or movable point frogs can be considered. Such components are costly, high-maintenance items and should be used only when unavoidable. 6.6.6 Lift Over (âJumpâ) Frogs Any frog design will generate some noise and vibration, which can be an adverse effect in many locations. In locations where a turnout is used only very infrequently, such as an emergency crossover, some light rail systems have employed what is known as either a âlift overâ or âjumpâ frog, as illustrated in Figure 6.6.6. A jump frog provides an open flangeway only for the main line movement. When a movement occurs on the diverging route, the frog flangeway and wing rail portion are ramped up to a level that allows the wheel to pass over the main line open flangeway and running rail head. To protect the direction of the raised wheel, a restraining guard rail is provided on the opposite wheel. The lift over action will introduce noise and vibration comparable to an ordinary frog. However, the more frequent, straight through, main line movements will have a continuous wheel
Track Design Handbook for Light Rail Transit, Second Edition 6-52 Figure 6.6.5 Contoured welded monoblock frog
Special Trackwork 6-53 Figure 6.6.6 Lift over, âjumpâ frog tread support and the overall amount of noise attributable to the light rail system will be reduced. Jump frogs are actually a very old concept, having appeared in the catalogs of trackwork manufacturers from over a century ago. The first such frog to be installed in a modern light rail line occurred in the 1990s.
Track Design Handbook for Light Rail Transit, Second Edition 6-54 Jump frogs have been adopted by several freight railroads for seldom-used sidetracks from high- tonnage freight lines. While transit operations might consider jump frogs so as to reduce impact noise and vibration, the railroads have a different incentiveâextending the service life of an essential frog that is used relatively infrequently on the diverging side. Rarely do the freight railroads concern themselves with noise or transmission of ground-borne vibrations. 6.6.7 Frog Running Surface Hardness Regardless of frog design, the portions of the frog that support the wheels should have a minimum surface hardness of 365 BHN. This can either be inherent in the material from which the frog is fabricated or achieved by post-fabrication treatments such as explosive hardening. If flange-bearing design is employed, the flangeway floor can be considered for pre-hardening. There are two schools of thought on this topic: ⢠Harden the floor, as described above, at the time of manufacture. ⢠Donât harden the floor (but do harden the head), and allow the flangeway floor to wear and work-harden under traffic so as to bring the frog more quickly into a conformal condition where the wheels bear uniformly on both the flange floor and normal tread-bearing surfaces. A higher level of maintenance may be required during this âwearing inâ period. The second option recognizes that precisely finishing the depth of the flangeway to the same tolerances as are possible for machining wheel flange heights is difficult and expensive. The decision may be contingent on the consistency of wheel maintenance on the transit system. If wheels are not trued regularly and flange height is erratic, there is a higher benefit to pre- hardening the flangeway floor. 6.7 FROG GUARD RAILS Guard rails must be installed opposite frog points to both position and steer the opposite wheel. This both protects the relatively thin and fragile frog point and prevents wheel flanges from tracking on the wrong flangeway through the frogs. If transit wheel gauge standards are followed, it may be necessary to provide a very narrow guard rail flangeway in order to ensure that the wheel flange remains in the proper path through the frog. Widened track gauge may be required. Guard rails should extend ahead of the point of frog for a distance not less than that given in the AREMA Portfolio of Trackwork Plans. They should extend beyond the frog point to at least the location of the heel end of the frog wing rail. Where the closure curve radius of the turnout is sharp enough that curve guarding is required, the required restraining rail system and the frog guard rail on the diverging side of the turnout should be continuous, beginning at the switch heel block and going to either a point opposite the end of the frog wing rail or the point where guarding is no longer required. Heel blocks can be specially fabricated to provide the requisite flare at the end of the restraining rail. Frog guard rails should be adjustable and generally compatible with the restraining rail design adopted for the project.
Special Trackwork 6-55 Installing an adjustable guard rail in embedded track is difficult; therefore, traditional street railway operations typically installed a section of girder guard rail in lieu of a conventional guard rail. Some contemporary embedded track installations provide a segment of U69 guard rail fastened to chairs in a manner that nominally permits adjustment (provided that the fastenings do not become corroded and unusable). If the guard rail cannot be adjusted in the installed environment, complete removal and replacement of both the pavement and the guard rail may be required. In addition, frog guard rails rarely need adjustments if properly installed. Designers should carefully consider whether frequent guard rail wear is likely before selecting a complex design that may have limited value. The frog guard rail area at embedded flange-bearing frogs is a critical area since the wheel opposite the guard rail is traversing through the frog point area on the greater diameter of the wheel flange. As stated previously, wheels solidly connected to the axle rotate at a similar rate. Therefore, the wheel on the flange-bearing frog will travel a greater distance, resulting in a steering action toward the smaller rolling diameter wheel. Although the flange-bearing distance may be short on some designs, other designs, such as through a crossing diamond, may be designed with a longer extended portion of flange-bearing through the entire diamond frog area. If such is the case, truck skewing or crabbing could result. To compensate, special trackwork designers have implemented flange bearing at the guard rail area with length to match the frog flange-bearing distance. This same steering action could steer the wheel away from the frog point. While this suggests that no guard rail would be required, nevertheless one is recommended. 6.8 WHEEL TREAD CLEARANCE Throughout any special trackwork unit, it is important to be certain that nothing projects above the top of rail plane into a zone where it might be struck by the outer edge of the LRV wheel tread. The designer must not only consider the as-new width of the wheel tread, but also the allowable transverse movements of the wheel due to wear limits on the side of the wheel flange and on the gauge line of the rail, as well as any allowable metal overflow on the outer edge of the wheel. Wheel tread clearance will rarely be less than 5 inches [127 mm] except for systems with narrow wheel treads. When considering wheel tread clearance for wheels projecting beyond the head of the rail on the field side, vertical deflection of the rail or trackwork component must be considered. 6.9 SWITCH TIES Trackwork designers must consider requirements for stray current control when choosing the type of switch tie to be used. If insulated rail seat installations are required, the designer must consider the dielectric properties at each rail seat, and the switch plate must be evaluated on both timber and concrete switch ties. For more information on rail seat insulation, refer to Chapter 5. See Chapter 5, Article 5.5.3.1 for extensive discussion of traditional timber cross ties and switch ties. Concrete switch ties improve the stability of turnout and crossing installations and will provide a track modulus that ranges from comparable to up to double that of main line concrete cross tie track. Concrete switch ties must be individually designed to fit at each specific location within a
Track Design Handbook for Light Rail Transit, Second Edition 6-56 turnout. Hence, a concrete switch tie designed for use at a particular location in a No. 6 turnout will likely not be usable in a No. 10 turnout. However, because of their sizeâthey generally are 10 inches [250 millimeters] wideâconcrete switch ties require a spacing layout that is distinctly different from that used with timber switch ties. The new tie layout can impact turnout switch design by requiring alternate switch rod positions. The two headblock ties at the point of switch area that support the switch machine must remain at the spacings recommended by AREMA if they are to accommodate standard power-operated switch machines or manual switch stands of North American design. Figures 6.9.1, 6.9.2, and 6.9.3 illustrate typical No. 6, No. 8, and No. 10 concrete tie ballasted turnouts. Several vendors now offer switch ties fabricated from steel shapes. Some of these include electrical insulation at the rail fastenings and hence may be suitable for installation in ballasted LRT track. Practitioners should consult with the manufacturers for current information. A long-standing problem for ballasted track maintenance has been tamping through switches. Ordinary switch rods interfere with production tamping equipment so that such areas need to be tamped using hand-operated tools. A relatively recent development has been hollow steel switch ties that take the place of the usual headblock ties. The switch rods can be positioned inside of these ties, leaving the cribs open for ballast tamping. See Chapter 10, Article 10.2.1 for additional discussion on switch machine interfaces. 6.10 RESTRAINING RAIL FOR GUARDED TRACK As noted in the beginning of this chapter, the broad definition of special trackwork includes restraining rail systems for guarded track. For details concerning these topics, refer to the following: ⢠For additional information design parameters for restraining rails, refer to Chapter 4, Article 4.3. ⢠For addition information on restraining rail designs for guarded track, refer to Chapter 5, Article 5.3. When curves with restraining rails are adjacent to turnouts and track crossings, the track designer should consider integrating the restraining rail into the turnout by design to avoid makeshift connections between the adjoining special trackwork components during construction. 6.11 PRECURVING/SHOP CURVING OF RAIL Precurved rail is also considered special trackwork since shop fabrication or special processing is required to bend the rail steel beyond its elastic limit. 6.11.1 Shop Curving Rail Horizontally For information on precurving of tee rail and groove rail in the horizontal plane, refer to Chapter 5.
Special Trackwork 6-57 Figure 6.9.1 No. 6 turnoutâconcrete ties with 13â curved switch
Track Design Handbook for Light Rail Transit, Second Edition 6-58 Figure 6.9.2 No. 8 turnoutâconcrete ties with 19â6â curved switch
Special Trackwork 6-59 Figure 6.9.3 No. 10 turnoutâconcrete ties with 19â6â curved switch
Track Design Handbook for Light Rail Transit, Second Edition 6-60 6.11.2 Shop Curving Rail Vertically for Special Trackwork If a special trackwork unit is within a vertical curve, as often happens when embedded trackwork must conform to existing street geometry, it may be necessary to shop curve rails vertically so that they lay uniformly without kinked joints or welds between contiguous rails. This is particularly true when it is necessary to field weld adjoining rails. When a 39-foot- [1,189-cm-] long 115 RE rail is supported only at its ends, it can assume a sag vertical radius of about 5,000 feet [1,524 meters]. A similar crest radius can be achieved by a rail supported only in the center. These equate to a mid-ordinate deflection of about 1 inch [25 mm] over the length of the rail. If the requisite vertical track curve radius is sharper than this, the rails should be shop curved vertically to avoid assembly problems in the field. Technically, the shapes assumed by such simply supported rails are neither circular curves nor parabolic curves, but are close enough for practical field purposes. In extremely sharp horizontal curves, it will be necessary to account for rail cant when bending the rails. This requires that the rails be cambered vertically prior to horizontal bending. 6.12 LIMITED SOURCES OF SUPPLY FOR SPECIAL TRACKWORK Many of the innovative, transit-specific special trackwork designs developed by European fabricators were not previously produced by North American special trackwork manufacturers. However, due to increasing demand for transit style special trackwork, several North American fabricators can now furnish many of the standards required. In general, North American special trackwork manufacturers are undertaking the investment necessary to satisfy the demand for such products; however, some of these designs are proprietary. Although unique special trackwork products for LRT are now more available, the trackwork designer must carefully consider the prudence of designing a system for which essential trackwork products will be difficult to obtain at reasonable cost through competitive bidding due to the complexity of the design. Use of sole-source products or proprietary designs should generally be avoided. Because complex interrelationships can exist between the various elements of the overall trackwork design, this evaluation should be performed before design details are selected and procurement and construction contracts are advertised. The designer should also consider whether the same products or interchangeable substitutes are likely to be available for future maintenance and expansion of the system. Caution is recommended if special trackwork sources are limited solely to overseas manufacturers or a single domestic supplier. Regardless of the source of supply, special trackwork units should be standardized to the maximum degree possible so that economies of scale are possible during both initial project construction and subsequent long-term maintenance. One-of-a-kind assemblies should be avoided. 6.13 SHOP ASSEMBLY Special trackwork layouts, particularly complex layouts involving more than one turnout, should always be preassembled at the fabrication shop. This will enable inspectors to verify that all
Special Trackwork 6-61 components fit together as specified and are in accordance with approved shop drawings. The fabricatorâs schedule should allow adequate time for the inspectors to conduct an unhurried examination, and the assembly should have passed an inspection by the fabricatorâs quality department prior to the arrival of the ownerâs inspectors. It is recommended that the installation contractor be required to send a qualified representative to observe the shop assembly. During shop assembly, all components should be fully assembled to duplicate the installation in the field. The fabricator should provide the labor and equipment to disassemble and reassemble any subassemblies if the inspector requires it. Complete measurements of all critical dimensions should be made and the results noted on prints of the shop drawings. Any allowable deviations from the previously approved shop drawings should be added to the electronic files of the drawings. These annotated drawings should then be provided to field installation crews so that they will understand any adjustments made to the trackwork during shop assembly and inspection. The fabricator should not be permitted to ship any part of the layout unless the entire layout has been verified as acceptable, with all deviations either corrected or accepted. The only exception to full shop assembly of special trackwork would be any bonded, insulated joints. These joints can be assembled âdryâ and held in position by C-clamps. Joints which will be field welded can be assembled with temporary joint bars, bolted through the thermite weld gap with a bolt of a diameter equal to the weld gap (generally 1 inch / 25 mm) and/or held in position by C-clamps. If cross ties and rail fastenings are to be furnished with the layout, they should be installed during shop assembly. If concrete or timber switch ties are included as a part of the assembly, they can be permanently preplated where required during the shop assembly, particularly if elastic rail fastenings are being used. It is good practice to require the fabricator to use second-hand elastic rail clips during the shop assembly so that the permanent clips are not damaged by repeated installation, removal, and reinstallation. It is recommended that the appropriate specified switch stand or switch machine be available for complete assembly. If the switch machines are being supplied by a different contractor, this will require coordination with the fabricator. A power source should be available for operating the switch machine, and inspection should include operation of the switch machine and the satisfactory throwing of the switch point rails to full closure in both positions. In extremely complex special trackwork layouts, such as when guarding of frog points might be an critical issue, a simulated operation of the trackwork by pushing and/or pulling a single rail vehicle truck may be beneficial to be certain the fabricated components comply with the design. The truck would need to be provided by the owner and, if possible, should not have new wheels, but rather wheels in an average worn condition. A similar test can be employed during installation, particularly in the case of embedded special trackwork, where corrective actions would be very difficult after the embedding pavement has been installed. 6.14 REFERENCES [1] American Railway Engineering and Maintenance-of-Way Association, Manual for Railway Engineering, 2010 Edition.
Track Design Handbook for Light Rail Transit, Second Edition 26-6 [2] American Railway Engineering and Maintenance-of-Way Association, Portfolio of Trackwork Plans, 2008 Edition. [3] Wm. Wharton, Jr. & Co. Incorporated, Philadelphia, Pa. U.S.A., Catalog No. 10, 1903, pp. 146â154. [4] Allen, C. Frank, Railroad Curves and Earthwork, Fifth Edition; âChapter VIII: Turnoutsâ and âChapter IX: Connecting Tracks and Crossingsâ; McGraw Hill Book Company, Inc., 1914. [5] American Transit Engineering Association, Way & Structures Division, Engineering Manual, âSection W13-37: Special Trackwork Layouts.â [6] American Transit Engineering Association, Way & Structures Division, Engineering Manual, âSection W10-21: Designs and Engineering Data for Turnouts and Crossovers for Tongue Switch Construction,â âSection W129-33: Tongue Switches,â and âSection W130-34: Design of Mates.â
