


Below is the uncorrected machine-read text of this chapter, intended to provide our own search engines and external engines with highly rich, chapter-representative searchable text of each book. Because it is UNCORRECTED material, please consider the following text as a useful but insufficient proxy for the authoritative book pages.
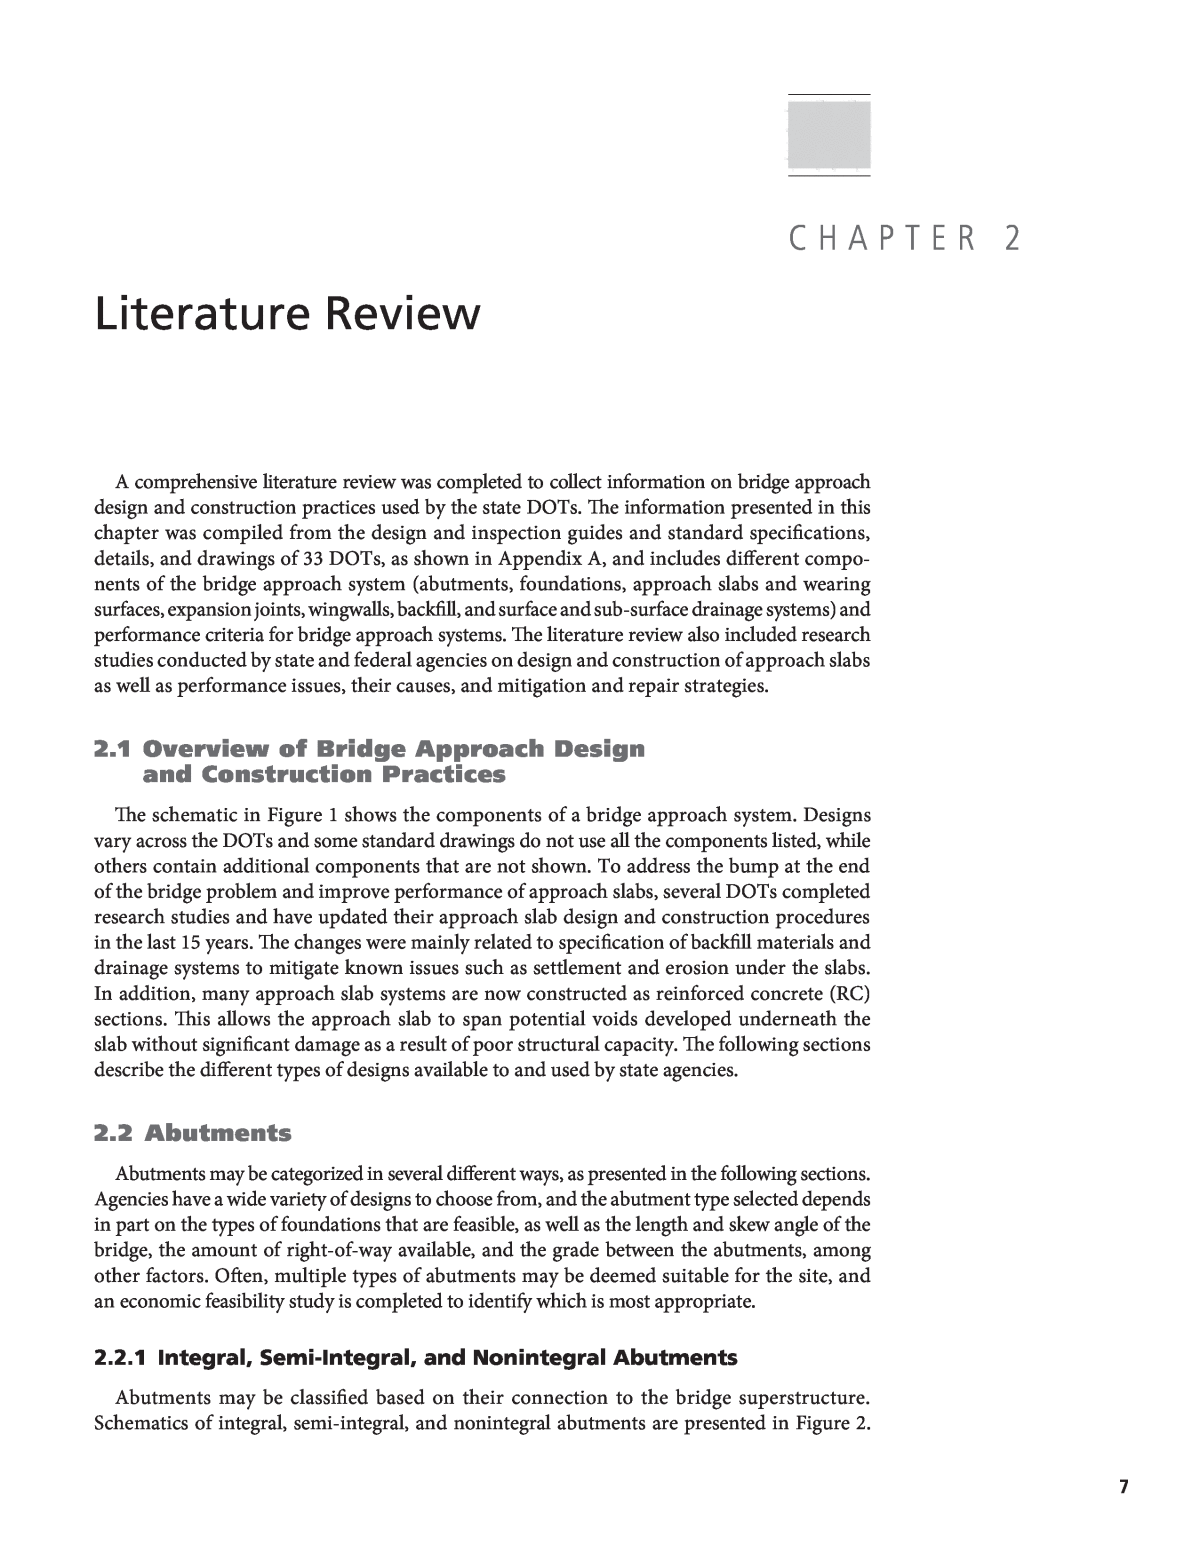
7  Literature Review A comprehensive literature review was completed to collect information on bridge approach design and construction practices used by the state DOTs. The information presented in this chapter was compiled from the design and inspection guides and standard specifications, details, and drawings of 33 DOTs, as shown in Appendix A, and includes different compo- nents of the bridge approach system (abutments, foundations, approach slabs and wearing surfaces, expansion joints, wingwalls, backfill, and surface and sub-surface drainage systems) and performance criteria for bridge approach systems. The literature review also included research studies conducted by state and federal agencies on design and construction of approach slabs as well as performance issues, their causes, and mitigation and repair strategies. 2.1 Overview of Bridge Approach Design and Construction Practices The schematic in Figure 1 shows the components of a bridge approach system. Designs vary across the DOTs and some standard drawings do not use all the components listed, while others contain additional components that are not shown. To address the bump at the end of the bridge problem and improve performance of approach slabs, several DOTs completed research studies and have updated their approach slab design and construction procedures in the last 15 years. The changes were mainly related to specification of backfill materials and drainage systems to mitigate known issues such as settlement and erosion under the slabs. In addition, many approach slab systems are now constructed as reinforced concrete (RC) sections. This allows the approach slab to span potential voids developed underneath the slab without significant damage as a result of poor structural capacity. The following sections describe the different types of designs available to and used by state agencies. 2.2 Abutments Abutments may be categorized in several different ways, as presented in the following sections. Agencies have a wide variety of designs to choose from, and the abutment type selected depends in part on the types of foundations that are feasible, as well as the length and skew angle of the bridge, the amount of right-of-way available, and the grade between the abutments, among other factors. Often, multiple types of abutments may be deemed suitable for the site, and an economic feasibility study is completed to identify which is most appropriate. 2.2.1 Integral, Semi-Integral, and Nonintegral Abutments Abutments may be classified based on their connection to the bridge superstructure. Schematics of integral, semi-integral, and nonintegral abutments are presented in Figure 2. C H A P T E R  2
8 Practices for Bridge Approach Systems Figure 1. Schematic identifying the typical components of a bridge approach system. Figure 2. Schematic of an integral abutment (left), a semi-integral abutment (middle), and a nonintegral abutment (right). In integral abutments, the steel or concrete girders are embedded within the abutment backwall such that the backwall must move as the girders lengthen and shorten in response to changes in temperature. In semi-integral abutments, the girders are embedded within the abutment backwall, but a horizontal joint between the abutment backwall and the abutment stem permits the backwall to move integrally with the girders while the abutment stem remains fixed. In nonintegral abutments, the girders rest on bearings and a gap permitting girder expansion is present between the girder ends and the abutment backwall. Nonintegral bridges require an expansion joint between the girder ends and the abutment backwall while integral and semi- integral abutment bridges do not. In general, integral abutments are the most preferred type of abutment across the state DOTs. They are cost-effective both in regard to initial construction and maintenance costs because
Literature Review 9  they are relatively simple to design and construct; require less complicated formwork, fewer piles, and shorter construction times; and eliminate bearings and joints. However, integral abutments are not always appropriate and the following limitations are common: ⢠Foundation Type. Integral abutments require deep foundations. One row of steel H-piles is the most common configuration (Dunker and Liu 2007), but steel pipe piles and some- times concrete piles have been used as well. Pipe piles are better suited for complex situations because of their symmetrical cross sections. Deep concrete foundations are rarely used for integral abutments because of their limited flexibility and propensity for cracking. If the subsoils are not suited to deep foundations, then an alternative abutment type must be selected. ⢠Minimum Effective Pile Length. The effective pile length refers to the length of the pile that is embedded in the soil and is typically at least 10 ft. This length is critical to ensuring the piles have enough flexibility to accommodate the movement of the integral abutment. ⢠Maximum Skew Angle. Maximum skew angles for integral abutments vary from 20° to 45°. Excessive skews cause uneven expansion of the girders on either side of the bridge, resulting in racking of joints (nonlongitudinal movement) and twisting of the abutments. ⢠Bridge Length or Expansion Length. Many DOTs, including New Jersey (New Jersey DOT 2016), New Hampshire (New Hampshire DOT 2015), North Carolina (North Carolina DOT n.d.), Maine (Maine DOT 2003), Michigan (Michigan DOT n.d.), and Rhode Island (Rhode Island DOT 2007), place limits on the bridge length or the expansion length, defined as the distance to the nearest fixed joint in the superstructure. These limits vary widely and depend on whether the superstructure is steel or concrete. The maximum bridge length for concrete superstructures may be between 400 ft and 600 ft, and the maximum bridge length for steel structures is typically 300 ft to 350 ft. ⢠Maximum Grade. A maximum longitudinal grade of 5% between the abutments is commonly specified. In design, the purpose of this limit is to reduce the vertical reactions of the abutment caused by earth pressure forces (Gao 2017). As indicated in the Colorado guide (Colorado DOT 2019), research shows that in practice, one end of the integral or semi-integral abutment bridge tends to lock up and the other experiences relatively high movements when high vertical grades are present. ⢠Abutment or Girder Height. Some DOTs specify a maximum girder depth of 6 ft while others specify a maximum abutment or diaphragm height of approximately 10 to 15 ft (Connecticut DOT 2003; New Hampshire DOT 2015; Michigan DOT n.d.; North Carolina DOT n.d.). These criteria are applied to limit loads on the abutment. Other conditions may also preclude the use of integral abutments, such as the use of curved girder beams or the potential for differential settlement. If differential settlement is a risk, then integral abutments are avoided because the superstructure cannot be raised, or âjacked,â to restore a smooth profile and good riding quality. Semi-integral abutments are often the second-most desirable choice. While they are not as cost-effective to construct, they still eliminate the need for an expansion joint in the deck at the abutment. Semi-integral abutments are subject to many of the same limitations as integral abutments, but do not require deep foundations and permit jacking of the superstructure in the event of differential settlement. Nonintegral abutments have been common historically but are now typically only used when the bridge site is not suited to integral or semi-integral abutments. They are unfavorable because the expansion joints are prone to leakage. Leaked water, particularly deicer runoff in Northern states, causes corrosion of the bearings, reinforcing steel, and the ends of steel or prestressed concrete girders. Repairs are often only made if the situation becomes severe.
10 Practices for Bridge Approach Systems 2.2.2 Open and Closed Abutments Abutments may also be categorized depending on whether they retain the backfill. Closed abutments fully retain the embankment and backfill by the abutment stem and backwall. Open, or âspill-through,â abutments are like interior bents or piers and consist of columns that support a diaphragm and a short backwall. Beneath this cap, the backfill spills through the columns. Closed abutments may be preferable to spill-through abutments because it is difficult to compact fill around the columns of spill-through abutments, making them susceptible to settle- ment issues. The slopes are also self-supporting and susceptible to erosion if they do not have protection, and open abutments are avoided at crossings where scour is a concern. Spill-through abutments are selected in unique scenarios; for example, when pile lengths would be too short otherwise or when the abutment is intended to be a pier and spans are planned to be added in the future. A few DOTs, such as Ohio (Ohio DOT 2004) and Iowa (Iowa DOT n.d.), prefer spill-through abutments while others, such as New York State (New York State DOT 2019) and Wisconsin (Wisconsin DOT 2020), favor closed abutments. 2.2.3 Perched, Partial-Depth, and Full-Height Abutments Abutments may be classified by their height relative to the embankment fill. Full-height abutments, also called shoulder abutments, are located at the toe of the embankment and retain the entire height of the fill from the grade of the lower feature to the upper elevation of the bridge. Perched abutments, also referred to as stub abutments, rest at or near the top of the embankment fill and the fill slope extends down to the feature being crossed. Partial-depth abutments sit approximately midheight and retain a part of the fill. Perched abutments are generally preferred because they are easier to construct and not as costly as taller abutments. They do not require extensive excavation and filling like full- height abutments and the smaller backfill depth requires less compaction and helps prevent performance issues associated with settlement. Additionally, perched abutments permit better visibility when traveling on the lower feature. However, perched abutments require longer bridge spans and full-height abutments may be required if there is not enough right-of-way for a berm slope in front of the abutment. Full-height abutments are essentially retaining walls. The most common types of retaining walls used as abutments include the following: ⢠Gravity Walls. Gravity walls use their self-weight to resist loads. They require little to no reinforcing steel, but have a relatively large footprint. Massachusetts and Rhode Island recommend gravity walls only for small heights under 14 ft (Massachusetts DOT 2013; Rhode Island DOT 2007), and some DOTs such as New York State DOT do not use gravity walls anymore (New York State DOT 2019). ⢠Cantilever Walls. Cantilever walls consist of a footing and a tall, reinforced stem. They use their weight as well as the soil mass on their footing to resist loads and, according to the Delaware, Massachusetts, Michigan, New York State, and Rhode Island DOTs, they are best suited for heights up to 25 or 30 ft for which gravity walls are not suited (Delaware DOT 2019; Massachusetts DOT 2013; Michigan DOT n.d.; New York State DOT 2019; Rhode Island DOT 2007). ⢠Sheet Pile Walls. Sheet pile walls are a type of cantilever wall, but instead of using an RC stem and footing, they are composed of interlocking structural steel sheets that are
Literature Review 11  driven deeply such that the soil provides the necessary support. These systems are typically proprietary. ⢠Counterfort Walls. Counterfort walls are similar to cantilever walls, but provide additional support to the stem using vertical, perpendicular walls, called âcounterforts,â on the earth side of the wall. These walls are most economical when heights are above 25 ft to 30 ft, accord- ing to the Michigan, New York State, Ohio, and Rhode Island DOTs (Michigan DOT n.d.; New York State DOT 2019; Ohio DOT 2004; Rhode Island DOT 2007). 2.2.4 Reinforced Soil Systems Abutments may be, or may incorporate, mechanically stabilized earth (MSE) systems. These systems consist of facing elements, backfill, and reinforcing elements. The facing is typically precast concrete panels or modular block-wall units but may be cast-in-place (CIP) concrete elements, welded wire-mesh facing, geosynthetic wraparound facing, gabions, or geocells (Berg et al. 2009; New York State DOT 2015). Backfill is typically a select granular material. The reinforcement may be metallic (called âinextensibleâ) or polymeric (called âextensibleâ). Examples of metallic reinforcement are welded wire mats, bars, and straps. Extensible or poly- meric reinforcement is typically a geosynthetic. In an MSE wall, the backfill and reinforcement are placed in alternating layers and the reinforcement is anchored, typically mechanically, to the facing to produce the retaining wall. The reinforcement spacing typically varies from 1 ft to 2.5 ft and each layer of backfill is compacted. A variation of MSE walls are prefabricated modular walls. These walls have backfill and facing elements, but no reinforcement. Instead, they function as gravity walls and rely on the modulesâ weight to provide adequate load resistance. A subset of MSE walls are geosynthetically reinforced systems. Geosynthetic reinforced soil-integrated bridge systems (GRS-IBSs) are a relatively new type of abutment system that, while used by some DOTs, is still in a trial phase and generally requires department approval. GRS-IBS abutments consist of a facing element, geosynthetic reinforcement, and compacted backfill. The geosynthetic layers have a smaller vertical spacing than is typical of an MSE wall, as small as 6 in. or less underneath the concrete seat holding up the bridge superstructure. Instead of a mechanical anchor, the geosynthetics are placed between the facing elements and held in place by friction. MSE and prefabricated modular walls are proprietary, while GRS-IBS abutments are typically designed according to Publication No. FHWA-HRT-11-026, Geosynthetic Reinforced Soil Integrated Bridge System Interim Implementation Guide (Adams et al. 2012). An updated guide Publication No. FHWA-HRT-17-080 was published in 2018. It contained step-by-step LRFD methodology, construction, and quality assurance/quality control (QA/QC) guidance, and recommendations for performance monitoring and maintenance of GRS-IBS abutments (Adams and Nicks 2018). These systems are relatively cost-effective and quick to construct, particularly the GRS-IBS abutment, because they can use precast elements and do not require deep foundations. However, they are primarily used on fill sections as they must be constructed from the bottom up. Use of GRS-IBS abutments is currently limited to single-span structures and/or local, low-volume roads, and some DOTs are cautious about using GRS-IBS abutments when there is a risk of scour. GRS-IBS abutments are stand-alone abutments, but MSE systems are often used in conjunc- tion with stub or integral abutments. By providing greater internal stability to the embankment slope, they decrease the required length of the slope and subsequently reduce bridge span lengths and right-of-way requirements (South Carolina DOT 2006).
12 Practices for Bridge Approach Systems 2.3 Foundations Bridge abutments are most commonly supported on spread footings or on piles. Piles may be steel H-piles, steel pipe piles, precast-prestressed concrete piles, and CIP piles, and they may resist loads by friction along their length, by bearing at their ends, or a combination of the two. Drilled shafts and micropiles may also be used in select scenarios. The type of foundation selected depends on the ease and cost of construction, type of abutment, site conditions, and load and performance requirements. 2.3.1 Ease and Cost of Construction Spread footings are typically more economical than deep foundations, provided the site is suitable for their use. Their economy decreases with footing depth as a result of increas- ing excavation efforts. In some scenarios, making the site suitable by implementing ground improvement methods may still be more cost-effective than designing and constructing deep foundations. Piles may also require significant excavation effort if a pile cap is included below ground. An advantage of piles over drilled shafts is that pile capacity can be tested on site to verify installation quality, while relatively complex methods, such as cross-hole sonic logging, are required to conduct quality assurance tests on drilled shafts. Some DOTs such as Louisiana (Louisiana DOTD 2005) may prefer precast piles instead of CIP piles, likely because quality is more easily controlled in precast plants. Other DOTs, such as New Hampshire (New Hampshire DOT 2015) and other Northeast agencies, do not use precast piles because the geology makes installation challenging and because of difficulties with splicing and handling the elements. 2.3.2 Type of Substructure Integral abutments almost always have a foundation consisting of one row of piles, which provides enough flexibility to accommodate abutment movement. Steel H-piles are most common. Indiana states that steel-encased concrete piles can also provide the required flexibility (Indiana DOT 2013a) and several DOTs permit CIP concrete piles, steel pipe piles, and micro- piles for bridges with short spans or lengths, approximately less than 150 ft. For greater bridge lengths, steel H-piles are usually required. The orientation of the H-piles varies; some DOTs such as New Jersey (New Jersey DOT 2016) and Delaware (Delaware DOT 2019) require the piles to be oriented such that bending is about their weak axis because of the improved flexibility, while other DOTs such as New York State (New York State DOT 2019) and North Carolina (North Carolina DOT n.d.) prefer strong axis bending. Maine cautions designers to consider strong axis bending to prevent formation of a plastic hinge, especially if anticipated abutment movement exceeds 1 in. (Maine DOT 2003). If the soil resistance is too large, holes may be predrilled at the pile locations, the piles installed, and the remaining void space filled with select granular material. Semi-integral and nonintegral abutments typically use spread footings, multiple rows of piles, or drilled shafts. If an abutment is located on top of a reinforced soil mass, the foundations are typically deep. 2.3.3 Site Conditions Site-specific constraints for foundation construction include the following: ⢠Depth to Suitable Bearing Material. Deep foundations are often required to carry loads through weak strata to stiff hardpan or bedrock layers underneath. Shallow foundations are used when bedrock is close to the surface since short piles are susceptible to pullout and have poor lateral load resistance. A depth of 10 ft is the typical cutoff point.
Literature Review 13  ⢠Potential for Scour. At sites where there is a risk of scour, deep foundations are used because they can carry loads below the potential depth of scour. ⢠Presence of Obstructions in Soil. Drilled shafts are often used instead of piles if the presence of boulders or other obstructions is expected to cause premature refusal of piling. ⢠Soil Corrosivity. In areas with aggressive soils, concrete piles may be used instead of steel piles to reduce corrosion risk. For example, New York State typically uses prestressed con- crete piles in marine environments (New York State DOT 2019). ⢠Proximity to Vibration-Sensitive Structures. If structures that are sensitive to vibrations are near the bridge site, driving piles may be too disruptive. Drilled shafts and micropiles are alternative options in these cases. ⢠Clearance and Access. Drilled shafts are typically favorable at sites with limited clearance and/or right-of-way. 2.3.4 Load and Performance Requirements The type of loading may affect the type of foundation selected. For example, piles are generally preferred, but drilled shafts may be more appropriate if significant seismic loads, uplift, and/or lateral loads are present. Settlementâboth differential settlement between the abutment and the approach and uniform settlement of the entire systemâis a concern and often governs the design of spread footings over load and bearing requirements. Several DOTs such as New Jersey (New Jersey DOT 2016) and Georgia (Georgia DOT 2019) specify that a maximum settlement of 1 in. is permitted. While footings can effectively mitigate differential settlement, they are relatively susceptible to uniform settlement and, if the 1-in. maximum limit is not achievable, then piles may be required. Conversely to abutments with footings, abutments with pile foundations can effectively prevent uniform settlement but are more susceptible to differential settlement between the backfill supporting the approach slab or pavement and the subsoils supporting the abutment. Piles support the abutment and maintain its elevation regardless of settlement of the fill, and they can help resist settlement of the fill by friction. Additionally, deep foundations are more resistant to lateral spreading (described in Section 2.12, Performance Issues and Mitigation Strategies) and drilled shafts are well suited to scenarios when only a small amount of defor- mation is tolerable. 2.4 Approach Slabs and Wearing Surfaces Approach slabs are commonly used to smoothly transition traffic from the roadway to the bridge deck. Alternatively, they may be called bridge end spans or relief slabs. While they are commonly CIP and the RC serves as the wearing surface, these slabs may also be precast elements and they may be constructed with bituminous overlays or buried such that a flexible pavement lies above them. In some instances, approach slabs are omitted entirely and the approach simply carries a flexible pavement to the bridge deck. 2.4.1 Approach Slabs Approach slab systems are designed to mitigate poor ride quality and other performance issues caused by settlement of the underlying fill and/or subsoils by providing support despite the development of voids (ElBatanouny et al. 2018). Many DOTsâincluding Michigan (Michigan DOT n.d.), Florida (Florida DOT 2020), and Connecticut (Connecticut DOT 2003)â encourage approach slabs for all new construction, but many othersâsuch as New York State (New York State DOT 2019), South Carolina (South Carolina DOT 2006), and West Virginia
14 Practices for Bridge Approach Systems (West Virginia DOT 2004)âonly require approach slabs for bridges on state-owned roads or interstates, and for all bridges with integral or semi-integral abutments. Pennsylvania is currently evaluating if approach slabs are required for all integral abutments or if they may be omitted for certain span lengths, highway networks, traffic volumes, and other factors (Pennsylvania DOT 2019). Some DOTs, such as Michigan (Michigan DOT n.d.), Maine (Maine DOT 2003), and South Carolina (South Carolina DOT 2006), may also require approach slabs if the site is expected to experience differential settlement or if the approach fill exceeds a certain height (e.g., 10Â ft). State DOTs commonly do not require approach slabs on low-volume roads and/or bridges owned by local governments. However, the definition of âlow volumeâ varies widely across DOTs. For example, Vermont does not require an approach slab if the projected average daily traffic (ADT) is less than 400 vehicles (VTrans 2010), while New Jersey does not require approach slabs on local roads if the projected ADT is less than 2,000 vehicles or the average daily truck traffic is less than 5% (New Jersey DOT 2016). Some DOTs, such as Delaware and West Virginia, permit approach slabs to be omitted if the expected thermal movement is less than 0.5Â in. (Delaware DOT 2019; West Virginia DOT 2004). To provide the necessary support, approach slabs are commonly designed as one-way slabs in accordance with the AASHTO LRFD Bridge Design Specifications, Section 4.6.2.3 (AASHTO Committee on Bridges and Structures 2020). Some DOTs such as Delaware (Delaware DOT 2019), Florida (Florida DOT 2020), and New Hampshire (New Hampshire DOT 2015) specify that the approach slab be designed assuming that only a fraction of its length is supported by the underlying fill, and that the slab is simply supported at the backwall of the abutment. Typically, two-thirds of the length of the approach slab is assumed to be unsupported, although Massachusetts specifies an unsupported length of 75% of the length of the slab (Massachusetts DOT 2013) while Delaware specifies the assumption that the slab has no support from the backfill or base material (Delaware DOT 2019). Many DOTs, such as Arizona (Arizona DOT 2007), Florida (Florida DOT 2017), Iowa (Iowa DOT n.d.), Mississippi (Mississippi DOT 2010), and Delaware (Delaware DOT 2019), typically have both top and bottom mats of reinforcing steel in the approach slab. New Hampshire is unique in that a singly reinforced slab made of synthetic fiber-reinforced concrete is required (New Hampshire DOT 2015). Several DOTs, such as Nebraska and Louisiana, may use piles to support the approach slab (Nebraska DOT 2014; Louisiana DOTD 2005). Some DOTs such as Connecticut (Connecticut DOT 2003) and Michigan (Michigan DOT n.d.) provide standard approach slab lengths, while other DOTs such as Ohio (Ohio DOT 2004) and New York State (New York State DOT 2019) specify a formula to calculate the required length. In the latter case, length is a function of embankment height, skew angle, width of the footing heel [defined by Maine DOT (2003) as the portion of the footing that protrudes back behind the abutment], and the type of soil under the fill. Minimum and maximum lengths are typically specified to ensure a reasonable size is designed, and lengths may vary from 10Â ft to 45Â ft. 2.4.2 Wearing Surfaces Asphalt wearing surfaces are sometimes applied to concrete approach slabs and are typically 1Â in. to 4Â in. in thickness. Some DOTs always require a bituminous overlay; for example, Connecticut requires approach slabs to be covered with a waterproofing membrane and bitu- minous overlay (Connecticut DOT 2003), Vermont requires approach slabs to be paved with the top two lifts of roadway bituminous concrete pavement [Vermont Agency of Transportation (VTrans 2010)], and West Virginia requires a 2-in.-thick, hot-laid bituminous skid-resistant overlay to be placed on top of approach slabs (West Virginia DOT 2004). Others conditionally
Literature Review 15  require a bituminous overlay; Florida requires an asphalt overlay with a minimum thickness of 1.75 in. if the approach roadway is flexible pavement (Florida DOT 2020) and South Carolina requires a 2-in.-thick overlay if the approaching roadway pavement is flexible and no sleeper slab is used (South Carolina DOT 2006). Of the DOTs reviewed, only Delaware explicitly stated that bituminous overlays are avoided because they prevent inspection of the approach slabs (Delaware DOT 2019). 2.4.3 Acceptable Surface Smoothness Approach slabs or pavements are generally only accepted once their thickness has been verified, their smoothness has been assessed and corrected, and a crack inspection has been conducted and any cracks that may be found are sealed. Some DOTs such as New Mexico and Oklahoma additionally require a water repellent be applied to the deck and approach slab, and Oklahoma requires the treatmentâs quality to be assessed by taking cores to measure the penetration of the repellent (New Mexico DOT 2019; Oklahoma DOT 2019). Crack sealing and water repellent application are primarily protective measures for improving the durability of the system while ride quality is assessed to ensure the serviceability of the as-built slab or pavement. Surface smoothness and ride quality are used to represent the performance of the larger bridge approach system. There are several ways in which the smoothness may be measured. The Federal Highway Administration (FHWA) Publication No. FHWA-HRT-16-072, FHWA LTPP Guidelines for Measuring Bridge Approach Transitions Using Inertial Profilers (Henderson et al. 2016), and FHWA-HIF-16-032, Measuring and Specifying Pavement Smoothness (Smith and Ram 2016) present smoothness and ride quality assessment in detail. The most common measurement methods used on approach slabs and pavements include the following: ⢠Straightedge. A straightedge, commonly 10 ft in length, although 12-ft straightedges have been specified as well, is used to assess the smoothness of the riding surface in the longitudinal and transverse directions. The edge may be a template steel straightedge or a rolling straight- edge. Straightedges are easy to use, but time-intensive if the approach is long or wide. ⢠Profilographs. Profilographs consist of a rigid frame that is typically a truss, a center wheel to measure the profile, and support wheels used to measure the datum. There are two primary types of profilographs: the California profilograph and the Reinhart profilograph. The California profilograph uses a 25-ft-long frame and measures the datum at one end while the Reinhart profilograph is 24.75 ft long and establishes the datum using measurements from its full length. Profilographs have been used by DOTs to collect pavement smooth- ness data for approximately 30 years but are a slow method of collecting data because they require speeds of approximately 2 to 5 mph (Smith and Ram 2016). The data collected with a profilograph may be analyzed to produce the following parameter: â Profile Index (PI). The PI is the most common parameter used for QC of the as-built condition. It is the sum of the difference between the observed profile and a straight refer- ence profile and is expressed in units of inches per mile. If the PI is used, then agencies commonly require a reading of each wheel path in each lane. ⢠Inertial Profilers. Inertial profilers use an accelerometer, laser sensors, and a distance measuring device to measure the riding surface. Because they can collect accurate and repeatable data at posted speeds, they are well-suited for network-wide, cradle-to-grave measurements, and states are transitioning from profilographs to inertial profilers. The data collected with an inertial profiler may be analyzed to produce the following parameters: â International Roughness Index (IRI). The IRI represents the average suspension motion a car would experience over the distance traversed and is also expressed in inches per mile. The IRI only simulates one wheel, so technically it is called the âquarter-car model.â
16 Practices for Bridge Approach Systems â Mean Ride Index (MRI). One flaw of the IRI is that it only measures the response of one wheel when there are two wheel paths. To calculate the MRI, the IRI is measured for both wheel paths and then averaged. Some DOTs such as Oklahoma (Oklahoma DOT 2019) and Alaska (Alaska DOT&PF 2020), only require a straightedge test, while other DOTs such as Ohio (Ohio DOT 2013) and Mississippi (Mississippi DOT 2017) only require testing by a profilograph or profiler. However, most DOTs require approaches to meet criteria based on both types of tests. Maximum acceptable variations from the straightedge are typically between 0.125Â in. to 0.375Â in. Maximum permissible PI, IRI, or MRI varies between the agencies significantly, and different requirements may apply depending on bridge length, posted speed, lane type, and the presence of joints. For example, Tennessee requires a maximum PI of 9Â in. per mi per 0.1-mi section for mainline roadways, auxiliary lanes, and high-speed ramps but permits a maximum PI of 20Â in. per mi per 0.1-mi section for ramps with a posted speed under 40Â mph (Tennessee DOT 2015). As another example, Ohio specifies a maximum IRI of 250Â in. per mi per 25-ft segment but permits an IRI up to 350Â in. per mi for 25-ft segments that contain steel-armored expansion joints (Ohio DOT 2013). As demonstrated by Tennessee and Ohio, different agencies may use different analytical lengths (0.1 mi versus 25Â ft in this case), which is another reason criteria vary, even when the same metric is used. In addition to PI, IRI, and MRI requirements, some agencies such as Arkansas, South Carolina, and Tennessee do not permit deviations greater than 0.3 or 0.4Â in. within 25Â ft as measured by the profilograph or profiler (Arkansas State Highway and Transportation Department 2014; South Carolina DOT 2008; Tennessee DOT 2015). If the slab or pavement does not meet the requirements, then areas of localized roughness may be corrected by grinding, as discussed in the standard specifications of Delaware (Delaware DOT 2016), Arizona (Arizona DOT 2008), New Mexico (New Mexico DOT 2019), and Oklahoma (Oklahoma DOT 2019). In cases where roughness is extensive, the contractor may propose placing an asphalt overlay instead of grinding. In extreme scenarios, removal and replacement of the approach slab may be required (New Mexico DOT 2019). 2.5 Deck-Abutment-Approach Configuration The connections between bridge deck, abutment, and approach have a variety of potential configurations. The deck often runs up to or over the backwall of the abutment. The approach slab may rest on a paving corbel (also called a paving notch, paving seat, concrete blockout, or haunch) attached to the backwall, or it may rest on top of the backwall such that it is directly adjacent to the bridge deck and the backwall is not exposed as part of the riding surface. The connections between the bridge deck, abutment, and/or approach may consist of joints that permit the adjoined elements to move independently of each other or may be rigid (also called âintegralâ) such that the elements translate and/or rotate together. 2.5.1 Conventional Configurations When conventional abutments with bearings are used, an expansion joint is typically required between the bridge deck and the abutment backwall and a second joint may be present between the backwall and the approach slab, or roadway pavement if no approach slab is used. The joint between the deck and the backwall is unfavorable because any joint leakage can cause the underlying girders, bearings, and RC elements to corrode. The joint between the backwall and the approach is also unfavorable because joint leakage will permit water to penetrate the backfill, resulting in higher loads on the abutment if the water is not drained properly and
Literature Review 17  potentially erosion, void formation, and clogged subdrains. As a result, most DOTs, such as Pennsylvania, Indiana, South Carolina, and West Virginia, favor configurations that eliminate joints at the abutment (Pennsylvania DOT 2019; Indiana DOT 2013b, c; South Carolina DOT 2006; West Virginia DOT 2004). 2.5.2 Jointless Configurations Integral and semi-integral abutments by definition remove the joint between the bridge deck and the backwall. The expansion joint may then be located between the backwall and the approach slab such that the backwall moves while the slab remains stationary, or the joint may be pushed further away from the bridge and located at the roadway end of the approach, wherein the backwall and the slab translate together. In general, placing the expansion joint at the roadway is preferred but may not be feasible; for example, when the thermal movement is large enough that an open finger joint or modular joint is required or if the approach slab is too large to translate easily with the abutment. If the joint is at the bridge end of the approach slab, typically no reinforcing steel is used to anchor the elements together and bond breakers are placed between them to facilitate move- ment. The abutment is therefore free to translate relative to the slab and the slab is free to rotate. If the joint is at the roadway end of the slab, the approach slab is often âpinnedâ to the abutment using bent reinforcing bars, which forces the elements to translate together while still permitting the slab to rotate. The approach slab is also anchored to the paving corbel to prevent it from âwalking off â of its support during translational movement. If no rotation is desired, then the approach slab may be cast monolithically with the abutment. However, a pinned connection is most common. When the approach slab is pinned to the abutment, a bond breaker is required between the slab and the underlying soil. This bond breaker is typically two 4-mil to 6-mil sheets of polyethylene. When an integral or semi-integral abutment is not feasible, a jointless bridge design may still be achieved by running the bridge deck over and past the backwall, as shown in Figure 3. In this jointless design, the deck must be able to translate relative to the fixed abutment. While a conventional abutment is used, the continuous deck protects the girders and bearings from any joint leakage. Figure 3. Schematic demonstrating a jointless bridge design with a conventional abutment according to Hoppe et al. (2016).
18 Practices for Bridge Approach Systems 2.6 Expansion Joints and Sleeper Slabs Expansion joints are designed to accommodate the thermal movement and other volumetric changes of the bridge superstructure. In select scenarios, an expansion joint may be deemed unnecessary. Some DOTs such as Indiana (Indiana DOT 2013b) and Connecticut (Connecticut DOT 2003) permit the expansion joint to be waived for short-span integral bridges (lengths less than 100 ft), particularly when the adjoining mainline pavement is flexible, or jointless bridges with expected movements that do not exceed 0.5 in. For example, Rhode Island permits a saw-and-seal joint at the sleeper slab under the latter scenario (Rhode Island DOT 2007). There are three common locations for expansion joints in bridge approach systems: (1) in front of the backwall between the deck and the abutment; (2) behind the backwall between the abutment and the approach; and (3) at the roadway end of the approach slab. Joints may also be located between separate panels of the approach slab(s) and multiple joints may be present at the sleeper slab. Sleeper slabs, also called sleeper subslabs, are commonly used at the roadway end of the approach to support the reinforced approach slab and provide a smooth connection to the pavement. 2.6.1 Pressure Relief Joints Several DOTs, such as New York State, Ohio, and South Carolina, may require pressure relief joints between the approach slab and the roadway if the roadway pavement is concrete (New York State DOT 2019; Ohio DOT 2004; South Carolina DOT 2006). A pressure relief joint may contain asphaltic concrete, in which case the joint width is typically on the order of 1 or 2 ft, or a foam filler, in which case the width is on the order of several inches. Images of each are shown in Figure 4 and Figure 5, respectively. Joints that use a compressible foam filler and a backer rod are an example of pressure relief joints. Asphaltic plug joints are bituminous pressure relief joints made of a flexible polymer- modified asphalt (PMA). The purpose of these joints is to accommodate thermal-induced pavement and bridge expansion with movements between 0.25 in. and up to 2 in. Restrictions on skew vary from a maximum skew of 25° to a maximum skew of 45°. Asphaltic plug joints are well suited for approaches and bridges that have bituminous overlays. However, they are ill Figure 4. Image of a bituminous pressure relief joint (Source: Ohio DOT 1973).
Literature Review 19  suited for roads where rutting or shoving of the PMA is a risk as a result of high traffic and/or truck traffic volumes and large slopes. 2.6.2 Strip Seal Joints Versus Compression Joints Strip seal joints and compression seal joints are similar in that they both use preformed elastomeric seals and they have similar restrictions on their use. Schematics and images of each are shown in Figure 6 and Figure 7, respectively. Strip seal joints are typically comprised of a neoprene gland mechanically locked to adjacent steel extrusions or rails and, as a result, these joints are generally armored. Seals used in compression joints may be closed cell foams or extruded web systems and must always be in compression during service since they are kept in place by friction with the adjacent structures. Compression joints may be armored or armorless. The concrete adjacent to the joint is referred to as the header. DOTs, such as New York State and Connecticut, have begun using elastomeric (polymer) concrete headers when constructing new joints or rehabilitating old joints (New York State DOT 2019; Connecticut DOT 2003). Additionally, North Carolina prefers elastomeric concrete headers when foam joints are used at end bents (North Carolina DOT n.d.). While more expensive than hydraulic cement concrete, Figure 5. Schematic and image of a foam pressure relief joint (Source: Minnesota DOT 2019). The photographed joint has some minor spalling damage.
20 Practices for Bridge Approach Systems elastomeric concrete cures quickly and bonds well to fully cured concrete if the concrete sub- strate is sufficiently dry. Elastomeric concrete has higher toughness to reduce cracking and spalling resulting from traffic impacts. Using elastomeric concrete headers can shorten traffic closures required for repairs. Limitations for the use of strip seal and compression seal joints are based on the following factors: ⢠Expansion length, ⢠Thermal movement, ⢠Maximum and minimum joint widths, and ⢠Skew angle. These parameters are interconnected. Expansion length, or distance to the nearest fixed bearing, controls the anticipated thermal movement. The thermal movement capacity of the joints is decreased by the presence of skew and subsequent joint racking and, as a result, allowable expansion lengths may vary based on skew angle. If skew is present, DOTs may require designers to assume the joint sealâs movement capacity is decreased by a factor, whose value varies based on the skew angle, or to limit the parallel ârackingâ movement to a certain percentage of the seal capacity. For example, New Jersey (New Jersey DOT 2016) limits racking to no more than 15% of the nominal width of a compression seal and New Hampshire (New Hampshire DOT 2015) limits racking to 60% of a strip sealâs capacity if the skew is between 30° and 45° and 50% if the skew is greater than 45°. For silicone joint seals, Connecticut (Connecticut DOT 2003) Figure 6. Schematic of a strip-seal-joint cross section (top image: Michigan DOT 2019) and photograph of a strip seal from above (bottom image: Michigan DOT 2019).
Literature Review 21  requires the calculated thermal movement of the joint to be multiplied by 1.5 or increased by 0.5 in. if the skew is between 30° and 45°, and to be multiplied by 1.75 or increased by 0.75 in. if the skew exceeds 45°, depending on the type of silicone joint. For strip seal joints, maximum expansion lengths may vary from 200 ft to 275 ft, depending on whether the bridge has steel or concrete girders. New Jersey specifies that the expansion length cannot exceed 70 ft if the skew is greater than 35° (New Jersey DOT 2016). Maximum Figure 7. Compression joint detail for a joint located over a sleeper slab (top image: Florida DOT 2019) and photograph of an armored compression joint from above (bottom image: Minnesota DOT 2019). The photographed joint has minor damage to the armor from snowplows.
22 Practices for Bridge Approach Systems skew angle limits for compression joints vary widely, from a maximum of 15° to a maximum of 30°. New York State DOT states that there is no restriction on skew angle for compression joints as long as they are armorless, but acknowledges that bridges with higher skew angles perform relatively poorly compared to those with lower skew angles (New York State DOT 2019). New York State has a strong preference for armorless joints because of the tendency of armored joints to leak not at the seal, but at the interfaces between the armor and the concrete. This results in corrosion of the steel and lift-out of the armor when the trapped water freezes. Maximum joint widths are typically 4 in. for both types of joints. A minimum joint width such as 1 in. might be specified for compression joints because of the requirement that they always remain in compression, which is not necessary for strip seal joints. Strip seal joints are generally permitted to be used when anticipated joint movements do not exceed 3 to 5 in. Many DOTs acknowledge that strip seals with a 5-in. capacity are available but note that they are difficult to install and perform relatively poorly and, as a result, only permit strip seals to be used for thermal movements up to 4 in. Compression joints have a lower thermal movement capacity and are generally only permitted for joint movements up to 1.5 to 3 in. The choice between strip seal joints and compression joints is a relatively polarized topic. There is no consensus on which type of joint is better, and DOTs generally try to use one as exclusively as possible as a result of poor experiences and performance of the other. For example, New Jersey (New Jersey DOT 2016) and Delaware (Delaware DOT 2019) strongly favor strip seal joints while New York State (New York State DOT 2019), Georgia (Georgia DOT 2019), and South Carolina (South Carolina DOT 2006) strongly prefer compression joints. 2.6.3 Modular Expansion Joints and Finger Joints Modular expansion joints, shown in Figure 8, and finger joints, shown in Figure 9, are used when large thermal movements are anticipated that exceed the capacities of strip seal joints and compression joints. Modular expansion joints are expensive and both of these joints present maintenance challenges. As a result, these joints are only used when alternative joints cannot accommodate the required movement, either as a result of large longitudinal movements or high skew angles and racking. Figure 8. Top view of a modular expansion joint (Source: Michigan DOT 2019).
Literature Review 23  Modular joints consist of a series of individual seals (called âcellsâ) clamped between steel center beams. The center beams are supported by short steel bars oriented parallel to the bridge/roadway, which are called support bars. The support bars rest on sliding bearings, which permit the cells to expand and contract with the bridge superstructure. The complexity of this system makes them expensive and difficult to maintain. Modular joints are susceptible to fatigue because they require bolted or welded connections between the center beams and the support bars. Finger joints consist of steel, cantilevered plates that extend across expansion joint openings. They are open joints and therefore require appropriate drainage systems. It is good practice to design a drainage trough underneath the joint, which may be concrete, stainless steel, or rubber fabric (Connecticut DOT 2003; New Hampshire DOT 2015; Ohio DOT 2004; Louisiana DOTD 2005; South Carolina DOT 2006; Kentucky TC n.d.; Delaware DOT 2019). New Hampshire specifies a minimum trough depth of 4 in., although 6 in. is desirable. Maine additionally uses a curtain system wherein water is permitted to free-fall onto a protected bridge seat while the girder ends are protected by neoprene curtains (Maine DOT 2003). Both systems require periodic cleaning to prevent debris buildup, and designers must provide adequate space for access. These types of joints are generally specified when the thermal movement is greater than 4 or 5 in. The maximum movement permitted for individual cells in modular expansion joints may be 2 or 3 in. These joints generally do not have limitations on skew angle. 2.6.4 Sleeper Slabs The expansion joints presented are not all suited for use at the roadway end of the approach slab. Modular joints may be required to be in front of the backwall, and finger joints are typically located at the abutment because of their drainage requirements, although Indiana DOT dis- cusses application of finger joints at the roadway end of the approach slab (Indiana DOT 2013b). Pressure relief joints are commonly located at the roadway end of the approach and on top of the sleeper slab, if one is present. Sleeper slabs help maintain good ride quality by mitigating rotation of the approach slab and by supporting the roadway end of the approach slab, as well as the joint between the approach Figure 9. Top view of a finger joint (Source: Michigan DOT 2019).
24 Practices for Bridge Approach Systems slab and the roadway pavement. Designs include buried rectangular beams, and inverted T-beams and L-beams that form part of the riding surface. The conditions under which sleeper slabs are required are not always well-defined. In general, sleeper slabs are used when the adjacent roadway is rigid and less used when the adjacent road- way is flexible. They are also commonly required when integral or semi-integral abutments are used. However, there are multiple exceptions to both of these rules. 2.6.5 Expansion Systems The manners in which the DOTs employ the various design options for approach system components vary widely and some examples are provided in this subsection to demonstrate. Figure 10 through Figure 12 show some of the expansion systems used by New York State DOT, Florida DOT, and Arizona DOT, respectively. The detail used by New York State DOT shows an inverted-T sleeper slab with one wing supporting the approach slab and the other supporting flexible pavement. A foam pressure-relief joint is present between the approach slab and the stem of the sleeper. For larger movements, more suitable joints, including modular joints, may be used instead. A bond breaker consisting of a 0.06-in.-thick compressed synthetic sheet is specified between the sleeper slab and the approach slab. The plan and section drawings from Florida DOT show that one approach system uses multiple sleeper slabs (called âsubslabsâ in the plan view) and expansion/compression joints between panels in the rigid roadway pavement instead of one sleeper at the end of the approach slab. Figure 10. Excerpt of section views of sleeper slab and expansion joint detail in one of the standard drawings from New York State DOT (Source: New York State DOT 2008).
Figure 11. Excerpt of views of approach and sleeper slabs and expansion joint detail in one of the standard drawings used by Florida DOT (Source: Florida DOT 2019). Figure 12. Excerpt showing sections of the roadway end of the approach slab from standard drawings used by Arizona DOT (Source: Arizona DOT 2007).
26 Practices for Bridge Approach Systems The details used by Arizona DOT show that a sleeper slab and foam pressure-relief joint are used when the roadway is made of rigid pavement, and a simple steel edge rail is used when the approach slab is adjacent to flexible pavement. A bond breaker consisting of hardboard and two layers of roofing paper is specified to be placed between the sleeper slab and the approach slab and pavement. 2.7 Wingwalls Wingwalls are retaining walls that laterally support the bridge approach embankment and fill. They are typically designed as cantilevered retaining walls but may also be designed as gravity or counterfort retaining walls depending on the required height and depth to rock. 2.7.1 Types of Wingwalls There are three primary types of wingwalls: (1) U-wingwalls, which are parallel to the bridge/roadway, (2) in-line wingwalls, which are perpendicular to the bridge/roadway, and (3) flared wingwalls, which are angled between the two other options. The type of wingwall selected depends on the type of abutment, the amount of right-of-way available, whether the site uses an embankment fill or a cut section, and/or whether or not the crossed feature is a waterway. When an integral or other flexible abutment is used, the wingwall is designed to minimize its resistance to abutment movement. Short wingwalls cantilevered horizontally off the abutment are commonly used, although there are different preferences regarding the ideal orientation of the wingwalls. Some DOTs such as Connecticut (Connecticut DOT 2003) and Indiana (Indiana DOT 2013b) require U-wingwalls while othersâsuch as New York State (New York State DOT 2019), Ohio (Ohio DOT 2004), and Michigan (Michigan DOT n.d.)âprefer in-line wingwalls. There is general agreement that large wingwalls, considered to have lengths greater than 10 to 15Â ft, are required to be independent of the abutment. This is achieved by constructing a vertical joint between the wingwall and the abutment and supporting the wingwall on its own piles or footing. However, some DOTs such as Maine (Maine DOT 2003) do not permit wingwalls of flexible integral abutments to have their own foundations or find this configuration unfavorable for integral abutments. An alternative to long wingwalls is a combination of short wingwalls that retain the fill close to the abutment and an MSE system that retains the fill toward the roadway side of the approach. MSE systems are used selectively, however, and pose potential conflicts with utilities and future construction. Additionally, increased maintenance requirements must be considered. For cantilevered abutments that are fixed, the wingwalls are typically supported on the same footing as the abutment, if applicable. Delaware discourages the use of horizontally cantilevered wingwalls with vertically cantilevered abutments because of the difficulty compacting under- lying fill beneath the wingwalls (Delaware DOT 2019). When right-of-way is limited, or a minimal footprint is desired to limit habitat encroachment and environmental impact, U-wingwalls are typically used. U-wingwalls are also well suited to fill sections while in-line wingwalls are suited to cut sections. In-line wingwalls and MSE systems are generally not permitted when the crossed feature is a waterway because they are susceptible to scour. Flared wingwalls are an economical alternative and considered on a case-by-case basis. They are often used when the site or bridge design is not suited to in-line wingwalls but full confinement of the embankment fill by U-wingwalls is unnecessary.
Literature Review 27  2.7.2 Wingwall-Approach Slab Configurations Wingwalls may be integral with translating abutments and approach slabs or independent of them. When independent U-wingwalls are used, a joint permitting relative movement between the wingwall and the approach is required. This joint can be difficult to seal and affects the approach systemâs susceptibility to erosion and associated performance issues and as such is an important part of the system. Many DOTs, such as New York State (New York State DOT 2019), Delaware (Delaware DOT 2019), and North Carolina (North Carolina DOT n.d.), use full-width approach slabs that end directly adjacent to the curb, gutterline, or the wingwall when U-wingwalls are used with an integral abutment. A 2-in. joint with a preformed resilient filler may be specified between the wingwall and the slab. New York State stresses that this width is required to prevent misalign- ment of the slab and wingwall from causing binding, wherein two elements rub against each other and the frictional forces result in damage to the elements (New York State DOT 2019). Alternatively, the joint may be located between the curb and traffic barrier and the wingwall such that water runoff from the approach slab does not have access to the joint. An example of this detail from Florida is shown in Figure 13 (Florida DOT 2017). Instead of a vertical joint, some DOTs extend the approach slab over the wingwalls and use a horizontal joint. Delaware specifies a 1-in.-thick preformed cellular-polystyrene filler to maintain separation between the approach slab and the wingwalls (Delaware DOT 2019). Florida also sometimes uses this configuration, as shown in Figure 14 (Florida DOT 2017). 2.8 Backfill The embankment fill and backfill support the roadway and approach slabs. However, the backfill is additionally designed to minimize soil and hydrostatic pressure on the abutment and wingwalls. Backfill is susceptible to settlement, typically as a result of incomplete compaction Figure 13. View for slab-wingwall configuration with vertical joint used by Florida DOT (2017).
28 Practices for Bridge Approach Systems and/or moisture content at placement, and erosion, both of which cause loss of support to the approach slabs. Occasionally, an elastic inclusion, such as a cellular material on the order of an inch thick, may be present between the backfill and the abutment to accommodate cyclic thermal movements of the abutment. 2.8.1 Backfill Materials Backfill materials are typically select granular borrow or soil. Some DOTs, such as Pennsylvania (Pennsylvania DOT 2019), Florida (Florida DOT 2020), and New Mexico (New Mexico DOT 2019), specify the use of AASHTO No. 57, No. 67, or No. 89 coarse aggregate or AASHTO Class A-3 or Class A-1-a soils, and a few permit open-graded subbase material to be used as backfill. These materials are intended to be cohesionless and generally have a maximum fines content, defined as the percentage passing a No. 200 sieve, and a maximum plasticity index specified. Maximum fines contents can vary from 5% to 25% and a maximum plasticity index between 5 and 10 is typical (Vennapusa et al. 2015). Backfill materials may be subject to additional requirements, such as maximum chloride, sulfate, and organic contents, that define how aggressive the soil is relative to corrosion of steel piles and other metallic components such as metal reinforcement in MSE systems, or an internal angle of friction, which helps define stability of the backfill. Some DOTs such as New Mexico (New Mexico DOT 2019) explicitly prohibit the use of recycled asphalt pavement or recycled asphalt shingles in backfill. These materials tend to permit the fill to creep, resulting in long-term settlement and displacement. Delaware does not permit flowable fill or large stone fill to be used as backfill, while Indiana typically uses removable flow- able backfill behind integral abutments belonging to RC slab bridges (Vennapusa et al. 2015). The boundaries of the backfilled area differ from agency to agency. Some specify a vertical layer of backfill on the order of several feet thick directly behind the abutment. The backfill commonly Figure 14. View of slab-wingwall configuration with horizontal joint used by Florida DOT (2017).
Literature Review 29  extends to the top of the piles or the top or bottom of the footing and may run up to the approach slab or, in some cases, a subbase supporting the approach slabs. If a subbase does not support the approach, the backfill material may be extended in a horizontal layer to the roadway end. Alter- natively, the backfill may slope up toward the roadway end of the approach. Several DOTs such as Ohio (Ohio DOT 2004) specify that the backfill is to be bounded by or wrapped in a geotextile filter fabric, which is intended to permit water infiltration and protect the backfill from erosion. 2.8.2 Geosynthetic Materials in Backfill The most common geosynthetic reinforcement used in bridge approach systems is geotextiles. Geotextiles are comprised of polymer fibers or filaments that may be woven together using traditional methods or bonded together by needle punching, in which barbed needles mechani- cally lock the fibers, or melting (Zornberg and Christopher 2007). They can serve a variety of purposes, including the following: ⢠Separation of Different Materials. Some DOTs such as Ohio and Louisiana apply a geo- textile fabric around the backfill material such that it is separated from the embankment and subsoils (Ohio DOT 2004; Louisiana DOTD 2017). This is particularly useful when the under- lying embankment and subsoils are fine clays, which may not support the aggregate backfill adequately or may contaminate the backfill (Zornberg and Christopher 2007). ⢠Reinforcement of the Soil. When used as reinforcement in MSE systems, geotextiles provide tensile strength to the soil mass. This increases the internal stability of the soil and permits steeper slopes, or even vertical earth walls, to be constructed which decreases the footprint of the embankment or backfill. This is particularly useful when there is limited right-of-way. Geogrids, which use similar materials as geotextiles but are constructed slightly differently such that they are more rigid and permit more direct interaction between the layers of soil, are also commonly used as reinforcement for soils (Zornberg and Christopher 2007). ⢠Erosion Control. Geotextile filter fabrics permit water to pass through them while retaining fine soil particles. Fines retention is critical to preventing erosion, but over time can clog the filter fabric and slowly turn it impermeable to water. ⢠Drainage Facilitation. Certain geotextiles are designed to transport liquid within their plane, which facilitates drainage of the surrounding soils or backfill. This is more typically a secondary benefit of geotextiles in bridge approach systems, as geocomposites are much more efficient than geotextiles for this function. Geocomposite drains and their role as part of the subsurface drainage system for bridge approaches are discussed in Section 2.9.2, Geocomposite Drains. 2.8.3 Backfill Construction Quality construction of the backfill is a key concern and restrictions on lift thickness, specified compaction and moisture content during placement, and QA/QC procedures are used. Lifts are typically restricted to a maximum thickness of 4 to 10 in. to support proper compaction efforts. Specified densities are often 90% of the dry density of the fill or greater and may vary depending on the location of the backfill. For example, a density equal to 100% of the dry density may be required at locations adjacent to the abutment while 95% may be sufficient for volumes away from the abutment. Some DOTs such as Texas (Texas DOT 2014) do not specify a value and instead require a certain number of passes with compaction equipment or state compaction must be to the satisfaction of the engineer. In rare instances, compaction may not be allowed. West Virginia specifies that loose, noncompacted backfill be used behind integral abutments with a thermal movement greater than 0.5 in. to minimize pressure on the abutment and wingwalls (West Virginia DOT 2004).
30 Practices for Bridge Approach Systems Moisture content must be controlled to ensure adequate compaction. DOTs generally specify that the fill is to be brought near the optimum moisture content during placement, although some permit the contractor to use the best moisture content for compaction based on their experience. One concern regarding moisture content is the occurrence of bulking, wherein the material expands as a result of the interactions between the soil particles and limited amounts of water. Bulking commonly occurs at moisture contents between 3% and 7% for granular materials and can result in collapse of the backfill after placement when the backfill undergoes saturated conditions (White et al. 2005). This may be prevented by measuring the bulk moisture content or by installing the backfill at a moisture content greater than the optimum moisture content; however, only a few agencies specify the latter (Vennapusa et al. 2015). To ensure compaction and moisture content requirements are met, approximately 30% of the state DOTs implement QA/QC procedures for measuring at least one of these properties on the field (Vennapusa et al. 2015). In situ density is most commonly evaluated using nuclear gages in accordance with AASHTO T 310, Standard Method of Test for In-Place Density and Moisture Content of Soil and SoilâAggregate by Nuclear Methods (Shallow Depth) (AASHTO Technical Subcommittee 1b 2019), although in-place deflection density and dynamic cone penetro meter are also used. DOTs generally do not require QA/QC testing of the lift thickness. 2.9 Subsurface Drainage Systems The backfill material is selected to permit water to drain freely; however, subsurface drainage systems are commonly used to prevent large hydrostatic pressures on the abutment and wing- walls. These systems may consist of weep holes in the abutment and wingwalls, underdrains at the base of the abutment or backfill, and vertical geocomposite drains behind the abutment. 2.9.1 Weep Holes Versus Underdrains Weep holes are drains that run through the stems of abutments and wingwalls to release water collected from the fill at the front faces of these elements. They may be extended through the retained fills, and examples of slopes include rise-to-run ratios of 1:8 and 1:12. Spacings between 8 ft and 12 ft are common, although some DOTs specify higher maximum spacings, such as 25 ft. The drainpipe diameter is commonly 4 in. Underdrains run parallel to abutment backwalls and retaining walls and their outlets are commonly located in or under wingwalls. These drains are typically perforated and 6 in. in diameter, although smaller diameters are used as well. The drains are generally embedded in a free-draining coarse aggregate and the assembly is wrapped in a filter fabric or sock. They are typically located at the bottom of the backfill, at the bottom of the abutment or footing, or underneath the sleeper slab and, in some instances, a relatively impermeable layer may be placed underneath the drain. Underdrains may have slopes of about 1% or 2%. The type of drainage system chosen often depends on the abutment features and the site. Underdrains are generally used with integral or semi-integral abutments while weep holes are used with nonintegral and cantilevered abutments. Weep holes are preferred when the approach is a dry fill section while underdrains are appropriate for wet, cut sections. Sometimes weep holes are required depending on the abutment height; New York State (New York State DOT 2019) requires weep holes for integral abutments greater than 10 ft in height and Rhode Island (Rhode Island DOT 2007) requires weep holes for nonintegral abutments greater than 6 ft in height. As a result of concerns that free-falling water from weep holes might pond on side- walks, roadways, and other surfaces and result in safety hazards, particularly if the ponded water freezes, underdrains are commonly used when the retaining wall is partly or fully adjacent
Literature Review 31Â Â to a sidewalk. Sometimes the decision is made based on which scenario calls for the shortest amount of pipe. 2.9.2 Geocomposite Drains While vertical drains behind the abutment can improve drainage significantly, geocomposite drains are uncommon and only used by a few DOTs, such as Pennsylvania and Louisiana (Pennsylvania DOT 2019; Louisiana DOTD 2005). Geocomposite drains are made of a semi- rigid plastic core that conducts water down to a drainage pipe, such as an underdrain, and a geotextile fabric that separates the core from the backfill and protects the system from soil infiltration. Geocomposite drains are formed as panels or sheets and must be designed to resist the soil pressures exerted on the abutment by the retained fill. 2.9.3 Additional System Components Some DOTs employ unique measures to ensure the retained fills are adequately drained. Pennsylvania (Pennsylvania DOT 2019) uses wick drains and sand or gravel drains, which are vertical drains typically used for ground improvement. Sand or gravel drains are simply columns of aggregates while wick drains, a more modern technique, are similar to geocomposite drains except they are manufactured with cylindrical cores rather than in sheets. These drains are installed to provide a path for water to escape from the subsoil and encourage faster consolidation. These drains are generally not considered part of the subsurface drainage system but provide some benefit in conducting water away from the fill. While most DOTs use either weep holes or underdrains, Maine considers a combination of French drains and weep holes for the drainage system behind abutments (Maine DOT 2003). French drains are drainage pipes located at the bottom of a volume of coarse aggregate with the perforations on the underside of the pipe. In this case, they may be considered a type of under- drain. Maine additionally stresses the need to manage drainage of the approach slab subbase, and the subbase is to open to daylight above the gutter line or contain an underdrain if the first option is not feasible. Florida uses designs that seal off the fill from water infiltration as completely as possible to avoid running water through or adjacent to retaining walls (Florida DOT 2020). In comparison, New Hampshire requires drainage pipes at the paving corbel if an expansion joint is located between the backwall and the approach (New Hampshire DOT 2015). MSE systems often have robust drainage systems because of potential erosion of the soil and corrosion of the reinforcement within the reinforced soil mass if steel is used. In addition to the use of an underdrain, an impervious membrane is commonly placed between the roadway or subbase and the topmost layer of reinforcement. Some DOTs specify that water must be released or retained a set distance from the MSE system. For example, Michigan requires that water be released at least 3Â ft from any reinforcement (Michigan DOT n.d.). Finally, many DOTs require joints in the substructure to be protected from water ingress, particularly expansion joints. This is especially critical for semi-integral abutments, which rely on a horizontal expansion joint to act as a bearing. An impervious membrane such as a neoprene sheet may be placed over the joint, or waterstops may be installed. 2.10 Surface Drainage Systems Surface drainage systems consisting of exposed drainage features such as inlets and gutters are sometimes used to capture and redirect runoff from the bridge and approach. Some DOTs stress preventing water from flowing from the approach to the bridge or vice versa. This is because
32 Practices for Bridge Approach Systems bridge deck drains are not typically designed to accommodate additional runoff from the highway approach and to reduce joint leakage. Other DOTs such as Maine (Maine DOT 2003) and Michigan (Michigan DOT n.d.) prefer all bridge drainage to be carried to and handled by the drainage structures of the approach. Surface drainage systems may use gutters, flumes, and inlets with catch basins. Gutters are shallow depressions that run adjacent to a curbless roadway and may be made of concrete or lined with stones. Flumes are channels used to transport water down slopes. In these features, the runoff is exposed. Alternatively, a closed system using an inlet with a catch basin may be used to capture and transport runoff to the highway drainage system or to an outlet. The features selected depend on the DOTâs preference toward open or closed systems and the siteâs suitability to each system. Closed systems may be required as a result of ⢠High water volumes, ⢠Water quality requirements for the runoff, ⢠Potential erosion of the embankment slope, ⢠Proximity to soil reinforcement, ⢠Traffic barrier requirements, ⢠Limited right-of-way, or ⢠Presence of underlying travel lanes. The location of the drains selected varies. Some DOTs prefer to place bridge end drains at both ends of the bridge while others only require end drains at the low-grade end of the bridge. End drains at the high-grade end of the bridge may only be required if water is expected to flow onto the bridge from the approach pavement. Inlets and catch basins may be required immediately off the end of the bridge, or may be required to be a minimum distance from the approach slab. Several DOTs, including New Jersey (New Jersey DOT 2016) and Florida (Florida DOT 2020), prefer no inlets be placed on the approach slabs. Florida avoids placing inlets in the slab because water can leak through the interface between the inlet and the slab. 2.11 Inspection of Bridge Approach Systems Bridge approach systems are evaluated immediately after construction and then are generally inspected biennially with the bridge for the remainder of their life to verify they are performing adequately. As-built condition requirements of the approach slabs and pavements and QA/QC requirements of the backfill were discussed in Section 2.4.3, Acceptable Surface Smoothness, and Section 2.8.3, Backfill Construction, respectively. This section focuses on inspection of the bridge approach system during its operation and discusses inspection policies and condition ratings. 2.11.1 Federal Inspection Requirements State bridge inspection programs are subject to the National Bridge Inspection Standards (NBIS) described by Code of Federal Regulations, Part 650. The NBIS requires bridge inspections to be carried out and reported at least biennially, although longer inspection intervals can be approved. Inspection results are reported via the Structural Inventory and Appraisal (SIA) sheet, which is coded as detailed by the FHWA Recording and Coding Guide for the Structure Inventory and Appraisal of the Nationâs Bridges (FHWA 1995). Since the NBIS was signed into law in 1968, DOTs have been required to provide the following information pertaining to bridge approaches: ⢠Structure Type, Approach Spans (SIA Item 44). Options for this item are the same as the options listed for identifying the structure type of the bridge deck and include Slab (Code 01)
Literature Review 33  and Other (Code 00). Neither precast, prestressed concrete pavement (PCCP) nor asphaltic concrete pavements are explicitly listed as options, although a PCCP may be considered an approach slab. ⢠Number of Approach Spans (SIA Item 46). The number of approach spans or the number of spans that use a different material than the main spans of the bridge is to be reported. ⢠Approach Roadway Alignment (SIA Item 72). This is a qualitative, indirect measure of ride quality. The alignment is rated on a scale from 0 (worst) to 9 (best); the interpretation for the individual ratings as defined by the FHWA Recording and Coding Guide is provided in Table 1. The guide recommends a rating of 3 or less if the horizontal or vertical curvature requires motorists to slow down substantially beneath the posted speed, a rating of 6 if minor speed reduction is required, and a rating of 8 if no reduction in speed is required. Since 2014, DOTs have also been required to conduct and report element-level inspection data to the federal government for all bridges on the National Highway System. National-level guidance for element-level inspection is provided by the AASHTO Manual for Bridge Element Inspection (AASHTO Committee on Bridges and Structures 2019), referred to as the AASHTO MBEI, which classifies elements as National Bridge Elements (NBEs), Bridge Management Elements (BMEs), and Agency Developed Elements (ADEs). NBEs are primary structural components of the bridge and the definitions for their element-level condition ratings are standardized across all agencies. BMEs are elements that are commonly managed by bridge agencies, and the AASHTO MBEI provides recommended definitions for condition ratings that can be modified as needed by the state DOTs and other bridge management agencies. ADEs are intended to provide a reporting platform for elements that are unique to specific agenciesâ practices. BMEs and ADEs are intended to accommodate the diverse bridge designs and management practices used across DOTs. The elements within bridge approach systems that are considered NBEs by the AASHTO MBEI include abutments and foundation elements. Monolithic or integral wingwalls are considered part of the abutment elements up to the first joint; otherwise, wingwalls are omitted from the AASHTO MBEI. Rating Description N Not applicable 9 Superior to present desirable criteria 8 Equal to present desirable criteria 7 Better than present minimum criteria 6 Equal to present minimum criteria 5 Somewhat better than minimum adequacy to tolerate being left in place as is 4 Meets minimum tolerable limits to be left in place as is 3 Basically intolerable requiring high priority of corrective action 2 Basically intolerable requiring high priority of replacement 1 This value of rating code not used 0 Bridge closed Source: FHWA Recording and Coding Guide for the Structure Inventory and Appraisal of the Nation's Bridges (1995). Table 1. Definitions of appraisal ratings used by NBI on 0 to 9 scale.
34 Practices for Bridge Approach Systems BMEs within the bridge approach system include approach slabs, wearing surfaces, and joints. Backfill and embankment material, sleeper slabs, and components of drainage systems such as inlets and underdrains are not discussed in the AASHTO MBEI. The AASHTO MBEI provides a four-level-condition state rating system consisting of CS1 (Good), CS2 (Fair), CS3 (Poor), and CS4 (Severe) for element-level inspection. Definitions of CS1 through CS4 are provided for different types of defects, which are categorized based on material type. For example, an image of the defects listed for RC and the definitions for their condition states are provided in Table 2. Types of defects listed for joints include leakage; seal adhesion, damage, or cracking; debris impaction; metal deterioration or damage; and damage to the adjacent deck or header. No standardized defect types are identified for approach slabs, although the types of defects listed for concrete decks would apply. The AASHTO MBEI considers general settlement of RC, prestressed concrete, timber, and masonry elements, but does not discuss differential settlement, void formation under approach slabs, or lateral Table 2. Defects listed for RC according to the AASHTO Manual for Bridge Element Inspection (2019).
Literature Review 35  spreading, which are discussed in greater detail in Section 2.12, Performance Issues and Miti- gation Strategies. 2.11.2 State DOT Inspection Requirements State DOTs commonly publish their own bridge inspection manuals, which identify how state policy deviates from the AASHTO MBEI. Because some approach elements are not standard- ized NBEs, state policies regarding inspection of approach systems vary widely. For example, New York State DOT does not include any additional elements relating to the approach system in their inspection and states that sleeper slabs are to be excluded in the inspection if they are present. In contrast, the Michigan and Pennsylvania DOTs distinguish between concrete approach slabs and asphaltic concrete-approach pavements, and Michigan additionally identi- fies approach slopes as elements to be inspected. The Ohio and Michigan DOTs provide defini- tions of CS1 through CS4 for the approach elements to be inspected, rather than defining CS1 through CS4 ratings for types of defects. As an example, the rating system Michigan provides for concrete approaches is shown in Figure 15. The New York State, Ohio, and Michigan DOTs all instruct inspectors to comment on signs of settlement, drainage issues, or erosion during visual National Bridge Inventory (NBI) inspections. 2.12 Performance Issues and Mitigation Strategies There are several issues that can compromise the performance of approach slabs and systems and cause poor ride quality across the approach. These issues can occur to any of the compo- nents of the bridge approach system, and the root causes and mechanisms have been studied in a large number of state- and federally funded research projects, some of which are summarized in the following discussion. Based on the findings of these studies, state DOTs have made changes and modifications to their designs and construction practices to mitigate the occurrence of common issues. Poor ride quality of an approach may be caused by a vertical discontinuity, or bump, at either end of the approach slab or pavement or by a rough slab or pavement surface. The latter is typi- cally preventable by specifying the construction acceptance criteria discussed in Section 2.4.3, Acceptable Ride Smoothness, and is generally not a concern. However, bumps across joints are common and can be caused by a variety of mechanisms. Figure 16 shows a bump at a bridge with a concrete approach and Figure 17 shows a bump at a bridge with an asphalt approach and an armored expansion joint. Bumps are undesirable not only because they compromise ride quality, but also because they can be hazardous to motorists, cause damage Figure 15. Guidelines for rating of concrete approaches, as shown in Table 5.20.01 of the Michigan DOT Bridge and Structure Inspection Program Manual (2019).
36 Practices for Bridge Approach Systems Figure 16. Bump between a concrete approach slab and bridge deck (Source: White et al. 2005). Figure 17. Bump between a bituminous approach roadway and a concrete bridge deck (Source: Minnesota DOT 2019). to vehicles and increase impact damage to bridges, and are costly to repair and maintain (Wahls 1990; ElBatanouny et al. 2018). 2.12.1 Settlement and Erosion One of the most common issues that can cause formation of a bump is settlement of the backfill, which causes subsequent settlement and cracking of the approach slab. This relationship
Literature Review 37  was realized in earlier studies that recommended some strategies for preventing bumps, including the following (Briaud et al. 1997; Wahls 1990): ⢠Improving the foundation soil, most commonly by preloading; ⢠Using backfills that are easily compacted, erosion-resistant, and elastic and that have limited amounts of fines; ⢠Including reinforcement and compressible and collapsible materials in embankments; ⢠Using footings or other shallow foundations instead of piles for the abutment; and ⢠Designing good surface and subsurface drainage. In a literature review by White et al. (2005), it was found that integral abutments are more widely used than nonintegral abutments because they eliminate the joint at the end of the bridge, making them more cost-effective and less susceptible to deterioration (Horvath 2000; Hoppe and Gomez 1996). However, integral abutments move with the cyclic temperature movement of the bridge deck, which can lead to void development at the abutmentâbackfill interface and differential settlement between the bridge and the approach slab (Arsoy et al. 1999). The voids make the embankment behind the abutment more susceptible to erosion and settlement, encouraging approach slab settlement and the formation of a bump. Similar observations were made by Luna et al. (2004) in a study funded by the Missouri DOT to identify failure of bridge approach slabs supported on abutments. The study by Luna et al. (2004) included studying 185 bridges and attributed the approach-slab-movement mechanisms to settlement and void creation below the approach slab system as a result of inferior embankment fill. This can occur if the backfill consists of poorly compacted materials or if drainage problems exist. Lenke (2006) also attributed formation of bumps to insufficient investigation of foundation behavior and construction practices, which caused unexpected embankment settlement. The study recom- mended that New Mexico DOT use a higher-quality backfill with less than 20% passing the No. 200 sieve in areas within 100 ft of the abutment. Problems with backfill material settlement in Colorado and their effect on the approach slab were also studied by Abu-Hejleh et al. (2006). The study investigated the performance of alternatives for the abutment backfill that have been used by Colorado DOT since 1992, including relatively expensive flowfill, MSE, and MSE with free drainage. At the time of the study, the authors noted that significant approach settlement problems were still being reported. The study indicated that bridges constructed after 1993 were performing well and most of the problems were occurring at bridges designed before 1994. Continuous expansion of MSE was noticed, especially at integral abutments. Compressible polystyrene sheets present behind the abutment were found to be able to accommodate the thermal expansion movement. The study recommended that high-quality backfill be used below the sleeper slabs and that the length of the approach slab should be related to the long-term settlement of the sleeper slab. Use of asphalt approach in situations where significant settlement is expected was also recommended, with the expectation that regular maintenance with asphalt overlays will be needed. Finally, the study recommended more rigorous specifications for compaction of the abutment and embankment fill as well as the flowfill. Erosion of backfill material, shown in Figure 18, is also a common issue and can exacerbate the settlement of approach slabs. In a recent study for Iowa DOT (ElBatanouny et al. 2018), ground-penetrating radar (GPR) was used to assess voiding conditions under the approach slabs of four bridges. It was found that, for the three integral abutment bridges investi- gated, deep voids up to 6 in. in depth and 13 ft in length (near the parapets) were detected by the GPR and confirmed using concrete cores and snake camera assessment. The voids were attributed to typical settlement of the backfill and cyclic temperature movement of the abutment. Evidence of water infiltration at the joint between the barrier (parapet wall) and
38 Practices for Bridge Approach Systems the approach slab was also observed, which likely resulted in erosion and a longer length of voids observed at the parapets compared to the centerline of the approach. It is noted that even though significant voids were detected, the performance of the reinforced approach- slabs system was deemed satisfactory as no cracking or significant settlement was detected as a result of the presence of the voids. This favorable performance was attributed to the robust design of the approach slab, which consists of a doubly reinforced 12-in.-deep slab section. Sleeper slabs are used by numerous DOTs to support the approach slab and roadway pave- ment and their connection. These systems are primarily used to prevent settlement or rotation of the far end of the approach slab, which can cause the bump to move further away from the bridge (Ng et al. 2014). In a study by Seo et al. (2002), a numerical analysis of approach slab design in Texas was completed and the results indicated that settlement of the sleeper slab decreases with increase in the length and support of the slab. 2.12.2 Failure of Joints In general, numerous studies indicated that joint failure, as a result of loss or deterioration of joint material as shown in Figure 19, is a common issue in bridge approach systems (Phares et al. 2011; ElBatanouny et al. 2018). Typical mitigation practices included following joint material manufacturer recommendations when determining the width of the joint or repair by cleaning joints and replacing compressible joint-fill material and strip seals to prevent water from getting under the slab (Phares et al. 2011). 2.12.3 Failure of Paving Corbel Failure of the paving corbel (Figure 20) was also historically noted as a reason for settlement and formation of bumps at the approach slabs. The recent survey by Ng et al. (2014) indicated that this is one of the least common causes of approach slab settlement. This could be attributed to revisions in the design of corbels. Note that corbel failure almost guarantees the formation of significant settlement at the end of the bridge as it usually is the main support for the approach slab when settlement of the adjacent backfill occurs. Figure 18. Photograph of severe erosion under approach caused by missing pressure-relief joint material (Source: Michigan DOT 2019).
Literature Review 39  2.12.4 Lateral Spreading Lateral spreading is a relatively uncommon problem and is expensive to correct when it occurs. Lateral spreading is defined as horizontal displacement of the abutment caused by hori- zontal movement of the soil and can be on the order of a few inches to tens of feet (Youd 1993). The abutment typically displaces toward the bridge and down the embankment slope or toward a free face, although abutment displacement away from the bridge was recorded in one instance (Turan et al. 2013). This phenomenon is most commonly associated with seismic loading, and the majority of case studies concerning this performance issue are related to liquefaction- induced lateral spreading. Images of seismic-induced lateral spreading damage are shown in Figure 21 and Figure 22. Bridges crossing waterways or with foundations on floodplains are at greater risk of experiencing liquefaction-induced lateral spreading. However, lateral spread- ing may also occur as a result of consolidation and settlement of subsoils after construction, which exert downdrag and lateral forces on foundations (Turan et al. 2013). In either case, large shear forces develop in connections and superstructures experience large compressive forces (tensile forces if abutments displace away from the bridge), which can result in connection Figure 19. Failed sealant and leakage of a modular expansion joint (Source: New York State DOT 2017). Paving notch Shear failure of the paving notch Figure 20. Photograph of shear failure in paving notch from White et al. (2005).
40 Practices for Bridge Approach Systems failure, buckling of the deck, and tilt of the abutments (Youd 1993). Liquefaction-induced lateral spreading is generally sudden and may require expensive rehabilitation or even replacement of the bridge or its components if the damage is severe enough. In comparison, in a case example by Turan et al. in Ontario (2013), lateral spreading caused by postconstruction consolidation of subsoils was accommodated in the short term by repositioning the bearings approximately 4 years after construction, and then again approximately 3 years after the first repositioning. Lateral spreading is best mitigated by using a robust design capable of withstanding large lateral forces and construction practices to prevent postconstruction soil displacement. For liquefaction-induced lateral spreading, foundations with enhanced structural capacity are typically preferred, although ground improvement methods may be considered instead (Caltrans 2017). Regarding consolidation-induced lateral spreading, preloading and surcharging of the embank- ment fill to encourage higher preconstruction settlements, use of lightweight embankment fill materials to decrease total settlement of the underlying subsoil, and use of wick drains to expe- dite pore water-pressure dissipation have been used effectively, and aggregate pier-supported approach embankments are under investigation (Turan et al. 2013). Figure 22. Lateral spreading of approach embankment belonging to one of the bridges crossing the Raqui River, identified as Raqui 2 (Source: Yen et al. 2011). Figure 21. Lateral spreading and settlement of abutment fill at northeast approach of Mataquito River Bridge (1 m = 39.4 in.) (Source: Yen et al. 2011).
