


Below is the uncorrected machine-read text of this chapter, intended to provide our own search engines and external engines with highly rich, chapter-representative searchable text of each book. Because it is UNCORRECTED material, please consider the following text as a useful but insufficient proxy for the authoritative book pages.
251 A A P P E N D I X A Geotechnical Instrumentation A.1 Purpose of Geotechnical Instrumentation Geotechnical instruments can be used in transportation projects before, during, and after construction and can play an important role in providing real-time or near real-time information on the health and serviceability of transportation infrastructure. Such information can be used to monitor the behavior or performance of structures and can be incorporated into an early warning system. This appendix contains information regarding geotechnical instrumentation that will help geoprofessionals evaluate the potential effectiveness of an instrumentation program. The information included is intended to assist geoprofessionals with the following: 1. Identifying potential failure mechanisms where an instrumentation plan may add significant value 2. Understanding the instruments that can be used to measure load, deformation, pore pressure, and vibration 3. Making a preliminary design of an instrumentation system, including the selection of the appropriate instruments and data collection system 4. Evaluating, presenting, and managing the data obtained from the instruments Detailed information regarding the types of geotechnical instruments and their specific applications to transportation projects is available in many documents and books (e.g., Bartholomew et al. 1987, Bartholomew and Haverland 1987, Dunnicliff 1993 and 2012, Florida DOT 2000, FHWA 1998, Marr 2013, Montana DOT 2008, New York State DOT 2013, USACE 1987, USACE 1995, and USACE 2011). A.2 Potential Failure Mechanisms Geotechnical structures can fail to perform as planned via several potential failure mechanisms. Foundations can experience excessive total or differential settlement. Embankments and rock slopes can experience slope instability caused by precipitation or excessive loading. Retaining walls can fail due to the development of excessive earth pressure or hydrostatic pressure behind the wall. Excavations can fail due to insufficient bracing, or excessive earth or pore pressures. Additional discussion of the applications of geotechnical instrumentation is provided in Appendix B. Monitoring key parameters (e.g., deformation, pore pressure, earth pressure, load, vibration) can provide decision makers with information needed to take proactive actions to mitigate the potential failure or reduce the consequences of failure. Therefore, when designing an instrumentation plan, the engineer must identify which parameters are critical to the anticipated failure mechanism and select the appropriate instruments to monitor those parameters. A.3 Instrumentation Geotechnical instrumentation is the process of designing and installing various mechanical, electrical, hydraulic, pneumatic, and optical devices to actively or passively monitor and record parameters associated
252 with the performance of geotechnical structures. This section describes basic types of instruments and how they can be used to measure the parameters identified above. A.3.1 Terminology Discussion on geotechnical instrumentation necessitates defining several technical terms. Some of these terms may have different meanings outside the field of geotechnical instrumentation: ⢠Range or Full Scale: The range of an instrument is defined as the highest and lowest readings an instrument can record without permanent damage to the instrument. A range is sometimes called a full scale. An example of a range is a piezometer that is capable of detecting pressures from 0 to 50 pounds per square inch (psi). ⢠Resolution: The resolution (or sensitivity) of an instrument is the smallest change in a geotechnical parameter that a sensor can detect. The resolution can be expressed in absolute terms (e.g., 0.05 psi of pore pressure) or as a percentage of the range (e.g., 0.025 percent of full scale). The resolution of an instrument is related to the resolution of the sensor itself and the resolution of data acquisition or display system. ⢠Accuracy: The accuracy of an instrument is the closeness of the measurement to the actual value. The resolution is distinct from the accuracy of a reading. The accuracy is usually expressed as a plus-minus value (e.g., ±0.1 psi, ±1 percent of reading, ±1 percent of full scale). The instrument accuracy is commonly set by a calibration method by the manufacturer. ⢠Precision: The precision of an instrument is how much the range of repeated readings will differ from the mean of those readings. The precision is usually expressed as a plus-minus value (e.g., ±0.1 psi, ±1 percent of reading, ±1 percent of full scale). Note that precision and accuracy are not related; one instrument can be more precise (less variation in measurement) but less accurate than another instrument. ⢠Stability: The stability of an instrument is the error in measurements of identical parameter values over time, due to degradation or damage to the instrument. The stability of an instrument is usually expressed as a maximum time period or number of readings for which an instrument can be used before it is considered unreliable and must be recalibrated or replaced. A.3.2 Measurement of Deformation Soil is a deformable material that can deform both vertically (settlement, heave) and laterally. There are many types of instruments that can measure ground deformation. Table A-1 provides the attributes of some of the common instruments used to measure deformation. Accuracy of measurements for these instruments depends on the proper installation and monitoring, in addition to accuracy of instrument itself.
253 Table A-1. Attributes of several instruments available for measuring deformation Instrument Application Advantages Disadvantages Comments Settlement Plate and Survey Marker Measures the settlement of soft ground under embankments Relatively inexpensive Requires regular visits by a surveyor, automation process is expensive, accuracy depends on the operator, and equipment is susceptible to damage by construction equipment. Useful when anticipated settlement is large (feet). A grid of settlement plates can monitor differential settlement over an area. Settlement Cell Measures the settlement of soft ground under an embankment Can be automated Accuracy depends on the durability of the equipment used and is susceptible to leaks. A grid of settlement cells can monitor differential settlement over an area. Used for large settlements (feet). Single Point Extensometer Measures ground settlement relative to an anchor point below ground Has high resolution, can be automated The range of measurement is small. Used for small settlements (inches). Multipoint Extensometer Measures settlement at multiple depths in one borehole Has high resolution, can be automated The range of measurement is small. Used when distribution of settlement with depth is needed. Manual Inclinometers Measures inclination and lateral deformation Has high resolution Requires regular visits by field staff and equipment is susceptible to damage by construction equipment. Cost effective when a small number of readings are needed. In-Place Inclinometers Measures inclination and lateral deformation Has high resolution, accuracy not subject to operator error, can be automated, can sustain large deformations before needing replacement Cost of instruments is high for short-term construction monitoring. Cost effective when frequent readings are needed over a longer duration.
254 Instrument Application Advantages Disadvantages Comments Horizontal Inclinometers and Settlement Profilers Measures settlement or heave Relatively inexpensive and can acquire large amount of data Potential for leaks if hydraulic system is used, potential collapse of the casing under embankment load (durability). Two types: (1) pressure sensor based, and (2) accelerometer based. Good for monitoring differential settlements across an embankment. Tiltmeters (can be made with either MEMS or accelerometers) Measures inclination over time at a fixed location (e.g., used to monitor the inclination of retaining wall or bridge abutment) Can be automated Unsuitable for areas prone to electrical interferences, such as lightning. Can be customized for range and resolution by selection of sensors, MEMS have small range but high sensitivity, accelerometers have large range but low sensitivity. Crackmeters Measures change in position between two fixed points along one axis, used to monitor crack movements Generally inexpensive, can be automated Unsuitable for areas prone to electrical interferences, such as lightning. Can include crosshairs and a grid for manual monitoring or electronic sensor for automated monitoring. Strain Gauges Measures strain on surface of a structure (e.g., piles, tunnels) Not susceptible to electrical interference or temperature swings, easily automated Requires a deliberate installation and protection during construction. Can be made with vibrating wire sensors, however vibrating wire strain gauges are susceptible to electrical interferences. Time Domain Reflectometry Measures slope deformation in narrow shear planes (few inches wide) More cost effective than traversing or in-place inclinometer. Limited use because it is only applicable to narrow shear planes. Not frequently used due their limitations. Source: Geosyntec Consultants Note: MEMS: Microelectromechanical systems A.3.3 Measurement of Pore Pressure Instruments commonly used to measure pore pressure are open standpipe or vibrating wire piezometers, as described in Chapter 7. A.3.4 Measurement of Load and Earth Pressure Some of the common types of instruments used to measure load and pressure include (i) pressure cells, (ii) load cells, and (iii) Osterberg cells. Table A-2 provides a summary of the attributes of several
255 instruments available to measure loads and pressures. In addition to the instruments listed in Table A-2, strain gauges attached to the soil reinforcement elements (e.g., soil nails, anchors) can be used to monitor the load indirectly. Table A-2 Attributes of several instruments available for measuring loads and pressures Instruments Applications Advantages Disadvantages Comments Pressure Cells Measures the distribution, magnitude, and direction of total stress Cells with pneumatic sensors are not susceptible to electrical interference. Cells with vibrating wire sensors are susceptible to electrical interference. Not used during design stage, used for monitoring during construction. Load Cells Used to measure compressive or tensile load in geotechnical structural member (e.g., tie back or rock anchors) Accuracy is not operator dependent. Cells are susceptible to electrical interference. Can be used for evaluating the structural force in geostructural systems. Osterberg Cells Measures end bearing and side friction resistance of a drilled shaft These do not require a load test frame. Cells are relatively expensive. Can be used during design to evaluate ultimate strength of the shaft or during construction for performance testing. Source: Geosyntec Consultants A.3.5 Measurement of Vibration Vibration, whether naturally occurring (e.g., earthquakes) or man-made (e.g., vibration from pile driving or blasting), can be harmful both to existing structures and structures under construction. Vibration can be monitored to gather data that will help with design and is often monitored during construction to ensure that vibration stays within allowable limits. Table A-3 provides a summary of the attributes of the instruments commonly used to measure vibrations. Table A-3. Attributes of several instruments available for measuring vibration Instruments Applications Advantages Disadvantages Comments Geophones Measures ground velocity Relatively inexpensive, accurate in low-noise environments Not accurate in high-noise environments.
256 Instruments Applications Advantages Disadvantages Comments Accelerometers Measures ground acceleration Very accurate measurements of strong and weak signals even in the presence of noise More expensive than geophones. Uses MEMS sensors. Hydrophones Measures changes in pressure due to acoustic waves in water Ideal for measuring wave propagation in fluid-filled boreholes Seismographs Measures acceleration, frequency, and duration of vibrations Can be programmed to monitor vibrations continuously or begin monitoring at a predetermined trigger vibration, can transfer data to a remote computer. Can be installed at the ground surface or at the base of the borehole. Source: Geosyntec Consultants A.4 Instrumentation System Design An instrumentation system must be designed for the specific monitoring objectives for a project. If a careful process is not followed in designing an instrumentation system, the data collected may not be useful. The instrumentation system design should include the following considerations: ⢠The need for instrumentation ⢠The geotechnical parameters to monitor ⢠The types of instruments needed ⢠The cost of the system ⢠The methods for installing and protecting the instruments ⢠The method of data collection A typical process for designing an instrumentation system is outlined in Table A-4. The data collection is discussed further in next section.
257 Table A-4. Steps of instrumentation system design Steps Considerations Planning Project conditions ⢠Anticipated project risks and objectives of the monitoring ⢠Failure mechanisms or hazards resulting in the risks (e.g., variations in water table, settlement, deflection) Need for instrumentation ⢠Identify critical factors contributing to the anticipated failure mechanisms. ⢠Are these critical factors quantifiable? ⢠Can an instrumentation system accurately and quickly measure these critical factors? Monitoring critical factors (e.g., water level, earth pressure, settlement) ⢠These critical factors should be measurable accurately and at an interval helpful to the projectâs risk mitigation plan. Length of monitoring period ⢠For construction, this could be construction duration plus an additional period to monitor residual effects. ⢠For existing conditions, this depends on parameters to be measured and the events to which they would respond. ⢠This could be based on a regulatory or other project-specific requirement. ⢠Requires a pre-defined end date
258 Steps Considerations Instrumentation Plan Instrument layout (type, quantity, and location) ⢠Select instrument types that measure relevant geotechnical parameters, with appropriate range, sensitivity, and accuracy. ⢠Select instruments with stability, reliability, and durability that reflect project conditions and monitoring duration. ⢠Consideration of advancements in sensor technology such as fiber optic or MEMS and communication devices ⢠Create layout including quantity and location of each instrument. ⢠Base quantities on expected extent and variability of the project conditions and the subsurface conditions. Instrument locations: select based on the following considerations ⢠Are there critical areas of interest? ⢠Is there a need for even distribution of the instruments over the site? ⢠Can you protect instruments from construction or normal operations? ⢠Will instruments be accessible for regular maintenance or manual readings? ⢠Is there a need for a reference instrument in unaffected area? ⢠Can you collocate instruments measuring related parameters (e.g., settlement or lateral deformation)? System redundancy ⢠Anticipate some sensors will fail during the monitoring period, and place multiple instruments in highly sensitive areas. Design drawings ⢠Show installed condition of each instrument and termination at the ground surface. ⢠Prepare procurement specifications Specify required procurement submittals (e.g., calibration sheets, specification sheets for procured instruments Monitoring Plan Monitoring frequency ⢠Select monitoring frequency based on how critical the data is, expected rate of change, and monitoring method (manual or automated). Define warning levels ⢠Warning level is set close to the design level of the factor. ⢠Action limit level is the maximum tolerable level of the factor. Remedial actions must be predetermined in the monitoring plan design phase. This could be a part of the projectâs risk mitigation plan. ⢠For warning level, actions should include reviewing monitoring data to evaluate whether the measured values are reasonable, expected, and tolerable; if not, mitigative actions, such as change in construction procedures or design modification or increase in monitoring frequency, need to be adopted. ⢠For action limit level, actions could include stopping work, evacuating, or preparing for failure.
259 Steps Considerations System Cost ⢠Include the cost of equipment; monitoring for the entire duration, maintenance, repairs, and spare instruments to replace damaged units. ⢠Evaluate the cost comparison between manual and automated monitoring systems with respect to frequency of monitoring. ⢠Evaluate the need for short-term or long-term monitoring. Installation Plan Installation plan should be developed well in advance of mobilizing to the field and should include the following: ⢠Detailed list of required instruments and materials ⢠Site-specific, step-by-step installation procedures which should include testing prior to and after installation ⢠Installation schedule (including allowance for the unexpected) ⢠Quality control procedures ⢠Careful handling and installation of the instruments onsite (follow manufacturerâs recommendations) Instrumentation Protection Plan ⢠A protection plan for the instruments before, during, and after installation must be developed. ⢠Selected instruments should be appropriate for the climate with respect to operating temperature, waterproofness, lightning protection, etc. ⢠If the instrument cannot withstand a weather event, it can be installed in a protective case or vault. Source: Geosyntec Consultants A.5 Automated Data Collection An important decision that must be made when designing an instrumentation is system is whether to use a manual or automated data collection system. Automated data collection systems are becoming more popular because data can be automatically collected, analyzed, plotted, and shared. Setting up an automated data collection system requires an understanding of the electronics involved in the sensors, the collection system, and the communication and data transmission systems used. A.5.1 Advantages and Limitations of Automated Data Collection Automated data collection has many advantages. The primary advantage is eliminating the need for a technician to be on-site to collect regular readings, although engineers must still visit the site to install the system and to perform periodic maintenance. In addition, the following are some of the many advantages of automated data collection: ⢠Increased data collection frequency ⢠Increased number of sensors ⢠Simultaneous reading of multiple sensors ⢠Automated data transmission ⢠Real-time automated data analysis ⢠Real-time automated data presentation ⢠Real-time automated alert system ⢠Monitoring of remote, inaccessible, or hazardous areas ⢠Remote sensor diagnostics
260 There are, however, several limitations to using automated data collection: ⢠Increased upfront cost ⢠Potentially increased total cost ⢠Increased complexity of system ⢠Increased difficulty of installation A.5.2 Data Loggers A data logger is an electronic device that collects, analyzes, and stores data from sensors. A data logger can be connected to one or more sensors, usually through external cables. Some specialized data loggers may have sensors integrated directly into their hardware. The data logger collects readings from the connected sensors at a preset frequency or trigger. The data logger can then, according to its programming, (i) convert the raw readings to engineering units, (ii) verify the readings by comparing to previous readings or to preset thresholds, (iii) send out an alert based on the results of the verification, and (iv) upload or send the data to a database or file transfer protocol (FTP) server. The data logger can also locally store readings in internal memory or in a memory card. The data logger capabilities can be expanded using measurement and control peripherals and communication devices. Measurement and control peripherals could include a multiplexer to increase the number of sensors that can be read. Communication devices could include external radios, satellite communication terminals, cellular communication terminals, external data storage devices, or field displays. Figure A-1 shows an installed data logger that is monitoring deformation, settlement, and pore pressure along a state highway embankment. Source: Geosyntec Consultants. Figure A-1. An installed data logger monitoring deformation, settlement, and pore pressure along a state highway embankment A.5.3 Data Transmission Once the data logger collects and analyzes the data, the data must be transmitted to a database or directly to an end user. The data logger can be directly wired to a computer for communication or can communicate through a wireless connection using radio, cellular satellite telemetry, or Wi-Fi. Whether the connection is
261 wired or wireless, a user can either manually connect to the computer and download the data or set up a program to automatically connect to the data logger regularly to download the data. A.5.4 Data Storage Data must be stored after being collected. For a small number of readings, the data can be stored locally on the internal memory or on an external memory card attached to the data logger. However, in many cases, the number of readings will exceed the storage capacity of the data logger or the external memory card between periodic visits by a technician to download the data or before the end of the project. Therefore, a data storage and management system must be designed. This database can be located on a local computer, on an on-line server, or on a cloud server. The data can either be manually or automatically copied to the storage database on a regular basis. A.6 Monitoring Data Management Whether the installed instrumentation system is manually or automatically monitored, the collected data must be stored and managed. If the data management system is not carefully designed, the data may not be readily available for analysis, visualization, troubleshooting, and reporting. In addition to the brief summary below, Appendix D describes the basic requirements for developing and implementing an effective data management system in more detail. A.6.1 Database Setup The first step in setting up a database is defining the various outputs that will be captured from the instruments. It might be necessary to convert these raw readings to engineering units. A database should be created to correctly and efficiently append the raw and converted data as they are transmitted or collected from the data logger. A.6.2 Data Analysis Once data is collected, it must be analyzed. This analysis can be as simple as converting to engineering units (if needed), or the analysis can be more complex (e.g., calculating the strain induced in a geosynthetic material from multiple settlement cells, calculating the rate of pore pressure increase from piezometer data). Data should be analyzed at a frequency required by the project; and the data may not necessarily need to be analyzed every time a new data point is collected. Depending on how critical the data is and how sensitive the project is, analysis may need to be performed daily, weekly, or monthly. A.6.3 Data Presentation Once the data collected from the instruments is analyzed, it should be plotted to clearly communicate the measured soil or structural response. Plots may be developed for individual instruments or for groups of instruments, and data may be plotted versus other relevant external data (e.g., construction activities, precipitation events). If multiple instruments are installed, the data can also be plotted in plan view to better understand the spatial distribution of the soil response. If desired, contour lines can be drawn based on the measured data as well. These contour lines can represent water level, temperature, settlement, surface elevation, strain, etc.
262 A.6.4 Data Reporting At a predetermined frequency, the collected data should be presented and summarized in a data report. This data report can communicate the results of the instrumentation monitoring to all project stakeholders. These data reports can include text, tables, and figures summarizing the data, and recommendations for ongoing construction or operations based on the data.
263 References Bartholomew, C.L., B.C. Murray, and D.L. Goins. 1987. Embankment Dam Instrumentation Manual. U.S. Department of the Interior, Bureau of Reclamation. Bartholomew, C.L., and M.L. Haverland. 1987. Concrete Dam Instrumentation Manual. U.S. Department of the Interior, Bureau of Reclamation. Dunnicliff, J. 1993. Geotechnical Instrumentation for Monitoring Field Performance. John Wiley & Sons, New York. Dunnicliff, J. 2012. âChapter 95: Types of Geotechnical Instrumentation and Their Usage,â In ICE Manual of Geotechnical Engineering, Volume II Geotechnical Design, Construction and Verification. Edited by Burland, J., T. Chapman, H. Skinner, and M. Brown. ICE Publishing: London. FHWA. 1998. Geotechnical Instrumentation Reference Manual. Federal Highway Association FHWA HI-98-034. Florida DOT. 2000. âChapter 7: Field Instrumentationâ In Soils and Foundation Handbook. Florida Department of Transportation. Gainesville, Florida. Marr, W.A. 2013. âInstrumentation and Monitoring of Slope Stability.â In Proceedings of Geo-Congress 2013, San Diego, California, pp. 2231â2252. Montana DOT. 2008. âChapter 11: Instrumentation.â In Geotechnical Manual. Montana Department of Transportation. New York State DOT. 2013. âChapter 23: Instrumentation and Testing.â In Geotechnical Design Manual. New York State Department of Transportation. USACE. 1987. Instrumentation for Concrete Structures. Engineering Manual, EM 1110-2-4300. U.S. Army Corps of Engineers. Washington, DC. November. USACE. 1995. Instrumentation of Embankment Dams and Levees. Engineering Manual, EM 1110-2-1908. U.S. Army Corps of Engineers. Washington, DC. June. USACE. 2011. âChapter 14: Instrumentation for Safety Evaluations of Civil Works Structures.â In Safety of Dams â Policy and Procedures. Engineer Regulation 1110-2-1156, U.S. Army Corps of Engineers. October.
264 B A P P E N D I X B Applications of Geotechnical Instrumentation B.1 Introduction Geotechnical instrumentation applications transcend all phases of a transportation projectâs life cycle. Geotechnical instrumentation data collected during the preconstruction phase contributes to the design of safe and economical geotechnical infrastructure. During construction, geotechnical instrumentation can be used to confirm whether the performance of geotechnical infrastructure is consistent with design expectations to help ensure safe construction of sensitive features. Once construction is complete, geotechnical instrumentation can monitor long-term performance of the geotechnical infrastructure and provide objective data for prioritizing maintenance and rehabilitation of the infrastructure. Geotechnical instrumentation systems can function as early warning systems to provide agencies with time to implement remedial measures to prevent disruption of services, property damage, or loss of life. This appendix focuses on applications of geotechnical instrumentation in geotechnical structures, such as embankments, excavations, dewatering systems, earth-retaining structures, deep foundations, tunnels, and grouting. Additionally, this appendix highlights the benefits of instrumentation in managing geotechnical assets and resolving legal disputes. B.2 Embankments The most frequent uses of instrumentation in embankment construction are related to monitoring pore pressure dissipation, settlement, and lateral displacement. The instruments commonly used for monitoring embankments include piezometers, settlement monitoring systems, and slope inclinometers. Figure B-1 provides an example of an instrumented embankment, and Figure B-2 provides example results from an instrumented embankment.
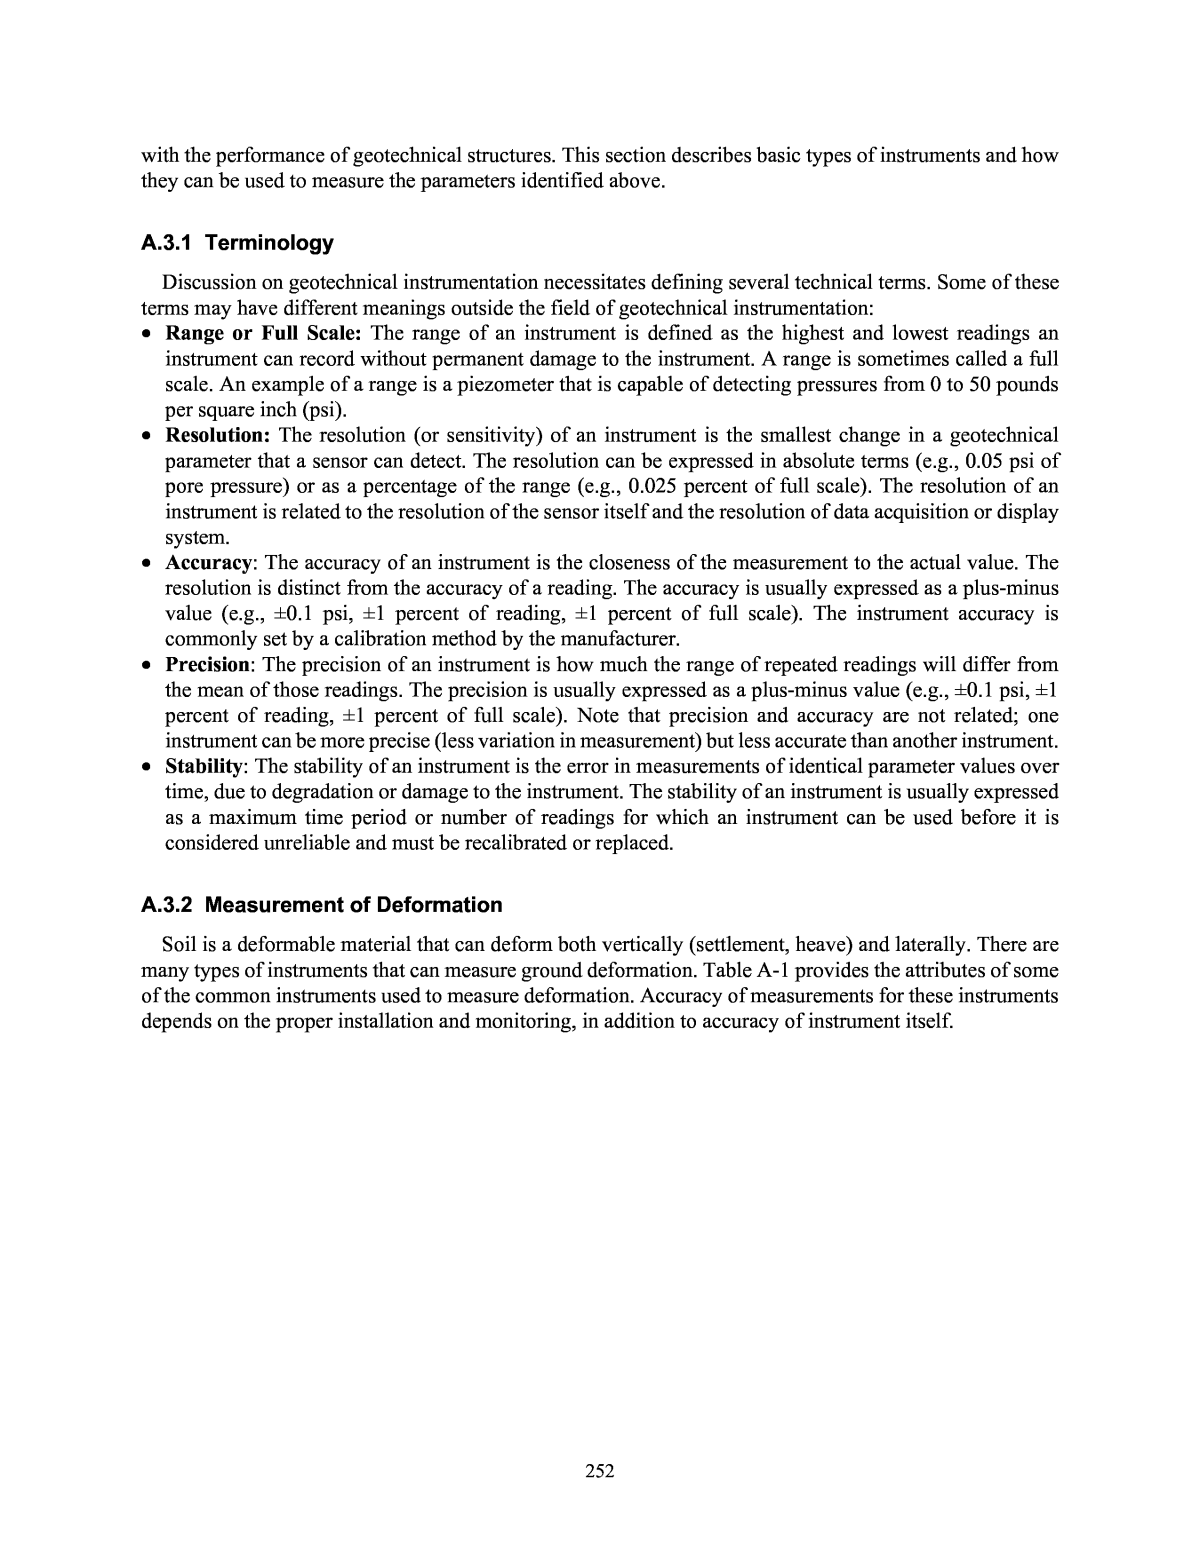
265 Source: Geosyntec Consultants, Inc. Figure B-1. Example of an instrumented embankment Source: Geosyntec Consultants, Inc. Figure B-2. Example results from an instrumented embankment B.3 Excavations Seven parameters are commonly measured during excavation in soil and rock: 1. Lateral displacement of cut slopes or excavation supports 2. Subsidence behind the excavation supports 3. Heaving at the base of excavation 4. Tilt in the support structures 5. Tension crack in rock 6. Load in the retaining structures, braces, and anchors -20 -15 -10 -5 0 5 10 15 20 25 30-15.0 -12.5 -10.0 -7.5 -5.0 -2.5 0.0 2.5 5.0 7.5 10.0 7/23/12 10/31/12 2/8/13 5/19/13 8/27/13 12/5/13 3/15/14 6/23/14 10/1/14 He ig ht o f E m ba nk m en t o r W at er H ea d (ft ) Se tt le m en t ( ft ) Date Settlement Water Head Height of Embankment
266 7. Change in pore pressure around the excavation area Measuring these parameters provides information pertaining to the following: 1. Site conditions prior to and during excavation 2. Lateral deformation 3. Creep behavior 4. Short-term and long-term stability of the excavation Instruments required to monitor excavations in soils and rock are illustrated in Figure B-3. Source: Geosyntec Consultants, Inc. Figure B-3. Instruments used for monitoring excavations, dewatering, and earth-retaining structures B.4 Dewatering Systems The parameters impacting the geotechnical dewatering programs include hydraulic conductivity, volume of water to be removed, subsidence, and heave. Instrumentation for dewatering is typically designed to monitor two parameters: 1. Changes in water elevation 2. Subsidence or heave Figure B-3 shows the typical instruments used for dewatering systems. Data from the piezometers and pumping stations can help define the groundwater regime prior to and during the dewatering activities, validate the site hydrogeologic model, and verify the adequacy of the dewatering system (e.g., the pump size and schedule). The ground movement due to an increase in the effective stresses or soil migration to the sump area for a specific dewatering project can be measured using settlement instruments or optical surveys.
267 B.5 Earth-Retaining Structures Earth-retaining structures (e.g., braced excavations, mechanically stabilized earth walls, soil nail walls) are commonly used as a part of excavation or embankment construction. Instrumentation systems provide the data needed to evaluate the performance of the earth-retaining structures. Four parameters are commonly measured during the installation and service life of the earth-retaining structures: 1. Lateral displacement or tilt measurement of the retaining structure 2. Subsidence behind the excavation 3. Load or strain in the retaining structures, braces, and anchors 4. Change in pore pressure beneath and surrounding the wall Figure B-3 provides an example of an instrumented earth-retaining structure. Excessive lateral displacement of the earth-retaining walls can cause ground subsidence, an unstable excavation, and damage to nearby structures or utilities. Properly planned instrumentation, such as inclinometers and piezometers, can provide early warning systems and identify the cause of the lateral displacements to allow remedial actions. Typically, proof and validation load tests are required for externally anchored retaining walls (tiebacks or soil nails). The proof tests validate the design load capacity of anchors with proper factors of safety and without excessive movements. Proof tests are also used to evaluate the creep behavior of the anchors and assess if the anchors are defective. The proof and validation tests typically require instruments, such as load cell and dial indicators, for measuring load and displacement at the head of the anchor (FHWA 2015). B.6 Deep Foundations Deep foundations are used to transfer loads from the structures over problematic subsurface conditions (e.g., weak, compressible, or liquefiable soils) onto a competent soil or rock stratum. Deep foundations can be in the form of cast-in-place piers or driven piles. Concerns related to serviceability of deep foundations are as follows: ⢠Load carrying capacity ⢠Structural integrity ⢠Impact of vibrations generated by installing driven piles on adjacent structures ⢠Additional loading (down drag) due to embankment settlement after installing a deep foundation ⢠Impact of installing large-displacement piles on adjacent structures Deep foundations are tested to determine their load carrying capacity using static pile and dynamic pile load testing in accordance with ASTM D1143 and D4945, respectively. Static pile load testing requires measuring the load and deformation behavior of the foundation system. There are a variety of instruments available to use for these measurements (e.g., load cells, Osterberg cell or O-Cell [for drilled piers], dial indicators with reference beam, linear variable differential transformers [LVDTs], telltales, strain gauges, extensometers, optical surveys). The pile dynamic analyzer (PDA) test is a high-strain test method used to assess the pile capacity by measuring pile strain and velocity after each impact of the pile by the pile driving hammer. This method evaluates the drivability of a pile, hammer performance, pile integrity or damage, and mobilized pile resistance. The instruments used in the PDA test include accelerometers, strain gauges, data acquisition, and processing systems. The impacts of construction vibrations on adjacent structures can be monitored using geophones. Geophones measure the particle velocities at varying distances from the pile. The change in the peak particle velocities with distance can help determine the rate of vibration attenuation at the site. Figure B-4 is an example of the test set up.
268 Source: Geosyntec Consultants, Inc. Figure B-4. Example of instrumentation for vibration monitoring and measured response The potential for down-drag load can be assessed by measuring the relative settlement between soil and pile, diagnosing ongoing settlement prior to pile driving using piezometers, and monitoring stresses along the pile (using strain gauge or load cells). Driven large-displacement piles can cause large displacements, settlements, and high excess pore pressures during and after driving, which can affect the load carrying capacity of adjacent piles and overall stability of the site and neighboring structures. Instrumentation systems can assist with planning the pile installation program and with responding to any adverse effects of pile-driving operations. B.7 Grouting The role of instruments in grouting programs is related to the purpose of the grouting program and type of grouting techniques that are used. For example, the possible uplift or compaction associated with permeation and fracture, jet, and compaction grouting might affect pore pressures and vertical deformations of the ground surface. The parameters commonly measured for these techniques include change in pore pressure during and after grouting, and settlement or heave. Locations and types of instruments for grouting projects are controlled by the factors affecting the change in pore pressure, settlement, or heave that might influence adjacent structures. B.8 Tunnels Problematic soil conditions can cause unstable conditions while excavating tunnels and installing structural support systems. The effect of hydrostatic groundwater pressure, soft soils and rock, or high earth pressure zones in soil and rock can lead to unstable conditions during construction. Instrumentation systems are widely used in tunneling projects. Typically, four parameters are monitored in tunneling projects: ⢠Convergence of the opening and deformation of support system ⢠Pressure between soil (or rock) and the support system ⢠Groundwater condition beneath and surrounding the tunnel opening ⢠Ground subsidence due to tunneling activity Data Acquisition Geophone Microphone
269 Various instrumentation systems (e.g., surveying equipment, borehole extensometers, tilt meters, crack meters, strain gauges, piezometers, inclinometers) can be used to monitor the performance of tunnels during construction. Figure B-5 shows a schematic of tunnel instrumentation with extensometers, piezometers, strain gauges, load cells, and inclinometers. For this case, extensometers measure the ground subsidence within the influence zone of the tunnel that might impact nearby structures; piezometers measure the ground water conditions around the tunnel; strain gauges and load cell measure the structural loads in the support system; and inclinometers measure the lateral ground movement and their impact on nearby structures or underground utilities. Source: Geosyntec Consultants, Inc. Figure B-5. Example of instrumentations for tunnels B.9 Preconstruction Monitoring In cases where geotechnical construction may influence adjacent structures, geotechnical instrumentation systems can establish a preconstruction baseline. This baseline can be compared to conditions after construction to determine whether construction activities affected the structures. Monitoring lateral deformations during excavations, crack opening in a sewer force main below a new highway embankment, or vibrations during pile driving to assess the impacts of these operations on adjacent structures are examples of geotechnical instrumentation applications that can be used for preconstruction monitoring purposes. B.10 Asset Management Asset management minimizes the costs of managing and maintaining transportation assets for the entire life cycle of the asset. Instrumentation and monitoring systems can provide valuable information needed to (i) evaluate the existing condition and the performance of assets controlled by geotechnical elements, (ii)
270 predict the long-term performance of the geotechnical structures, and (iii) identify structures with impending higher risks of failure or deficient performance. This information allows resources to be better allocated for operating, maintaining, and upgrading current systems.
271 References FHWA. 2010. Drilled Shafts: Construction Procedures and LRFD Design Methods. Publication No. FHWA-NHI-10-016, FHWA GEC 010, Federal Highway Administration, Washington, DC. FHWA. 2015. Transportation Planning and Asset Management. Publication No. FHWA-IF-06-046, Federal Highway Administration, Washington, DC.
272 C A P P E N D I X C Evaluation of Existing Bridge Foundations for Reuse C.1 Introduction Reuse of existing bridge foundations has attracted the attention of State Departments of Transportation (DOTs) because of the potential for savings in construction time, direct construction costs, and indirect costs, such as road user costs. In addition to cost savings, there are other additional benefits: reduced environmental impacts, resource conservation due to reduced demand for new construction materials, and improvement in bridge replacement construction (Collin and Jalinoos 2014). Nevertheless, there are impediments to large-scale reuse of the existing bridge foundations: ⢠Increased foundation loading due to changes in the design criteria over time ⢠Lack of confidence in the methods currently used to characterize the condition (integrity) of the existing bridge foundation elements, their load-carrying capacity, remaining service life, and risk ⢠Additional liability issues for State DOTs, designers, and contractors ⢠Change in construction and monitoring standards over time ⢠Lack of federal and state guidelines for the designers responsible for evaluating potential reuse of existing bridge foundations This appendix does not address all the impediments identified above. Instead, it focuses on the two items that require executing a subsurface investigation activity: (i) characterizing the integrity of the existing bridge foundation elements and (ii) assessing their load-carrying capacity. C.2 Assessing the Structural Condition of Existing Bridge Foundations One of the most important considerations in determining whether existing bridge foundation elements should be considered for potential reuse is their integrity. If their integrity is compromised, their load- carrying capacity will also be compromised, and there is likely no need for performing additional evaluation. The methods used to evaluate the integrity of existing bridge foundation elements include the following: ⢠Reviewing available records ⢠Conducting nondestructive geophysical tests ⢠Excavating ⢠Conducting concrete core drilling and laboratory testing C.2.1 Available Records The number of available records usually depends on the age of the bridge; older bridges will typically have fewer available records than newer bridges. There are several types of information that will aid in assessing the integrity of the existing bridge foundation elements:
273 ⢠Biennial bridge inspection reports that the Federal Highway Administration (FHWA) requires State DOTs to perform ⢠Bridge maintenance history ⢠Monitoring reports (e.g., for bridge scour) ⢠Documentation of any extreme loading conditions (e.g., bridge impacts by an errant barge) C.2.2 Geophysical Testing Methods The geophysical testing methods typically used to assess the integrity of existing bridges include sonic echo/impulse response (SE/IR), dispersive flexural wave testing, half-cell potential, and ultraseismic profiling. All seismic or sonic testing for pile defects or pile length require that the pile element of interest be accessible. These types of tests cannot be conducted from a pile cap. C.2.2.1 Sonic Echo/Impulse Response The SE/IR test is performed on driven concrete and timber piles, drilled piers, and auger-cast piles. The test identifies potential defects and determines approximate lengths of deep foundation elements. The SE/IR test is performed by striking the top surface of a deep foundation element with a hammer to generate a compression wave. The compression wave will propagate downward until it encounters a change in mechanical impedance due to a defect within the foundation element or bottom of the foundation element that causes a reflected compression wave that travels upward. By measuring the time required for the compression wave to return to a receiver mounted on the top surface of the foundation element (Figure C- 1), the depth to the defect or bottom of the foundation element can be estimated. The compressive wave velocities of concrete and timber elements can be measured (if possible) or estimated based on the values documented in the literature. The depth to a defect or to the bottom of a pile or drilled pier is calculated by multiplying the compressive wave speed with the time measured from the SE/IR test and then dividing the result by two to account for the two-way travel path of the wave. Some of the advantages of this test are that it can be performed quickly and at low cost. Some of the disadvantages are that the test cannot be performed on steel piles, cannot detect additional defects below a major defect, and cannot be performed on foundations socketed in rock (Wightman et al. (2004)). Source: after Wightman et al. (2004)
274 Figure C-1. SE/IR test setup C.2.2.2 Dispersive Flexural Wave Test The dispersive flexural wave test is performed on driven concrete and timber piles, drilled piers, and auger-cast piles in situations where the top surface of a foundation element is not accessible. This test identifies potential defects and provides approximate lengths (Holt et al. 1994). It is somewhat like the SE/IR test, except the foundation elements are struck on their side as shown in Figure C-2, and flexural waves are measured instead of compression waves. This test has the same advantages and disadvantages as the SE/IR test, however it has additional limitations pertaining to the maximum pile lengths to which the test is applicable due to attenuation issues associated with flexural waves. Source: after Wightman et al. (2004) Figure C-2. Setup for dispersive flexural wave test C.2.2.3 Half-Cell Potential Test The half-cell potential test evaluates the corrosion activity of the reinforcing steel in the hardened concrete bridge foundation elements. The standard testing procedure is described in ASTM C876. This test is based on the principal that during the electrochemical corrosion reaction, an electric potential difference is generated in the reinforcing steel. The half-cell is a hollow tube containing a copper electrode that is immersed in a copper sulfate solution. The bottom of the hollow tube is porous and is covered with sponge material. The test is performed by making an electrical connection to the rebar, pressing the sponge soaked with copper sulfate solution over
275 the concrete, and measuring the voltage difference (Figure C-3). The potential difference between the reinforcing steel (anode) and the copper sulfate half cell (cathode) gives an indication of the presence or absence of corrosion activity in uncoated reinforcing steel in concrete. Some of the limitations of this test are that the oxygen, chloride concentration, and resistivity of the concrete may influence test results. Also, some repair technologies (e.g., corrosion inhibitors, chemical admixtures, cathodic protection) may impact the results as well. Source: after Wightman et al. (2004) Figure C-3. Half-cell potential test setup C.2.2.4 Ultraseismic Profiling The ultraseismic test evaluates the integrity and determines the lengths of the deep and the thicknesses of shallow foundation elements. The ultraseismic test can be used to test drilled piers, auger-cast piles, and driven timber and concrete piles. The ultraseismic test is performed by striking either the horizontal or vertical surface of a foundation element with a hammer and measuring response time using at least three receivers (Figure C-4). The ultraseismic test can acquire signals from different wave types rather than a single wave type as in the SE/IR test. The types of waves typically measured include compressional, torsional, flexural, and Rayleigh. The ability of the ultraseismic test to measure multiple wave types allows for a more robust data interpretation and, therefore, results in more accurate results. One disadvantage of the ultraseismic test is its inability to distinguish defects below a large defect or defects near the bottom of the foundation element.
276 Source: after Wightman et al. (2004) Figure C-4. Ultraseismic test setup for vertical profiling C.2.3 Excavation The excavation method assesses the integrity and determines the lengths of bridge foundation elements. This method makes visual inspection and direct testing of foundation elements possible. The method has the advantages of being direct and accurate. However, the method is limited primarily to shallow foundations because safety and cost considerations limit its use for deep foundations. C.2.4 Concrete Core Drilling and Laboratory Testing Concrete core drilling and laboratory testing can be used to assess the integrity of concrete foundation elements and their lengths or thicknesses. This method is applicable to both shallow and deep concrete foundations. For shallow foundations, the test is performed by first drilling to the top of the concrete footing and then coring through it. For deep foundations, the test may require coring through the bridge deck and the cap before coring through the concrete deep foundation element. Visual inspection of the concrete cores provides some indication of their integrity. Additionally, laboratory tests such as compressive strength and chloride penetration tests can be performed to evaluate strength and corrosion of reinforcing steel, respectively. The core holes can also be used for performing geophysical tests. This method has the advantage of being accurate, but also it has the disadvantage of being costly.
277 C.3 Information Needed to Evaluate Load-Carrying Capacity The following information is required to evaluate the load-carrying capacity of bridge foundation elements: ⢠Geometric properties of the foundation element (shape, cross section area, and length) ⢠Structural properties of the deep foundation element (e.g. strength, stiffness) ⢠Properties of the foundation subsurface materials (e.g., strength, stiffness, compressibility) Available methods for obtaining information required to evaluate the load-carrying capacity of existing foundation elements include (i) reviewing available records, (ii) conducting nondestructive geophysical testing, (iii) characterizing foundation materials, and (iv) conducting load testing. C.3.1 Available Records Project records that may contain information regarding load-carrying capacity of existing bridge foundation elements include project plans, project specifications, geotechnical reports, and construction records. C.3.1.1 Project Plans Project plans include original design and as-built plans. Plan documents usually include the following information: ⢠Type of foundation element (deep or shallow) ⢠Type of material (e.g., concrete, steel, timber) ⢠Geometry of the foundation elements (e.g., diameter, width, length) ⢠Listing of design bearing pressures for shallow foundations and design loads for deep foundations C.3.1.2 Project Specifications Project specifications will contain the following information: ⢠Required material properties (e.g., compressive strength of concrete, grade of steel) ⢠Required geotechnical submittals that could provide information regarding whether any load tests were required during original construction ⢠Required driving resistance in case of driven piles and required tip resistance in case of drilled piers C.3.1.3 Geotechnical Reports Geotechnical reports will typically have the following information: ⢠Subsurface boring logs and plans showing stratigraphy ⢠In situ and laboratory test results ⢠Design calculations for the original design C.3.1.4 Construction Records Construction records will typically include documents such as foundation installation logs of driven piles and results of any load tests that were performed. Foundation installation logs can provide information useful to estimating the resistances achieved at the end of driving or after a restrike using pile dynamic formulas. Load tests results can provide a good estimate of the available ultimate geotechnical resistances. This can be compared to the anticipated design loads to determine whether the existing foundation elements can carry the anticipated design loads with an acceptable factor of safety.
278 C.3.2 Geophysical Testing Methods Nondestructive geophysical tests are primarily used to estimate the lengths of the deep foundation elements. The following are some of the more common geophysical tests performed: ⢠SE/IR ⢠Dispersive flexural wave ⢠Ultraseismic profiling ⢠Induction field method ⢠Parallel seismic method Information pertaining to the SE/IR, dispersive flexural wave, and the ultraseismic testing methods is presented in Section C.2.2. C.3.2.1 Induction Field Method The purpose of the induction field method is to obtain estimates of the lengths of the in situ steel or continuously reinforced concrete piles. The testing procedures consist of drilling a borehole deeper than the foundation element and inserting a magnetic field detector. Two electrodes are then installed to generate a magnetic field. One of the electrodes is mounted on the pile, and the other one is installed some distance from the pile (Figure C-5). The detector measures the strength of the magnetic field in terms of voltage generated. Typically, the magnetic field is very strong along the pile and drastically diminishes below the bottom of the pile. The test requires a polyvinyl chloride (PVC)-cased borehole because no signal will be received through a steel-cased borehole. One of the main advantages of the induction field method is that it is a proven technology for determining the length of in situ steel and continuously reinforced concrete piles.
279 Source: after Wightman et al. (2004) Figure C-5. Setup for the induction field test method C.3.2.2 Parallel Seismic Method The parallel seismic method is primarily used to obtain estimates of the lengths of deep foundation elements but can also be used to estimate the thickness or depth to the bottom of shallow foundations. The test is applicable to footings, drilled piers, driven concrete, steel, and timber piles. The parallel seismic method requires a borehole very close to the foundation element drilled to a depth of at least 10 to 16 feet (ft; 3 to 5 meters [m]) below the bottom of the foundation element (Figure C-6). A hydrophone or geophone is then placed in the borehole. If a hydrophone is going to be used, the borehole must be cased, capped at the bottom, and filled with water. If geophones are going to be used, the borehole must be cased and grouted to prevent the borehole from caving in during the test. The test is performed by impacting any exposed surface of either the structure connected to a foundation element or the foundation element itself with a hammer. The impact generates compressional or shear waves that are measured by the receivers. At the beginning of the test, the receiver is lowered to the bottom of the borehole, and a test is performed. When the first test is concluded, the receiver is raised by 1 or 2 ft (0.3 to 0.6 m) and the test is repeated. This process is repeated until the receiver reaches the top of the borehole. The depth of the foundation element may be inferred from the change in measured wave velocity with depth. Source: after Wightman et al. (2004) Figure C-6. Parallel seismic test setup
280 C.3.3 Characterizing Foundation Materials Evaluating existing bridge foundations for reuse requires the same types of material parameters as needed for characterizing foundation materials for the design of new bridge foundations. Therefore, the methods and procedures presented in Chapters 5 through 8 for new bridge projects are also applicable to evaluating existing bridge foundations. Some of the more common required parameters include the undrained shear strength ( ) in clays, friction angle ( ) in sands, elastic soil modulus, preconsolidation stress, and lateral stress coefficient ( ). C.3.4 Load Tests The methods for evaluating load-carrying capacity presented in Sections C.3.1 to C.3.3 are all indirect methods, and some State DOTs may not be comfortable deciding whether to reuse existing foundation elements without having direct measurements of the load-carrying capacity. There are two options available for directly measuring the load-carrying capacity: ⢠High-strain dynamic load tests ⢠Static load tests C.3.4.1 High-Strain Dynamic Load Tests A brief overview of the high-strain dynamic load test is presented in Section B.2.5 of Appendix B. This test may be feasible to evaluate existing bridges if the heads of the existing piles can be accessed with adequate headroom for the pile-driving equipment. C.3.4.2 Static Load Tests A brief overview of static load tests was provided in Section B.2.5 of Appendix B. The difficulty with performing this test on existing bridge foundations depends on the configuration of the existing structure or nearby infrastructure. However, if performance of these tests is feasible, it may be possible to use the existing bridge superstructure for reactionary forces, which could eliminate the need for constructing a reaction frame.
281 References Collin, J.G., and F. Jalinoos, 2014. Foundation Characterization Program: TechBrief #1 â Workshop Report on the Reuse of Bridge Foundations. FHWA-HRT-14-072, Federal Highway Administration, Washington, DC. Holt, J. D., S. Chen, and R.A. Douglas. 1994. âDetermining Lengths of Installed Timber Piles by Dispersive Wave Propagation,â Design and Construction of Auger Cast Piles and Other Foundation Issues, Transportation Research Record No. 1447, Transportation Research Board, National Research Council. National Academy Press. Washington, DC. Wightman, W.E., F. Jalinoos, P. Sirles, and K. Hanna. 2004. Application of Geophysical Methods to Highway Related Problems. FHWA-IF-04-021, Federal Highway Administration, Washington, DC.
282 D A P P E N D I X D Management of Geotechnical Data D.1 Introduction In large measure, historical information from transportation projects is documented on paper and maintained in project files. But, with the explosive growth of computer usage in engineering, most information is now being collected and maintained electronically, which should make the information easier to collect, manage, and use on future projects. This is especially true of the data related to subsurface characterization, field testing, and laboratory testing, as the original data are often captured and distributed electronically. Frequently, these electronic records (e.g., boring logs, summary tables, spreadsheets) are distributed as electronic Portable Document Format (PDF) files. Accordingly, data are managed only as information due in large part because geoprofessionals are not trained and, generally, have not been very proficient in (or focused on) data management. To their credit, geoprofessionals have long recognized the need for and use of geotechnical data, which usually comes from numerous disparate sources, including historical aerial photos, geologic maps, previous subsurface investigations, and construction records, as well as the in situ and laboratory testing results from the current subsurface investigations. Although geoprofessionals recognize the value of data, they do not usually recognize that the content of PDF files is not really data; it is information. With the rapid advancement of technology, the geoprofessional is now being inundated with an unprecedented amount of data that can be beneficial to designers. Techniques are available to facilitate efficient data management, and this appendix includes information related to managing geotechnical data. D.1.1 Objectives There are three objectives for this appendix: (i) describe and highlight the benefits and utility of effective geotechnical data management to encourage adopting and implementing it in day-to-day practice; (ii) describe requirements and perceived impediments to adoption; and (iii) demonstrate effective data management strategies that can be readily implemented by the geoprofessional community. Benefits of Effective Geotechnical Data Management The primary benefits of effective geotechnical data management are increased efficiency and time and cost savings. While all transportation agencies (as well as owners and consultants) routinely collect immense amounts of data for projects, they historically manage these data as information. The distinction is relatively simple; if a user has to type, enter, or cut-and-paste project-related facts, numbers, records, or statistics from one medium to another medium to use it, they are managing information, not data. For instance, when an agency or user receives a PDF file, word processing file, or spreadsheet table, graph, or plot as a representation of project-specific data, the PDF of that data is considered information. To reuse portions of this information in a report or replot it at a different scale, the information in the PDF file must be copied into a spreadsheet, word processor, drafting software, or database. It would be more efficient if
283 the original electronic data was maintained in a format that allows users to readily access the original data they need. This efficient access of original data can be accomplished by using a database to store and retrieve the data. Additionally, by incorporating data management practices, time and cost savings can be realized by significantly reducing the effort involved in retyping, reentering, and cutting and pasting information multiple times from multiple spreadsheets into other application software. An additional common consequence of poor data management relates to storing and maintaining paper and electronic files generated for a project. If the results of boring logs, lab tests, and numerical analyses are stored in file boxes at off-site locations, they will often be forgotten or lost. When a new project develops that could use these data, it is often found to be easier to simply drill, sample, and test the area againâ¯often in very close proximity to locations where the previous borings or tests were advancedâ¯rather than find and retrieve the original files. The result is that valuable time and financial resources are devoted to an effort that could be avoided completely if the original data were properly maintained and readily available. In addition to these tangible advantages for the organization and profession, there are other important benefits that are realized over time. If personnel no longer spend time reacquiring or retyping data, the organizationâs work flow becomes more efficient. Not only does this bring financial benefits, it also allows individuals time to devote to critical project needs that may have been previously addressed inadequately due to budget and schedule constraints. Other benefits of efficient data management include improved employee training and the opportunity to develop new and advanced capabilities that capitalize on the availability of robust, easily accessible data. Another important benefit is the ability to easily perform calculations based on the compiled data and then visualize the data itself or (ideally) the calculation results. All stakeholders benefit if original geotechnical data are maintained effectively by having all invested parties adopt and implement data management strategies. Components Required for Effective Geotechnical Data Management The technology-related tools necessary to adequately maintain geotechnical data are straightforward: a computer and data management software (e.g., Access, SQL Server, MySQL, or Oracle). If the data are to be shared with others and protected for future use, it is beneficial to store (or archive) the data on a dedicated server hosted by the client, agency, or owner or in the cloud. One of the most difficult components necessary for effective geotechnical data management is not related to technology. Rather, effective data management requires the agency, organization, owner, and users to commit to changing old practices in favor of a new data management strategy. Changing personal habits is difficult and often requires acquiring new skills through training; it is common for an organization or individual users to justify resisting change by assuming the cost and time to affect an institutional change is unnecessary because the current system works fine. Unfortunately, this attitude is short-sighted. As the geotechnical community rapidly enters the world of âbig data,â many of the currently used data and information management strategies simply will not work. Change is inevitable and needs to be recognized and addressed. Subsequent sections of this appendix will describe the primary commitments that an organization must adopt to effectively manage project-related data. The success of a geotechnical data management system within an organization lies in the following three fundamental factors: 1. Senior management support 2. An internal champion who makes it his or her mission to gain adoption and success 3. A commitment to maintenance to make the system sustainable. Effective Data Management Strategies Effective data management starts with recognizing that virtually all relevant project information can be treated as data if managed appropriately. Effective data management can be facilitated by using forms or templates that can be deployed on tablet computers, field computers, or smart phones. With these tools, the
284 data are collected in a consistent, standard manner, thus minimizing the opportunities for introducing human error. Another technique to facilitate data management is to adopt a standard data transfer protocol. The Federal Highway Administration (FHWA) and the Geo-Institute (G-I) of the American Society of Civil Engineers (ASCE) have recently collaborated on the development of a standard data transfer schema that offers significant promise: Data Interchange for Geotechnical and Geoenvironmental Specialists (DIGGS). Details regarding DIGGS and example work flows that use the DIGGS format are presented in Section D.7. D.1.2 Organization This appendix is organized to provide background regarding basic data management concepts and guidance for developing and implementing a standardized geotechnical data management system. The remainder of this appendix consists of the following sections: ⢠Section D.2 identifies conceptual requirements and focuses on the basic building blocks to facilitate effective data management. This serves as the foundation for subsequent sections that are organized to implement these requirements. ⢠Section D.3 describes the basic requirements for developing and implementing an effective data management system and focuses on the work flow process that an agency must recognize and adopt before effective data management can be achieved, including the electronic collection, maintenance, and presentation of data. ⢠Section D.4 introduces the various software requirements that must be considered when an organization or agency decides to implement a geotechnical data management system. This includes the requirements for collecting, storing, maintaining, managing, and visualizing data and other project-related information. ⢠Section D.5 describes sources of transportation-related information that can be collected and managed as data beyond the obvious boring log and laboratory or field test data. ⢠Section D.6 explains how geoprofessionals can effectively use the properly managed data while executing project-related activities and provides guidelines for facilitating this integration. ⢠Section D.7 introduces the concept of standardized geotechnical data transfer as a new concept that will facilitate effective data management by introducing the DIGGS format developed as a pooled-fund initiative by FHWA to facilitate data transfer and, in turn, promote effective data management. ⢠Section D.8 provides references for the information presents throughout this appendix. D.2 Basic Features of a Geotechnical Data Management System This section introduces the conceptual changes that must occur and requirements that are needed when a data management system is developed. The first requirement is recognizing the basic rules or tenets of effective data management. This is followed by the notion that data management implies data organization, which introduces the concept of a database schema. Once these basic building blocks are realized, the next steps relate to efficient data collection, georeferencing, and decisions related to the type of data that are included in the database. D.2.1 Tenets of Effective Data Management The first and most fundamental issue regarding data management is recognizing the basic concepts regarding data that must be identified, realized, and implemented. In many cases these tenets require a fundamental change in the organizationâs current practices. The basic tenets are as follows: 1. Single source for data storage 2. Data that are untouched by human hands after entry 3. Use of nonproprietary data software for data use
285 4. Spatial consistency of every data entry 5. Readily transferable data 6. Documentation of specific data management strategies Single Source for Data Storage When a geoprofessional receives test results or other forms of data from a third-party (or internal) client or vendor, they typically save it to the firmâs server and maintain a copy on a local computer. For the current project, the user typically will manipulate the received file to perform calculations, make edits, and develop plots, and then save the manipulated file. Simultaneously, another colleague will often retrieve the original file from the server and perform their own calculations. Unless data management practices are used, there is no assurance regarding integrity of the original data. Repeat this procedure several times on a project and allow the project to remain dormant for an extended period of time, and it is easy to see that version control becomes unmanageable and the original data can be easily misplaced. One way to address the problems of multiple users and multiple versions is to ensure that the original data in a single location, preferably in a relational project database (i.e., a database constructed where data in one table relates to the data in another table). If multiple users are anticipated, it is best to have the database hosted on a server. Once the data have been entered into the database, the rules for maintaining the integrity of the database are: ⢠Only authorized individuals are allowed to edit these data ⢠All edits must be documented so users are aware of the edits and additions ⢠All users retrieve a copy of the data from the database for use on their local computer. If these rules are implemented, the original data remains intact and resides in only one location: version control is no longer a problem. Data That Are Untouched by Human Hands after Entry Having data untouched after entry minimizes the risk for human error when manually entering data. If data are provided electronically, then protocols should be developed to facilitate transfer of these data to the project database. A subset of this tenet is to require that someone else generate the data. Specifically, if a lab conducts the test and generates the data, the client or user should dictate that the data be provided in an electronic format that can be readily uploaded to the project database without manually entering the data. If data must be manually entered into the database, then a quality control system must be in place: the data must be reviewed by someone other than the person entering the data for accuracy after entry. Once the data have been uploaded or manually entered into the database, there should be no reason for these data to be further touched by human hands. Once the data are in the database, a simple query of the database will provide a copy of the necessary data that can be downloaded to a local computer and accessed by the user. Use of Nonproprietary Data Software for Data Use The database that houses project data should be open and available to all parties. It is not uncommon for a vendor, consultant, or laboratory to house project data in their own proprietary system. When the original data is kept in this proprietary system, the user, owner, or client can only get access to the data as long as they maintain a contract with the vendor, consultant, or laboratory managing the database. This is called holding the data hostage and should not be tolerated. Data ultimately belongs to the owner of the project and should be available to the owner (or their designated representative) at any time, by any owner- authorized user. It is not uncommon for an entity to agree to this open-access policy in principal, but when the owner, user, or client requests a copy of the data, the entity housing the data only provides a PDF copy of project information rather than the actual data. A provision should be explicitly required in the project specifications that at the end of the project, the proprietary software will effectively transfer its data into a
286 nonproprietary data software program of the ownerâs discretion. In this way, it is explicitly required as part of the project specifications that the entity generating and hosting the project data recognizes the rules for working on the project. Owners have the authority to require that this tenet be adopted by all parties working on a project. Spatial Consistency of Every Data Entry One of unique aspects of geotechnical and geologic data is that they provide information regarding a specific location on Earth. Because of this, if data are maintained appropriately, it is possible to compile (and recover) considerable information regarding the specific location (and surrounding areas) over the long term. Therefore, it is imperative that spatial (i.e., location) data are valid and consistent for all project- related data. Unfortunately, spatial data may be stored or recorded in the coordinate system preferred by the owner, contractor, consultant, or vendor. While it is relatively straightforward to convert spatial data between these systems, the database ideally should have a consistent location reference system. To this end, the recovered data may be in a project-specific coordinate system, but the project database should also store the converted data such that there is consistent record of location associated with other data. While most coordinate systems can be readily converted, the long-held practice for linear transportation projects of station and offset should never be used exclusively on a project; station and offset information is difficult to convert to any standard Cartesian (x, y, z) coordinate system. Readily Transferable Data One of the benefits of most commercial databases is the ability to readily map data from one database to another. This mapping facilitates the ability to transfer data when they are needed, as is often the case when a client selects a different consultant or when a consultantâs project database is different than the agencyâs database, which may include multiple projects and multiple consultants. If a consultant or vendor selects a nonstandard database system for a project, the owner or client should impose the requirement that the consultant or vendor ensures data transferability as part of the current project. Additionally, the owner should not have to incur an additional cost to access data they own. This data transferability tenet can be easily implemented if a standard data transfer protocol is adopted; however, this requirement is not a necessity. The concept of standard data transfer is described in detail subsequently in Section D.7 Documentation of Specific Data Management Strategies The final tenet relates to documenting the specific strategy used by the party to manage its data. There are numerous decisions that must be made regarding data organization (e.g., what type data are allowed and how the data are managed, who is authorized to enter and alter the data once it is entered, and how and by whom can data be corrected or adjusted once in the database). This information should be well documented. The data management strategies document is essentially a living document; it will constantly must be updated as new data sources are included. D.2.2 Data Organization For most geoprofessionalsâ¯particularly those that use spreadsheets for any type of recording or analysis⯠data organization is an inherent (although unrecognized) attribute. In a spreadsheet, each column generally includes specific information that is entered in a specific format. Subsequent analysis or manipulation of this information depends on the format and location of the entered information. When recording data using a database, it is necessary to not only continue this practice, but to remain consistent with the format of the specific data fields and data organization. The basic aspects of data organization are introduced below.
287 Data Organization Data organization acknowledges the concept that all data ultimately must be recovered and used in some manner. Therefore, it is imperative to input data in a consistent format and in a specific location in the database. Consistent format refers to the type and form of the data. For example, if the date is to be recorded in the third column of a spreadsheet or database table, a decision must be made about the format the date will be stored (e.g., mm/dd/year, dd/mm/year, month/dd/yr). Similarly, for numerical entries a decision is necessary regarding whether to store the value in an integer or floating point format. The database does not need to be perfect or complete from its inception to facilitate data organization. New fields, tables, and relationships can be established as the database is being developed. However, once developed and implemented, it is important to acknowledge the specific organization. It is important to devote time at the beginning of a project to think about what data will be used and how to best manage these data. To facilitate the organization as well as the communication of the data organization, it is recommended to develop a data dictionary for the fields in a database. A data dictionary lists the formats of the collected data. An example of an organized data table and data dictionary is provided as Figure D-1. Field Type Key Required Relationship Example Description Location Text(40) PK Y BH2059 Name of element or instrument Station Float 2058.7 Distance along barrier wall to centerpoint of element or instrument (in centerline defined by tblLocation.CenterlineID) [add units to description] Offset Float 0.3 Offset from centerline [add sign convention and units to description] Centerline_ID Text(20) FK Y vvlCenterline.Centerline Name of centerline to account for multiple stationing schemes Northing Float 49504 Y coordinate of centerpoint of element or instrument [add units and coordinate system to description] Easting Float 78990 X coordinate of centerpoint of element or instrument [add units to description] Top_Elevation Float 436 Elevation in ft. msl of ground or platform at location Top_Elevation_Datum Text(40) Guide Wall Description of measurement point for Top_elevation (ground or platform) Location_Type Text(20) FK Y vvlLocationType.LocationType Borehole Classification of element or instrument (pile, borehole, etc.)
288 Field Type Key Required Relationship Example Description Group Text(40) CA 1 User-defined grouping of locations (e.g., critical area, line ID, etc.) Comments Text(255) Date_Appended DateTime Y Date and time of record creation (applied automatically where possible) Date_Modified DateTime Date and time of last record modification (applied automatically where possible) Author_Appended Text(40) Y User ID of record creator (applied automatically where possible) Author_Modified Text(40) User ID of last record modifier (applied automatically where possible) Source: Geosyntec Consultants, Inc.. Figure D-1 Example of data dictionary Although it is easier to maintain consistency by storing data in a database, data can be maintained in a spreadsheet as well. In fact, some of the examples included herein reference spreadsheets, as they are more familiar to most geoprofessionals. Nevertheless, the concepts presented apply equally to spreadsheets and databases. While there are similarities between spreadsheets and databases, there is one important differentiator: Spreadsheets are commonly used to not only store data, but to manipulate the data as well. Manipulation is common to perform calculations involving one or more columns or fields of data and to then record the result in another column or field. While many databases can be used to perform relatively simple data manipulations (e.g., is the value in one column greater or less than the value in another column), complex numerical manipulations are easier to perform in a spreadsheet, and it is recommended that data be copied from a database to a spreadsheet for complex calculations. The database is best used to store the actual data and not the results of numerical operations. Another way of viewing this is to remember one of the tenets of good data managementâ¯single source location of data. When a new data interpretation algorithm is developed and incorporated into practice, it is important to recognize that the derived value is not data and should not be treated as such. Introduction to Data Schema The next step in data management is to formalize the data organization. This formal organization of data is referred to as a data schema, a database schema, or simply a schema. The data schema references the structure of the database to formally identify the relationship (if any) between the various fields in the database. Here again, is one of the primary differences between a spreadsheet and a database. For example, if data from multiple projects in being stored in a single spreadsheet, the first 10 columns may include information related to the project itself (e.g., project number, location, funding sources, and responsible parties). The next 10 columns may contain information about the exploration activities at the site (e.g., the number of borings during a specific phase, the driller, and type of drilling). The next columns may include
289 specific test results at a specific borehole. Because there may be multiple records that describe these activities, it will be necessary to keep track of the previous 20 columns for every data record, so that the data are appropriately referenced and associated with the correct project and drilling activity. To isolate specific fields of interest, the user must sort and filter the spreadsheet. Alternatively, it may be possible to integrate various workbooks in the spreadsheet to keep track of the general project information independent of the geotechnical data, but requires significant organization to be consistent for other users. The database alternative to this would be to have a table that only includes general project-related information (i.e., information from the first 10 columns of the spreadsheet example), while a second table only includes the exploration-related activities (i.e., information from the next 10 columns of the spreadsheet example). A third table may only include the specific test results. There is, however, one field in each of the tables to identify which project and which drilling activity are related to the specific test results. While this creates multiple tables, the tables are focused on similar types of information, which eliminates the constant repetition (and potential opportunity for error) associated with a single very large spreadsheet. Introduction to Parent-Child Relationships and Primary Keys To gain the advantage of the data schema and multiple data tables from the previous section, the user needs a technique to relate the data in one table to the data in another. This manner of relating data fields is the dominant purpose and advantage of a relational database. The parameters that relate the various tables are primary keys. If each table includes the primary key, the relationship between the various data tables is maintained. This concept leads to a concept of parent-child relationships. The analogy to domestic relationships is consistent. Specifically, one set of parents (i.e., a primary key) can be associated with multiple children (i.e., tables), and a child is associated with only one set of parents (i.e., through the use of a primary key). In the geotechnical context, this means that the project table can be related to two (or more) exploration events, which can then, in turn, include multiple borings, piezocone penetration test (CPTu) soundings, or additional information. The primary keys for the project and the exploration event would be included in the table that reports boring logs and CPTu soundings. An example of the data schema that shows multiple parent-child relationships is shown in Figure D-2. Source: Geosyntec Consultants, Inc. Figure D-2. Example of data schema to show primary keys
290 D.2.3 Data Collection Once the commitment is made to manage data instead of managing information, the user should contemplate the best procedures for collecting the requisite data for a project. Following one of the basic tenets of effective data management, collecting and recording data need only be done once. This section introduces some ideas that can be used to facilitate data collection. Efficient Data Collection When a laboratory analyzes samples or when instrument readings are recorded from the field, the results (i.e., data) are typically produced and collected electronically. The most efficient way to capture and collect the data generated from these sources is to simply import the lab data or instrument readings into the project database with minimum human intervention. These data might come from a spreadsheet or a text file that includes information that might not necessarily be included in the database. In these cases, the user needs only electronically map the requisite fields from the spreadsheet to the relational database. While this not an automated solution, it is a one-time action and (importantly) does not require any manually typed data entries. This minimizes the potential for errors, particularly transcription errors. Form-Based Data Collection In many applications, laboratory- or field-based electronic data collection is not possible. In these cases, it is common to capture data using paper and pencil. To facilitate this effort, personnel are encouraged to use a prepared checklist (or form) to help ensure that no handwritten information is inadvertently omitted when collecting laboratory or field data. In cases where forms-based data collection is adopted, technology has allowed the âformsâ to be electronically replicated on tablets or field computers. This is a very efficient technique for data collection and the completed forms are often printed and submitted for review and documentation. These collected data can be electronically transferred to the project database without need for manual data entry. It is recognized that efforts are needed to develop effective data transfer procedures; however, if the field and laboratory forms are developed with an organized data mindset, the resources devoted to developing data transfer operations are well-worth the effort, because once the procedures are developed, they can be used numerous time by a simple click of the button. Thus, this is considered a develop-once-and-use-many-times strategy that is incorporated into many data management practices. Whenever possible, form-based data collection practices are encouraged when manual data recording operations are deemed the only feasible data collection alternative. Automated Data Collection Historically, when conducting laboratory tests, performing field tests and inspections, and obtaining surveying records, the user had to use paper and pencil for data collection and recording. Today, many of these data-collecting operations are facilitated by pushing a âdata captureâ button in which case the data are recorded electronically, where it can be recovered as a text file; in many cases, data collection can now be automated, where the user no longer needs to even push the button. Instead, they simply initiate settings on the instrument to automatically and electronically record data every few seconds or minutes, depending on the type of data being captured. Regardless of the data collection frequency, data are captured in a format that should enable data management without any need for manual entry of any of the collected data. In some cases, manual intervention by cut-and-paste operations may be necessary, but this is hoped to be a single-event operation that can evolve into an automated data transfer operation. While techniques are now available for efficient data collection that minimizes the need for manual data entry, it is recognized that the evolution to effective data management does involve some effort and the
291 development of new skills. Specifically, personnel will likely must learn new computer skills that require computer coding strategies to facilitate the evolution. Eventually, as data management becomes more accepted and endorsed, software will become available to facilitate the operations. In the interim, however, geoprofessionals should anticipate a learning curve. Regardless, the efforts dedicated to facilitating efficient data collection and data management is encouraged, as it will result in effective, efficient data transfer and management. D.2.4 Data Referencing One unique aspect of geotechnical data management is the concept of georeferencing. Georeferencing is a way to express that the data being collected is relevant to a specific location (i.e., the x and y coordinate or the latitude and longitude location) and in many cases at specific depths (i.e., z coordinate or vertical elevation). Georeferencing is the process for assigning a specific coordinate to the captured data. Introduction to Georeferencing The adoption of smart phone technology, Google Mapsâ¢, Google Earthâ¢, and geographic information system (GIS) concepts into day-to-day life has been a subtle introduction to the idea that every place on Earth can be uniquely defined by a set of coordinates. Knowing these coordinates opens numerous doors to many applications (e.g., mapping software to find efficient driving routes, autonomous vehicles that can efficiently navigate from Point A to Point B, and managers/schedulers being able to track the physical location of a vehicle). The notion that a geotechnical boring has a unique physical location on the planet that can be captured is extremely powerful. Recognizing the uniqueness of the location data is acknowledged as georeferencing and is extremely important attribute for geotechnical data management. Efforts should be extended to assign a unique x, y, and (often) z location to each data record. Different Coordinate Systems There are two decision points in assigning and adopting a georeferencing system for a project: (i) determining which system is best and (ii) deciding what to do with historical data captured prior to the now- accepted concepts of georeferencing. Both items can be easily addressed, although it is recognized that initially there will be some technical barriers to overcome prior to full implementation. Regarding the appropriate georeferencing system, there is one discussion focused on the x and y coordinate referencing system and one focused on the vertical referencing system. For the x and y coordinates, latitude and longitude are perhaps the most common system employed today, largely because of the near-universal acceptance of the system. The decision regarding degrees/minute/second (i.e., N43°38'19.39") versus decimal (e.g., 43.63871944444445) representation is project-specific and can be easily converted between representations. For many projects, however, a State Plane coordinate system is adopted by the owner or contractor. As the name implies, these systems are based on planar x-y coordinates to facilitate surveying and ground measurements. Many states are large enough to require multiple planar referencing systems. Software programs (e.g., CORPSCON v. 6.0) and websites (e.g., http://www.earthpoint.us/convert.aspx) can readily make the coordinate transformation between geographic, State Plane, Universal Transverse Mercator, and U.S. National Grid on the North American Datum of 1927 and 1983 (NAD 27 and NAD 83, respectively). Protocols must be established regarding the x-y coordinate system that is referenced in the database. In some cases, it is convenient to report using more than one coordinate system. Regardless of the specific coordinate system that is adopted, a project-specific coordinate system that references an arbitrary 0,0 coordinate as a reference is not recommended. For many transportation projects (particularly historic projects), a linear referencing system was adopted, primarily because of the linear nature of roadways. The notation of a âstationâ and âoffsetâ references a linear distance from the start of
292 the project (often an arbitrary reference to 0+00) reference along a project centerline and offset left or right from the centerline. Conversions from this type of reference system are possible, although it is typically quite labor intensive. Although still used today to facilitate linear measurements and locations, referencing exclusively by station and offset is not recommended. With regards to a consistent reference to vertical location or elevation, it is common to reference the depth below ground surface (bgs) when advancing geotechnical borings and cone-penetration test (CPT) soundings. To assign a unique location, it is preferred to use elevation when citing a subsurface sample. To allow reference to elevation (in lieu of depth), two vertical reference datums are common: the National Geodetic Vertical Datum of 1929 (NGVD 1929) or the North American Vertical Datum of 1988 (NAVD 88). The selected vertical datum must be explicitly referenced. Because the interpreted data in various assessment applications may depend on depth and other application may require elevation, it is recommended that both elevation and depth bgs be recorded in the project database. D.2.5 Computing Infrastructure As mentioned previously, one fundamental difference between data recording in a spreadsheet and a relational database, is the relative ease of including calculation results in a spreadsheet. It is better to complete calculations before entry into the project database. It is recognized that the output of the geotechnical monitoring and testing equipment used to collect results of laboratory and field tests may be in millivolts, volts, or frequency. Often, other applications (either internal or external to the data recorder) perform calculations and represent the data in conventional engineering units of force, displacement, or pressure. In some cases, the collected data represent the result of calculations performed to calculate additional information, such as stress, torque, and strain, that are used for the tested interval or specimen. This section provides a discussion of decisions that must be made regarding this dilemma. Storing Raw Data or Engineering Values A decision needs to be made regarding which of the aforementioned data elements are the data that should be captured and maintained in the database. Generally, data and calculation results are often designated for storage in the database. With regards to geotechnical monitoring instruments, there are no rules regarding these decisions. However, it is recommended that the basic engineering units calculated from the instrument readings themselves are the most appropriate to be recorded in the project database. This may be from the data-capture instrument itself or as the calculation result from another application. For instance, if a vibrating wire piezometer is used for data capture, the instrument output will be a frequency that when used in collaboration with calibration parameters can be converted to a pressure; the calculated pressure is recorded as data. Some instrument manufacturers recognize this dilemma and provide the opportunity to independently capture the raw data (in the example case, this would be the frequency) in a separate file that can be stored in a separate folder that can hyperlinked from the database should there be a need. This dual storage strategy is recommended, particularly on critical projects where archiving data is deemed critical. There is another item to consider regarding the data that are collected and stored in the project database. Because data are critical to current and future project activities, it is best to capture relevant information regarding the origin of the collected data. This includes information regarding when the data were collected, how it was collected, and potential information regarding the source of the data. This data about the data is referenced as metadata and is also stored in the project database. An example metadata file is presented as Table D-1.
293 Table D-1. Example of Project Metadata TableName SourceDatabase ObjectType Description Author vXs_PlanesExport /Features Shapefile Lines in plan view at GDOT provided Station R. Bachus tblAccelerograph prjBlackDMS Table Accelerograph Table G. Rix ReportsLibrary AASHTO_3D.gdb GDB Feature Class Imported from LiDAR data digitized in MicroStation J. Speed Nottley_Lake_Basin Data/Sidescan_Data Raster Raster with combined .tif files L. Leighton TblAnchos_AsBuilt AnchodID prjBlackDMS As-built anchor installation details P. Sabatini Source: Geosyntec Consultants, Inc. Calculations Stored in Database As described above, it must be decided which information is going to be collected and managed in the database (i.e., raw data, engineering units, or calculation results). While there is no definitive answer, the general rule is that calculation results should be stored in the project database, while the raw data collected from the instrument is managed independently in the instrumentation database. How these values are calculated are captured in the metadata. If the raw data is stored in an external file or database, the metadata captures this information. Other calculation results may be obtained from a spreadsheet that is also acknowledged as metadata. It is important to provide comprehensive references regarding any actions taken to capture the data represented in the project database. D.3 Guidelines for Implementing a Geotechnical Data Management System Once it has been decided that a data management system will be implemented, the next step for the user or agency is to consider how the data will be used. For example, is it necessary to simply archive information for later use or will the user use the collected information to generate summary or interpretative reports? This section will address the considerations that should direct subsequent decisions regarding the adopted data management system. The first component builds on recognizing that data should be stored one time in one place and that there are rules for entering and editing the stored data. The agency needs to also establish how it wants the data to be accessed and used. Since there will now only be a single source of data, it is critically important that the data in the database be considered valid. Therefore, this section will also discuss the concepts related to a data dictionary, acceptable values of data, and procedures to ensure that only valid data are stored in the project database. Finally, the user or agency needs to consider how the collected data will be used and interpreted. Since the data are always available in a consistent and
294 validated form, it is possible to develop reports, data summary tables, and plots directly from the database. This section will provide an introduction on the end use of the data. D.3.1 Project Database In this section, some basic concepts common to all databases will be introduced and recommended practices will be provided regarding database management. Questions regarding specific data management software will be described in Section D.4. Data Management Practices Maintaining geotechnical data in a project database is not typically taught at a university, so many of the concepts introduced thus far are somewhat foreign to the geoprofessional. Therefore, new skill sets will must be acquired to become proficient data managers. Previous sections introduced the basic tenets regarding data management, as well as some basic differences between spreadsheets (which are commonly used by geoprofessionals) and databases. A logical question relates to the basic operations of a database. Whereas a spreadsheet can be considered a large data table, a database is really a series of related tables, with each table containing a specific bit of information. Before one considers how to manage that information, it is necessary to define the type of data that will be captured and maintained. The first step in effective data management practice relates to organizing the dataâ¯the way data are captured, entered, and maintained in the project database and the way the data will ultimately be used. This process is defined as the project work flow and is a necessary first component of data management. An example work-flow diagram for a construction project that uses geotechnical data is presented in Figure D-3. As can be seen in this figure, the diversity of data, the type of data, the methods for data capture, transfer of data, and data visualization were all considered while developing the project management strategy. Source: Geosyntec Consultants, Inc. Figure D-3. Example project work flow diagram
295 User Considerations A critical component of the project work flow relates to the role of the various users of the data management system. As shown on the left side of Figure D-3, the user may be engaged in the earliest stage of data collection, as they may be responsible for populating the forms-based template. User training is important, to facilitate data entry and minimize the chance for operator error (or missed data). Similarly, as data will likely be originating from several disparate sources in multiple formats, concepts regarding data transfer, data storage, and data retrieval must be developed. It is imperative to minimize the chances of incorrect data being entered or critical measurements being inadvertently missed. The middle section of Figure D-3 also has a user-consideration component. Specifically, will the user be involved with storing and managing the data or will this be the domain of the database manager? In more cases than not, the previously identified database champion will serve as database manager, but as data management practices are honed and adopted, the reliance on a single person will likely be overwhelming, so tools and techniques must be considered for developing and optimizing the database structure. This is where the data dictionary, data schema, and parent-child relationship between the numerous project tables needs to be established and documented. The user also figures prominently in the right side of Figure D-3, specifically as the end user. The user can decide the best way to use the data to serve specific needs. In some cases, it may be a simple output that can be incorporated into another program or application. The user will most likely want to visually display the contents of the database in the form of tabulated results, summary, or a plot. Graphical representations or visual summaries from the database are an ideal way to facilitate assessment of results. D.3.2 Database Access and Use Once the data are in the database, the goal is to make the content available to all appropriately authorized personnel. To accomplish this, some planning is essential. This section provides a discussion regarding the recorded data and user access to these data. Enterprise vs. Desktop Because it is necessary to keep the data in only one location, choosing the most appropriate location of the physical database is important. For most organizations, sharing the data is the key. This implies that the data are hosted by a central (i.e., enterprise) server that can be accessed via a computer network by authorized members of its entire organization from any remote location. For one-off projects or in cases where there is a single point of contact for data management, hosting the database on an individual computer may be appropriate. The three primary advantages of the enterprise solution are (i) simultaneous access to multiple users; (ii) access, data backup, and security protocols often managed by the organizationâs information technology (IT) department; and (iii) version control is relatively easy to maintain. Version Control As mentioned in previous sections, data should reside in only one location, and this location should be under the control and management of a single individual. If this tenet is followed, previously noted problems related to version control become a thing of the past. When a user needs access to the data, they can copy relevant tables from the database to their local computer using queries. Alternatively, user-defined queries of the database can produce reports, tabulated summaries, and other summaries. If individuals need access to specific data or the entire database, they can download it to a local computer. They will, however, not be allowed to then upload to the database as there is a chance that the data could have been altered; only the database manager should have permission to modify the data. Even when changes by authorized personnel are allowed, the changes and the reasons for the changes must be documented.
296 D.3.3 Data Validation Just because data are collected and recorded, does not mean that the data are always 100 percent correct. Errors could be due to transposing numbers or placing data in an incorrect field. In the former case, a project in Kansas may show up in the database as being in California. In the latter case, the database may be expecting a date and the entry inadvertently provides temperature or load. To minimize the potential for these types of errors, there are tools that can facilitate the recording of valid data. Even if there are no errors in recording the data, there is still a chance that the data are wrong (e.g., test was conducted improperly, test equipment was not correctly calibrated). These types of errors must be identified in a data quality assessment by the appropriately trained professional responsible for data collection. The database can be tested for valid data but cannot be used independently to guarantee accurate or correct data. Data Dictionary One of the easiest ways to ensure that valid data are captured is to give some forethought regarding the content of each field entered into the database. As mentioned previously, some fields will be associated with location, some regarding dates, and others regarding readings (e.g., load, temperature, displacement, pressure). In setting up the data schema and potentially the input templates, the developer simply informs the user regarding the types of data expected and the format for these data. In some cases, typical values are provided in the data dictionary. An example of a data dictionary was previously presented in Figure D- 1; a data dictionary should be a required project document. Acceptable Values Closely following the data dictionary is the consideration of acceptable values. For example, while the date can be recorded by the user in any number of formats, only one format should be accepted in the database. Therefore, if an alternate date format is entered by the user, the database will reject the entry, as the value is unacceptable. Similarly, if ambient air temperature is considered as data, then an air temperature of 650° F is clearly in error and would be rejected before it is entered into the database. The selection of acceptable values can be facilitated by use of drop-down menus that provides a priori a list of acceptable values for select data fields. Again, the benefits by the developer in considering acceptable values will be helpful to the user. D.3.4 Data Visualization Viewing and reviewing project-related data visually can alert users to possible errors in data entry. Data values that are in error and that may have been inadvertently overlooked in a table or list may be overlooked when viewed in a tabular format, but would be easily caught by the human eye trained to observe trends. While data visualization strategies are considered good practice in many arenas, it may well be considered essential in the world of big data. End-User Considerations There are any number of ways to present data in a visually appealing manner. It is recommended that the database manager (who might not necessarily be a geoprofessional by formal training) collaborate with a geoprofessional, subject matter expert, or owner to understand how the data may be used and what form of data representation will be most beneficial. The collaboration between the database developer or database manager and the end-user is invaluable and is highly recommended. From the end-userâs perspective, the existence of a suite of data that was previously unavailable allows the end-user to potentially explore new ways to view the results to gain insight regarding interpretation of the results. Recall that this was one of
297 the big advantages to adopting more efficient techniques for data management. Therefore, it is strongly recommended that data visualization strategies be considered with an end-user interface in mind in the early stages of project database development. Reports, Graphs, and Plots Technology allows data representation to be provided in several different formats and a host of options should be considered by the user. More importantly is the notion that different users may have a desire to visualize the same data from a different focused perspective. For example, given a geotechnical instrumentation program on a critical project, the instrumentation engineer may must see all data from each instrument on a five-minute interval, whereas the project manager only needs to see the hourly or daily trends in compiled results. The project director or client may only must see verification that none of the instruments are in a state of alarm in which the recorded value exceeds a user-defined threshold that is indicative of performance. Depending on the needs of the various project participants and stakeholders, a custom report, graph, or plot can be automatically generated and distributed directly from the project database and e-mailed, as appropriate. This function simply requires that some forethought be given to the project requirements as part of the database design and database management development. D.4 Software Requirements for the Data Management System Once the commitment to data management is made, the next critical decision relates to the requirements for the data management software. This decision is followed by selecting the various software applications that will incorporate information in the project database. D.4.1 Database Software The software used for the geotechnical database run the gamut from proprietary systems, commercial systems, and open-source systems. The selected system depends of many factors, to include preferences of the user and owner, internal software support, number of simultaneous users, and internet accessibility. There are advantages and disadvantages to each option, so there are no specific recommendations or hard- and-fast rules. The most important factors to consider are (i) the selected system meets the project or agency requirements and (ii) if the database selected for the geotechnical data management system is different than a larger agency-level data management system, the systems should be compatible. This latter suggestion is because experience has shown that once a data management commitment is made, there will undoubtedly be a desire to integrate data from various disparate sources. Software Identification There are many commercial, proprietary, and open-source software products available to the user, and the selection of the appropriate database product is often not well researched to identify the most appropriate system for the project and organization. In reality, the decision is often based on cost, but should also be governed by the way the agency wants the information and data to be used (e.g., number of simultaneous users, size of the database, database access). In some cases, it may be possible for a single user to maintain a database on an individual desktop computer, while in other cases, there may be multiple users accessing the database for information concurrently. Unless there is a project-specific need for a one-time use, it is recommended to consider the multiple-user scenario to allow maximum flexibility and anticipated growth. The important lesson, however, is that regardless of the system being used, there is only one real official record of the data (i.e., the project database). While copies of the database can be used and manipulated, the data resides in the project database. Consideration should also be given to compatibility between data management software. While this is usually not a problem with commercial software and open-source
298 solutions, there may be limited options when using proprietary database programs, primarily because these software vendors have a commercial interest in limiting the options that users have. Again, this practice is highly discouraged and when presented with this option, the user should simply decline and look for other more sustainable solutions. Advantages, Disadvantages, and Considerations There are many choices for database management software solutions. As mentioned in the previous section, these run the gamut of commercial, proprietary, and open-source options. The following summarizes the advantages and disadvantages of each option: ⢠Commercial: The commercially available database software options are among the most common, primarily because they were developed to address wide variations in database management objectives. An example (but not exhaustive) list includes (i) Microsoft Access, (ii) Microsoft SQL Server, (iii) Oracle SQL Server, and (iv) IBM DB-2. Some of the advantages of these programs are general flexibility, helpful documentation, available helplines, and a large user community. Many of these software packages can be purchased, but there are often annual licensing agreements associated with the programs. When considering commercial alternatives, the user needs to insist that the software have backward compatibility. This will ensure that migrating data stored and managed in an earlier version of the program to a new updated version of the program will be simple and complete. For future reference, the commercial software is often referenced as the back-end databaseâ¯the end where all the work is being done. ⢠Proprietary: There are currently many proprietary database alternatives for geotechnical and geoenvironmental data management. An example (but not exhaustive) list of vendors and their software packages includes (i) Bentley: gINT; (ii) Keynetix: HoleBase; (iii) Dataforensics: PLog; (iv) ESCiS: ESdat; (v) EarthSoft: EQuIS; (vi) EnviroData: EnviroData; and (vii) AF Howland: GeoDASY. While many of these software packages can be purchased, there is an increasing desire by vendors to lease the programs, where a license for use is renewed each year. This allows for regular upgrades to the most current version of the program. Although these are referenced as data management programs, they are typically the front-end to a commercial or open-source database. The chief benefit of proprietary programs is that they are generally more user-friendly, as the front-end component includes user-friendly interfaces that automatically populate the back- end database. This can be very advantageous, as it facilitates the migration to data management. The downside is usually related to the cost and licensing fees that commonly are derived by the number of users. Two factors must be explicitly considered: the user should insist on backward compatibility between new and old versions of the program and probably most importantly, the user needs to have permanent access to the back-end database if a license is not renewed with a specific vendor. Failure to insist on this permanent access to the back-end database allows the vendor to hold data hostageâ¯a situation that an agency or owner does not want to find themselves in. ⢠Open-source: There is an ever-increasing number of open-source database management options. An example (but not exhaustive) list includes (i) Firebird, (ii) Oracle MySQL, (iii) PostgreSQL, and (iv) SQLlite. The term open source implies that the data schema is published and available for use, modification, and distribution to a user community without the need for a license. The dominant advantage of these programs is dominantly cost, as well as the satisfaction of contributing to an entrepreneurial community that provides readily available computer solutions.
299 The disadvantages include the lack of documentation and product support, although a community of like-minded users generally avail themselves to help support the product. The primary disadvantage, however, is that the longevity of the product is not guaranteed, so the user will likely must be computer savvy and have the ability to code as needed to maintain the program and to increase functionality. D.4.2 Application Software Used by the Database With reference to Figure D-3, the database can both receive data from several sources and provide data to several different applications. The options are near-limitless, particularly in todayâs computer-centric world, and need only be compatible with the database. Typical Software Identification Software can be used to provide data to the database. These data can be as simple as comma separated variable (*.csv) text files or spreadsheets. It is common for data to be imported directly from laboratory or field instruments as well as field computers in a *.csv format. Data transfer protocols, as discussed in Section D.7 are also common techniques for data entry. As discussed previously, vendors can provide front- end application to facilitate data entry. Application software can also be used to process and visualize data retrieved from the database. Again, *.csv, spreadsheet, or data transfer protocols can be used to retrieve data from the database in a commonly used format. Once in a spreadsheet, users are generally well-versed in developing tabulated summaries and graphs. Additionally, there are numerous commercial and open-source application products available to the user, depending on the functionality that is desired. As database management practices evolve, it is expected that the number of available output options will expand significantly over the next several years. Regardless of the selected method for data input and output, the user should not forget the invaluable tenet that automated data transfer is much preferred to cut-and-paste actions. Therefore, it may require a degree of coding to essentially automate the various data mapping activities. Again, experience has shown that these efforts are well worth the investment of resources. Advantages, Disadvantages, and Considerations The advantages of a simple *.csv and spreadsheet data entry is that it is extremely flexible and can accommodate almost any type of electronic data. The disadvantage is that it may require new skills and coding experience to facilitate seamless mapping and data entry. The obvious advantage of a vendor- provided front-end is that the vendor has provided the coding expertise in the application software and mapping is done automatically as part of the package. The disadvantage is cost and the potential that the user may have to adapt their data input needs to the specific software offered by the vendor. On the data output side, again the advantage of *.csv formats and spreadsheets lies in their flexibility, simplicity, and user familiarity. The disadvantages of these formats are that the graphical outputs may look rudimentary and unprofessional. Commercial and open-source application generally solve this problem but may require the acquisition of additional skills to map the data. D.4.3 Web Viewing and Reporting Alternatives and Options As stated previously, there are numerous advantages to maintaining the database on a central server in lieu of an individual computer. One critical advantage is that access to the database can be granted and provided to multiple simultaneous authorized users over the internet, so physical location and proximity to the database is not an issue. Before final selection of a project or organization database is made, the
300 capability and functionality of the database should be ensured. An SQL-based database is often selected because of its demonstrated ability to function in this capacity. Web access can be protected by any number of security protocols such that only authorized users are entitled access. Depending on the rights granted by the database administrator, web access can be limited to viewing only or data entry only. It is possible to provide complete access to authorized users such that data queries can be performed such that the host of data output options can be provided to authorized users. Coding Requirement As the enhanced functions of the database are engaged, experience has indicated that there will be a need for training and limited amounts of coding expertise. This is often left within the domain of the database manager or administrator, but as geotechnical data management gains traction, it is anticipated that the computer coding skills of geoprofessionals will likely must be enhanced. Therefore, the organization should be prepared to commit time and financial resources to provided training to expand the userâs skill set. Advantages, Disadvantages, and Considerations The advantages to web deployment and access are too numerous to categorize. In 2018, geoprofessionals (and the general population) have accepted and in fact, come to rely on, web access to data. One needs look no further than to online bill paying, automated airline and hotel reservations, and banking transactions, to appreciate how dependent we have become to web access of data. It is inconceivable that the geoprofessionals will not quickly be faced (or forced) to adopt this standard of practice. Despite the advantages cited, there are disadvantages and hazards related to widely accessible data. Data security issues are paramount and will continue to be a concern. Organizations are fast recognizing these challenges and the geoprofessional community will benefit from the protocols that are developed to safeguard personal data and data breaches. While a geotechnical data breach may not represent a catastrophe, losing geotechnical data would have severe consequences. For this reason, it is critical that protocols be established to provide regular electronic backups of the database. For organizations with established IT departments, this is a routine and required activity. It is imperative that data backup procedures be developed, implemented, and followed. D.4.4 Geographic Information Systems Producing visual representations of georeferenced data (e.g., graphs, maps) are possible because of GIS technology. Because data are georeferenced, they can be placed in a consistent geographic framework and displayed on a map. Although the concepts are relatively mature, the power of GIS in data management has been recognized to the point that the database behind the GIS can be capture, store, manage, analyze, and visualize data. The concept of a GIS is to represent common data on a georeferenced layer that can be turned on or off when viewing or analyzing the data. In principal, when one looks a flat map that shows information (e.g., a road, building, geotechnical boring log locations, groundwater levels), it looks like a complicated network of data on a single map. In reality, each of these elements (e.g., roads, building, boring locations, groundwater wells) are represented on individual transparent layers that are compiled through georeferencing. These different layers allow the users to view all items they need, while hiding the visual noise of the items they do not must see. Software Identification There are currently many commercial and open-source GIS programs available. The geoprofession is but one minor avenue that uses this technology. In the future, geoprofessionals should expect to see more interest and utility due to how functional GIS programs are. An example (but not exhaustive) list of vendors
301 offering commercial packages includes (i) Bentley, (ii) Autodesk, (iii) Tableau, (iv) ESRI, (v) Intergraph, and (vi) MapInfo. There are numerous open-source GIS packages. As with most open-source programs, these are free to the user and appear to have a well-established support community that is interested in expanding the use of GIS. An example (but not exhaustive) list of companies offering open-source GIS packages includes (i) QGIS, (ii) Whitebox GAT, (iii) SAGA GIS, (iv) MapWindow, (v) OpenJump, (vi) GRASS GIS, and (vii) FalconView. Many of these tend to favor various mapping functions and map overlays, but are expected to adequately represent geospatial data for geoprofessionals. In addition, there are map-based systems that are essentially GIS in spirit that have been to represent geotechnical and geologic boring and testing locations. An example (but not exhaustive) list of products includes (i) Google Maps, (ii) Bing Maps, (iii) OpenStreetMaps, (iv) Apple Maps, and (v) ArcGIS. The New Zealand Geotechnical Database, developed in the aftermath of the Christchurch earthquake in 2011 provides a map interface for its nationally supported geotechnical database. Advantages, Disadvantages, and Considerations It is difficult to note any disadvantages to incorporating GIS technologies into the geotechnical data management arena. GIS is a compelling and useful tool for aiding in the collection, storage, management, analysis, and visualization of geotechnical, geologic, and geoenvironmental data. Systems can be deployed on individual computers, over the web, and through smart phones. GIS is especially relevant for transportation systems that are most commonly represented and best cataloged on a map. Perhaps the biggest disadvantage of these systems is that management of GIS data truly requires a dedicated data management individual or staff because the GIS is essentially a front-end to a relational database with extensive postprocessing data visualization capabilities. The learning curve can be steep to become truly proficient in its use. Another disadvantage relates to selecting the program that best suits the needs of the project or organization. Commercial packages are extremely well supported on the technical front. Open- source system are fast gaining popularity, but may fall into disfavor for large organization because of the heavy investment in resources and the uncertainty regarding longevity of the products. D.5 Data Sources Considered in a Geotechnical Data Management System A common question regarding geotechnical data management is âwhat is considered geotechnical data?â A more realistic question is âwhat is not considered geotechnical data?â Once one starts to think of geotechnical information as data, there are a plethora of data sources that will be invaluable to the geoprofessional. D.5.1 Traditional Project Information Inventories Maintained by Agencies Perhaps the lowest hanging fruit for consideration of geotechnical data involves the traditional data that are routinely captured by DOTs for use on projects. Examples of how these data are used in a geotechnical database are discussed below. Field and Laboratory Test Results Historically, the geotechnical data State DOTs collect and use for design is most commonly geotechnical boring logs, followed closely by laboratory test data. With regard to geotechnical boring data, most State DOTs currently use gINT to record and capture these data. Most DOTs only use the gINT program to produce boring logs; it has only been in the recent years that the agencies have started to view and manage the boring logs as data. In most cases, they still only use the back-end to gINT for boring logs and seldom capture other associated data.
302 Geotechnical laboratory data would be the next most logical candidate for the database. Once these data are captured and assessed, State and regional characterization assessment could be readily performed. As mentioned previously, if laboratory data are to be managed in a database, a decision needs to be made regarding raw data for the laboratory testing equipment or the derived engineering values. It is recommended that, in fact, both data get captured and stored. Raw data can reside in a laboratory test database, while the derived engineering results can be managed in the larger geotechnical database where they will be analyzed and assessed. Data from Geotechnical Instrumentation Almost all geotechnical instruments currently record data digitally and electronically. It is common that these results are exported as *.csv files. Transferring these data to the geotechnical database is the next step. Once introduced to the database, it will be possible to easily compare laboratory test results and field performance. There are few obstacles for developing the input algorithms (or templates) to facilitate data entry. Geohazards The transportation and geology community have developed significant data regarding geohazards (e.g., landslides, karst, earthquake faults, rockslides.) as these have significant adverse impacts on transportation infrastructure. Most of the compiled geohazard information is presented on maps, so coupling these data with those from specific test boring locations using GIS tools can provide powerful capabilities to geoprofessionals. Geotechnical Assets There is currently a significant focus in the transportation community on asset management including geotechnical assets. Because transportation assets are associated with specific locations, an integrated GIS database is ideal to manage and analyze these data. D.5.2 Project Data from Nontraditional Sources The previous section identified data sources that are logical candidates for a geotechnical data management system. Experience has shown that there are several nontraditional data sources that can prove invaluable to making geotechnical decisions. A few of these will be introduced and discussed. Construction Information While geotechnical subsurface characterization data can be easily georeferenced and considered in the database, it is well known that project budgets are dominated not by the cost of the investigation, but rather by the cost of construction. Yet valuable information is captured by construction managers to assess pay items, but seldom are these data available to geoprofessionals to inform geotechnical decisions. Recent experience with projects with the U.S. Army Corps of Engineers has demonstrated the value in compiling construction-related data, not only to inform geotechnical decisions but to provide valuable construction quality assurance (CQA) verification. Once in the database, it would be possible to assess potential changed site conditions and any impacts of certain geotechnical features on construction progress and compare construction production rates associated with specific geotechnical settings. All of this is possible if data are entered in the geotechnical database.
303 Performance Monitoring Information The geotechnical instrumentation that may be used during site investigation or during construction are often left in place to monitor performance after construction is complete. If these records are provided in the database, then performance can be associated with specific geotechnical condition, construction difficulties, geohazards, or other events. The end use of these compiled data could be extremely powerful in the hands of managers and planners. Maintenance Records While construction costs are critical factors in a State DOT budget, the day-to-day expenses related to maintenance can quickly accumulate, often without the knowledge of other departments. If inspection and maintenance records were georeferenced, the data could again be correlated to site characterization information. Knowing the signs and progression of increased maintenance could lead to developing preventive maintenance programs across a state level or nationally. This has been observed to reduce emergency action funding requirement in the United Kingdom and could be an interpreted outcome of the geotechnical database. D.5.3 Historical Information for Region Geotechnical data for transportation projects are often associated with projects, but DOTs typically have multiple projects within a specific region or district. If projects are viewed as independent elements, then it is difficult to learn lessons from one project and extend them to others within the region. If data are maintained in a georeferenced database, the user could query the database for all projects within a specific geologic formation or geographically similar region or other parameters and compare boring, test results, construction costs, maintenance requirements, and postconstruction performance. Geological Information Geologic information is perhaps the easiest to visualize on a regional basis. Geologic maps are now georeferenced and readily imported to GIS platforms and used as layers to provide and underlying frame of reference. Significantly, geologic boundaries do not necessarily honor state borders, so information compiled in northeast Tennessee may be valuable for a project is western Virginia. If data were compiled by State DOTs in a consistent manner (an effort that could be suggested at a national level), it would be possible to beneficially use data throughout a geologic province. Hydrologic and Hydrogeologic Data Geoprofessionals recognize the critical role that water plays in geotechnical projects and performance. Water is also a critical subject of study for hydrologists and hydrogeologists. Information from these disparate groups is commonly georeferenced, but may not be consistently recognized by geoprofessionals. Once again, if consistently georeferenced, the data can be easily accessed and at least considered by others in the geoprofession. Similar to geologic information, these data can be made available for multiple uses by various geoprofessionals by being tracked on separate layers in a GIS map. D.5.4 Research Data Geotechnical data may be used for project-related activities and then archived until the next project in the area requires the use of the data. And these same data can be continuously reviewed, updated, and subject to various geostatistical assessments to establish state- or region-wide correlations. Thus, the
304 database can be viewed as a tremendous resource to researchers. This is yet another positive attribute and benefit that comes from a commitment to manage geotechnical data. Agency-Supported Research Findings State DOTs often fund research studies focused on specific problems in specific regions (e.g., expansive soils near Dallas, Texas; pile load tests in New Orleans, Louisiana; liquefiable sands near Columbia, South Carolina). If researchers had access to geotechnical data from the State DOT districts, local municipalities, and even private owners and developers in a common georeferenced database, it would facilitate analysis of the data and minimize the mundane effort (and extensive budget) devoted to locating data files, manually entering the data, and then compiling the data into a database. Research budgets could be put to better use, and significant value should be expected. National Research Findings What starts at a state level is amplified when one considers national ramifications of a consistent database. Admittedly, the effort to consider data compilation at a national scale could be overwhelming, but the benefits are easy to envision. For example, conditions that lead to rockfalls in Colorado could be easily compared to conditions in Oregon, Tennessee, and North Carolina and the finding, performance, and lessons in these different geologic conditions could be compared. Similarly, the concept of a national pile load database would be more easily envisioned if standard templates were used to collect data from all projects across the country. Geoprofessionals at the state and national level could help influence decisions regarding data consistency, as they would be the primary beneficiaries of consistently compiled georeferenced data. D.5.5 Geoenvironmental Remediation While State DOTs occasionally encounter adverse geoenvironmental conditions that must be remediated, these are often considered one-off projects that are thoroughly investigated, remediated, and then closed. Again, valuable data are often gathered during these investigations. When viewed in companion with other geotechnical information in the area, geoenvironmental data can be consider valuable supplementary data. If coupled with geoenvironmental data submitted to United States Environmental Protection Agency (EPA) and considered to be in the public domain, geoenvironmental data can be a lost-cost addition to geotechnical site characterization assessments. Monitoring Well Construction Records Geoprofessionals frequently need information regarding water levels. For geoenvironmental projects, it is common to install numerous groundwater wells that are screened across specific zones. The density of the wells is typically such that it is possible to assess groundwater flow direction within specific hydrogeologic units. This level of detail is seldom available for most projects focused exclusively on geotechnical characterization. Therefore, these data could be used to significantly enhance the geotechnical characterization of a project site. Site-Specific Geologic Information Geologic data is now available electronically and on georeferenced maps. For many geoenvironmental projects a conceptual site model is developed based on the geologic and hydrogeologic conditions. For these projects, the interpreted geology often far surpasses the presentations made during investigations
305 focused primarily of geotechnical data. Having access to this information in a common reference system, will likely prove valuable to the geotechnical project. D.6 Business Processes Considered in a Geotechnical Data Management System As referenced in Section D.1, a successful geotechnical data management system requires senior management support, efforts by a system champion, and commitment to sustainability. This section will focus on the business-related aspects of data management. Words like support, efforts, and commitment imply financial resources devoted to making a data management system successful. There is truly a business component of data management that cannot be overlooked; this component will be addressed in this section. D.6.1 Data Collection and Management There are three progressive business elements that must be considered. The first element is the physical process of data collection and data management. These efforts focus on finding the most efficient techniques to get valid information and data into a data management system. This work will largely be the responsibility of the identified champion who can see the link between the collected data, the database, and the visualized results. Data Collection Data collection is time consuming and resource intensive. If efficient techniques are invoked for collecting the data, the resources responsible for data collection can be reduced, in many cases significantly. This is facilitated using templates and automated data entry. Most importantly, however, the data that are collected and conveyed to the database will not now be relegated to the paper files that are stored in boxes in the basement. These data will be allowed to survive and flourish in the database, where they can be reused effortlessly for future endeavors. This is a point that needs to be brought to the attention of management. Data Management If data management has not yet been considered, the addition of this component sounds initially as an additional expense that had not been budgeted. While some of this is true, effective data management implies that resources are not expended to locate archived files, to manually reenter data into a spreadsheet, and to cut-and-paste various fields to compile tables and plots of the data. If a conscious effort is made to account for the time and resource savings, these avoided tasks can offset the cost associated with the new project task of database manager. In discussions with several agencies who have made the transition, it has been reported that effective data management is an excellent way to extend project budgets and accomplish more than had been realized following the traditional information (not data) management activities. D.6.2 Data Analysis and Visualization The second element focuses on the end users who will perform analyses and identify the requisite plots, tables, and visualization requirements. Again, the database management champion will be important, but well-trained users are inherent to a valuable data management system. New skill sets will often must be developed.
306 Data Analysis Historically, geoprofessionals have dedicated much of the allocated time for the project to collect and compile the data, resulting in less-than-desired time for data analysis. If the data collection and compilation efforts can be streamlined, then there should be time available for analysis of the data. This is one of the subliminal benefits of effective data managementâ¯geoprofessionals are provided more opportunities to do productive work, rather than devoting extensive time essentially on clerical activities. With this new-found opportunity comes the potential for better integrating and evaluating data, performing analyses, and assessing results. Data Visualization Preparing summary tables, plots, and graphs have historically been time consuming because it normally required cut-and-paste efforts from large files. As a result, it is usually the traditional data summary plots and test results that are generated. While it is recognized that additional benefits could be gleaned from the data, there is usually insufficient time to perform these functions and assess various âwhat ifâ options. A benefit of effective data management is that data visualization can become much more efficient, thus allowing additional time to explore other ways to view or interpret that data. For example, using the database, allows time to perform geostatistical evaluations on the data and generate additional useful graphs and plots (e.g., probability distribution graphs, cross-correlation plots). These efforts are anticipated to increase confidence in the test results, improve understanding of the variability of the results, and allow better assessment of the sensitivity of various parameters on the design. Again, for the time previously allocated to providing data interpretation, the geoprofessional using the database can be much more productive. This information is anticipated to have significant benefit in the load and resistance factor design method adopted by FHWA, as the owner can realize financial advantages when the variability of parameters is reduced. These benefits must be confirmed and brought to the attention of management. D.6.3 Integration of Data with other Systems The third element includes techniques and efforts to demonstrate the value of the geotechnical data to the nongeotechnical professionals. These may include project managers, construction managers, and owners, who see the integration of the geotechnical data with other sources of data (e.g., project productivity, construction costs) as a value-added component of the project that is worthy of their supportâ¯physically and financially. These aspects contribute to the value and the sustainability of the data management system. Data Integration with Business Units Geotechnical data can often be considered a silo of information that serves a single function on a project (e.g., specifically to size a footing or pile, assess a safe slope angle). Once completed, it is not unusual for the geotechnical data (and the geoprofessional) to no longer participate in the project. But, the geotechnical database can be used to manage other important project data that are related to geotechnical performance, including construction information, CQA records, and instrumentations records. As such the database can (and should) become a valuable part of the entire project. Using the database, the geoprofessional can query other project personnel to understand what type of data can be included in the database that would beneficial to them. This information will not only strengthen the database, but also keep the geoprofessional engaged for the duration of the project. As postconstruction performance monitoring may be considered (or required) and as maintenance records are periodically entered, the geoprofessional will again be able to contribute.
307 Data Integration with Other Technical Units Within the agency organization, there are other technical units, including hydraulics, pavements, and structures, that have a need for geotechnical data. The geotechnical database can also store, manage, or reference geotechnical information that are related to the project success. For example, pavement conditions and pavement maintenance records are anticipated to be related to subgrade conditions and precipitation records. Again, storing relevant information or dereferencing this information in a database will not only allow maximum utility of the geotechnical data, but will keep the geoprofessional engaged. D.7 Data Interchange for Geotechnical and Geoenvironmental Specialists (DIGGS) Format Previous sections of this appendix discussed the relative merits and utility of geotechnical data management. Once a commitment is made by an organization to implement a data management system, one focus needs to identify the most efficient way to get information into and out of the database. For most geoprofessionals who have interacted with FHWA and State DOTs over the past 15 years, they have heard reference to standardized data and data transfer protocols. During this time, FHWA in collaboration with the Ohio DOT and the G-I have been working on a data interchange format referenced as DIGGS. DIGGS is the standardized data transfer protocol for the geotechnical and geoenvironmental data most commonly used by geoprofessionals. DIGGS is now available to the entire industry and can be accessed through the DIGGS website1 or at the G-Iâs website2. This section provides a brief introduction to DIGGS and shows how DIGGS can (and should) be incorporated into the routine practice of geoprofessionals D.7.1 Benefits of Using DIGGS One of the most important aspects of DIGGS, and one of the hardest for geoprofessionals to comprehend, is that DIGGS is explicitly not a database, but rather a protocol for getting data into a database. If the DIGGS development team opted to define a specific database schema or suggest a specific database as a solution, the decision would have been met with resistance because it would force DOTs, agencies, and users to adopt a very specific data management strategy. Rather, in the early days of development, the extensible markup language (XML) was selected as a standard for exchanging data. While not necessarily being well understood by geoprofessionals, XML is the common data transfer format adopted by the computer science industry. The user can think of the link between XML and geotechnical data in the same spirit as the link between HTML and the internet community. In this spirit, it is recognized that a user does not must understand HTML to be able to browse the internet, because the user understands that the developers used tools that work in the background to assure that the user can use any browser to perform a Google search. The goal of DIGGS is to facilitate geotechnical data input and output from the database and other software applications and products. Electronic Data Structure for Database Development The heart of DIGGS is a schema for preparing an electronic file that meets certain requirements such that it will be universally recognized. As such, a data schema was established during development and subsequently published at the DIGGS website. Thereafter, if a file is prepared consistent with the DIGGS schema and if the application (e.g., relational database, plotting software, GIS platform) receiving the DIGGS file can accept DIGGS files, then any data from any application can be interchanged. This is 1 http://diggsml.org/ 2 http://committees.geoinstitute.org/people/diggs-standard/
308 demonstrated in Figure D-4. If users understand the DIGGS schema and the associated rules for identifying attributes of the schema, then any data can be converted into a valid DIGGS file. Source: ASCE Figure D-4. Concept for DIGGS data interchange User-Friendly Data Dictionary To facilitate the use of DIGGS and to understand the data schema, a user-friendly data dictionary has been developed for geotechnical boring logs, CPTu soundings, and the most common geotechnical tests. A working knowledge of the DIGGS schema will allow developers (or sophisticated users) to generate valid DIGGS files for other tests or activities. The data dictionary is published on the DIGGS website. Open- source programs are available to facilitate development of valid DIGGS files (e.g., oXygen, XML Notepad, Adobe FrameMaker). As part of the Ohio DOT and G-I development, an online DIGGS Feedback Tool was developed to assist with developing valid DIGGS files from an Excel spreadsheet. Information regarding access to this feature is provided on the DIGGS website. Rules for Managing Metadata Although not officially part of the DIGGS file, the developers provided guidelines for preparing the metadata used to develop the valid DIGGS file. These guidelines are consistent with the computer science community guidelines. Automatic Data Validation through Independent Software As a component of the G-I development efforts, a DIGGS Validator was developed to assure that a userâs DIGGS file is consistent with the DIGGS schema. If a template is developed for a specific test and the template is initially validated, it is not necessary to validate each DIGGS file generated using the template.
309 Tools to Facilitate Data Input, Output, and Exchange The DIGGS developers are working to develop tools that can be used to facilitate data input, output, and interchange. These tools will be posted on the DIGGS and G-I website to promote use of the DIGGS standard, at least until software developers (either commercial or open-source) embrace the DIGGS format and include provisions for DIGGS import and DIGGS output in existing software applications. D.7.2 Requirement for DIGGS Sustainability DIGGS has been developed and demonstrated to work and perform as designed. While the schema has been developed, the tools for modifying existing software packages to import and export valid DIGGS files require case-by-case coding. Currently, the DIGGS developers are continuing to work with the G-I to develop and post tools that can facilitate DIGGS file development. Ultimately, it is hoped that geotechnical software developers will incorporate the DIGGS format as supported data input and output formats. User-Friendly Data Input and Output One of the functional attributes developers adopted is to develop user-friendly templates and guidelines that users can follow to create user-defined templates. This is accomplished by generating templates in spreadsheets that can generate valid DIGGS files automatically with a click of the button. The back-end to the spreadsheet is the DIGGS Feedback Tool. The developers believe that until software developers implement the DIGGS schema, facilitating DIGGS file generation is an important contribution in the interim. Sustainable Business Model It is G-Iâs goal to develop a sustainable business model that can support the geoprofessional community by providing an array of tools that generate and use DIGGS files. This model may come in the form of individual licenses, voluntary financial or in-kind contributions, or sustaining government grants. There are models currently available for this type sustainable development, including (i) the Association of Geotechnical Specialists (AGS) format developed in the United Kingdom for AGS, (ii) the New Zealand Geotechnical Database (NZGD) developed and supported by the government in New Zealand, and (iii) the Pipeline Open Data Standards (PODS) developed in support of the oil and gas pipeline industry. Required Use by Agencies The ultimate success of DIGGS can be assured when software vendors develop the capabilities to import, export and interchange DIGGS files. This will require costs for coding that will be absorbed by the software developers. The G-I is actively working on strategies to have the software deployment community support this initiative. One way to virtually guarantee success of DIGGS is for notable government agencies (e.g., United States Army Corps of Engineers, FHWA, AASHTO, EPA), owners, or industry organization (e.g., Deep Foundations Institute, Association of Drilled Shaft Contractors) require its use and adoption. Again, the G-I development team is actively engaged in soliciting support from these organizations.
310 E A P P E N D I X E Quality Assurance Systems E.1 Introduction Quality assurance (QA) systems consist of processes that evaluate and monitor a product or service to ensure compliance with established norms or standards. The goal of QA systems in the context of this manual is to maintain an acceptable level of quality and consistency of the geotechnical services being performed for the State Departments of Transportation (DOTs). The following are the components of a QA system, sometimes referred as total quality management (TQM): ⢠A quality plan ⢠A QA process ⢠A quality control (QC) process A quality plan for geotechnical services should be developed by each State DOT and should include the standards and practices that must be used when providing geotechnical services. The State DOT management should develop the QA process. The QA process monitors and determines if the geotechnical services are being performed in accordance with the quality plan. The QA process must integrate management principles that include identifying authority and organizational structure, consistently evaluating and monitoring the quality plan, measuring and reporting the adherence to the quality plan, routinely evaluating and improving the quality plan. The geotechnical service providers should implement the QC process. The QC process ensures that geotechnical service providers are adhering to the requirements of the quality plan when executing geotechnical work. While implementing the QA system, geotechnical service providers should not lose the perspective that the goal of the QA system is to maintain a level of quality and consistency of the geotechnical services being performed that is consistent with the goals of the State DOT and its responsibilities. The QA system is a tool for improving the quality plan and for exposing deficiencies in meeting the requirements of the quality plan. It should not be used as a tool for punitive reprimands or unconstructive criticism as this will degrade the ability of the QA system to evaluate the quality and consistency of the geotechnical services being provided. This appendix includes guidelines for developing a quality plan that will define the State DOT standards and establish how the QA process is to be used by the State DOT when geotechnical services are being provided. The guidelines included in this appendix address the following topics: ⢠QA plan key components ⢠QA/QC plan ⢠Subsurface investigation prequalification ⢠Instrumentation prequalification ⢠Policy and procedures ⢠Standards ⢠Geotechnical data management ⢠QA performance monitoring and improvement process
311 Additional information and guidance to develop a QA system can be obtained from the U.S. Office of Personal Management (USOPM) Federal Total Quality Management Handbook (USOPM 1991), the Federal Highway Administration (FHWA) Quality Assurance Procedures for Construction (FHWA 2002), and the National Cooperative Highway Research Program (NCHRP) 20-68A Best Practices in Quality Control and Assurance in Design (NCHRP 2011). Several State DOTs have developed QA plans for geotechnical services, but currently the plans vary greatly in the scope and detail provided. Some QA plans encompass the entire geotechnical scope of services, and others are specific to geotechnical design, subsurface investigation, field testing, and laboratory testing. The State DOT QA plan for geotechnical services is sometimes contained in the State DOT geotechnical design manual or the materials procedures manual. The following are some of the State DOTs that have notable geotechnical QA plans: ⢠California DOT Geotechnical Manual (CALTRANS 2012) ⢠New York State DOT Geotechnical Design Manual (New York State DOT 2013) ⢠South Carolina DOT Geotechnical Design Manual (South Carolina DOT 2010) ⢠Utah DOT Geotechnical Manual of Instruction (Utah DOT 2014) ⢠Virginia DOT Manuals of Instruction (Vermont DOT 2015) ⢠Washington State DOT Materials Quality Assurance Program (Washington State DOT 2016) and Geotechnical Manual (Chapter 1 â QA) (Washington State DOT 2017) E.2 Quality Assurance Plan Key Components The State DOT should develop a QA plan document that provides guidance and expectations to the State DOT and consultants that provide geotechnical services. The QA plan should include guidelines for geotechnical services provided during the design, construction, and maintenance phases of a geotechnical feature. The QA plan should contain the following key components: ⢠Introduction ⢠Purpose ⢠QA/QC policy ⢠Roles and responsibility ⢠QA/QC plan ⢠Prequalification requirements ⢠Policies and procedures ⢠Standards ⢠Geotechnical data management ⢠QA performance monitoring and improvement process E.2.1 Introduction The introduction lists the overall objectives of the QA system and describes the program mechanisms necessary to accomplish the objectives stated. E.2.2 Purpose The purpose describes the systematic methods used to monitor performance and identifies the required documentation and resources to be used.
312 E.2.3 Quality Assurance/Quality Control Policy The QA/QC policy is the State DOT policy statement to obtain geotechnical services that meet the state and federal acceptable levels of quality and consistency. E.2.4 Roles and Responsibilities The roles and responsibility of the State DOT upper management, project managers or supervisors, and geotechnical personnel are defined with respect to implementing the QA plan. E.2.5 Quality Assurance/Quality Control Plan The QA/QC plan defines the protocols necessary to manage, conduct, and evaluate if geotechnical services are being completed at an acceptable level of quality and consistency. This requires establishing a systematic process that is accountable and traceable. The success of the QA/QC plan is based on having QC documentation standardized and the roles and responsibilities of all personnel involved clearly defined and traceable throughout each step of conducting the geotechnical services. The QA/QC plan must document the geotechnical services to be used on State DOT projects during design, construction, and maintenance. A subsurface investigation QA/QC plan can be developed based on ASTM International (ASTM) D3740 as the minimum requirements for testing and inspecting soil and rock for use in engineering design and construction. An example of a quality management program is presented in the CALTRANS Geotechnical Services Quality Management Program (CALTRANS 2012). Guidelines of items that should be included in the QA/QC plan for subsurface investigation and geotechnical instrumentation are provided below. The QA/QC plan requirements should distinguish between the distinct types of subsurface investigation programs (preliminary and final). E.2.5.1 Field Testing The field testing plan establishes communication protocols, roles and responsibility, scope of work, anticipated effort required, and deadlines for completing the geotechnical services. The field testing QA/QC plan should address the State DOT policies, procedures, specifications, and QC documentation for the following geotechnical services: ⢠Soil drilling ⢠Soil and rock sample retrieval ⢠Transport soil and rock samples ⢠In situ testing ⢠Instrumentation ⢠Geophysical testing The QA/QC plan should standardize the format of reporting field data (i.e., logs) that document field testing and the type of deliverables to maintain consistency and facilitate the evaluation of quality. E.2.5.2 Laboratory Testing The laboratory testing plan establishes the QA/QC expectations of the geotechnical services being performed. The plan establishes communication protocols, roles and responsibility, scope of work, special instructions, and deadlines for completing the geotechnical laboratory testing services. The laboratory testing QA/QC plan should address the State DOT policies, procedures, specifications, testing standards, and QC documentation for the following geotechnical services: ⢠Storing soil and rock samples
313 ⢠Handling samples ⢠Selecting test specimens ⢠Calibrating equipment ⢠Specifying and referencing laboratory testing standards and manuals The QA/QC plan should standardize the format of conducting and reporting all laboratory testing and type of deliverables to maintain consistency and facilitate the evaluation of quality. E.2.5.3 Instrumentation The instrumentation QA/QC plan requirements should distinguish between the distinct types of geotechnical instrumentation programs. Instrumentation programs are typically undertaken because of either poor field performance of a geotechnical structure after construction or during construction to verify that the structure performance meets the design requirements or when unacceptable performance is observed during construction. A geotechnical instrumentation monitoring plan establishes communication protocols, roles and responsibility, scope of work, anticipated effort required, reporting expectations, and deadlines for completing the geotechnical services. A subsurface investigation plan may also need to be prepared to facilitate the installation of the geotechnical instrumentation and to provide additional subsurface information to assist with the interpretation of the subsurface site conditions. The instrumentation QA/QC plan should address the State DOT policies, procedures, specifications, and QC documentation. The instrumentation QA/QC plan should also standardize the format for collecting and reporting all instrumentation monitoring data and types of required deliverables to maintain consistency and facilitate the evaluation of the quality. E.2.6 Prequalification and Verification The prequalification requirements are defined for State DOT and consultants providing geotechnical services. Prequalification verifies that the geotechnical services providers have the equipment and qualified personnel to perform the required geotechnical services. The verification process includes inspections, certification, training, and experience. Prequalification requirements pertaining to field testing, laboratory testing, and instrumentation are provided below: E.2.6.1 Field Testing A prequalification requirement helps to ensure that State DOT and consultants have the training, knowledge, and skills to provide the subsurface investigation services required. Prequalification should include reviewing personnel qualifications, project experience, and site inspections, as well as requiring specific training courses to be able to perform specialized geotechnical services. The National Highway Institute (NHI) courses 132084 (Geotechnical Subsurface Exploration) and 132079 (Subsurface Investigation Qualification) or similar courses should be required as part of the prequalification process for geotechnical managers, inspectors, and field personnel. The National Institute for Certification in Engineering Technologies (NICET) has also developed a certification program for engineering technicians engaged in soil investigation. Most states require that the drilling crew have water well licenses. The prequalification process should be periodically performed to ensure that all QA/QC plan requirements are being met. The State DOT should clearly define the prequalification process with respect to prequalification for specific geotechnical services, minimum requirements, and documentation of these items for (i) subsurface drilling and sample collection, (ii) in situ testing, and (iii) geophysical testing.
314 E.2.6.2 Laboratory Testing Laboratory testing services can be prequalified by using the AASHTO Materials Reference Laboratory (AMRL) certification program for specific laboratory tests using either the AASHTO or ASTM laboratory standards or as required by the State DOT. NICET has also developed a certification program for engineering technicians engaged in laboratory testing. The laboratories should only conduct those tests for which that specific laboratory is certified. If certification is not available for a specific laboratory test, then a QA/QC plan for that test shall be developed and approved by the State DOT as given and included in the State DOT material testing procedures manual. The prequalification for laboratory testing should be periodically performed to ensure that all QA/QC plan requirements are being met. E.2.6.3 Instrumentation A prequalification requirement for instrumentation certifies that State DOT internal staff and consultants have the training, knowledge, and skills to provide the geotechnical instrumentation services required. Instrumentation prequalification should include reviewing personnel qualifications, project experience, and site inspections, as well as requiring specific training courses to perform specialized geotechnical instrumentation services. The NHI course 132041 (Geotechnical Instrumentation) or similar course should be required for managers and supervisors as part of the prequalification process for geotechnical instrumentation services. E.2.7 Policies and Procedures A QA system requires that State DOTs develop policies and procedures to establish the geotechnical standard of practice that promotes an acceptable level of quality and consistency of the geotechnical services being performed. The policies and procedures provide the basis for QA evaluation and QC verification. The policies and procedures are typically documented by State DOT in geotechnical design manuals, materials testing procedures manuals, and specifications. These documents typically address the following: ⢠Administrative processes ⢠Subsurface investigation planning ⢠Field subsurface investigation ⢠Laboratory testing ⢠Material description, classification, and logging ⢠Field instrumentation ⢠Design criteria ⢠Design procedures ⢠Reporting Some examples of noteworthy geotechnical design manuals that have been prepared by State DOTs include Florida DOT Soils and Foundation Handbook (Florida DOT 2018), Minnesota DOT Geotechnical Manual (MNDOT 2017), South Carolina DOT Geotechnical Design Manual (South Carolina DOT 2010), and Washington State DOT Geotechnical Manual (Washington State DOT 2017). E.2.8 Standards The State DOT policies and procedures should adopt accepted nationwide standards for field testing, laboratory testing, and instrumentation equipment, whenever possible. State DOTs typically use AASHTO and ASTM standards for acceptability of geotechnical services.
315 Many State DOTs have specialized laboratory testing standards that either modify existing nationally recognized standards or have laboratory testing procedures that have been developed specifically for the State DOTâs use. These specialized laboratory testing procedures must be formally documented by developing an in-house standard testing procedure. E.2.9 Geotechnical Data Management The State DOT should establish geotechnical data management policy, procedures, and protocols for collecting and storing geotechnical data obtained during subsurface investigations or geotechnical instrumentation monitoring. The State DOT should standardize the electronic format to be used for geotechnical service deliverables. Additional information regarding geotechnical data management is presented in Appendix D. E.2.10 Quality Assurance Performance Monitoring and Improvement Process The State DOT should establish policy and procedures to monitor the QA system by evaluating established metrics that asses the quality and consistency of the geotechnical services being performed by the State DOT and consultants. For each established QA performance monitoring metric, the following should be specified: ⢠Required data ⢠Frequency of data collection ⢠Target goals ⢠Data collection responsibilities ⢠How and when data is collected The following are examples of resources that can be used to obtain data for evaluating the selected metrics: ⢠Documented results of laboratory participation in proficiency sample testing, methods used, on-site inspection programs, and laboratory testing reporting ⢠Documented results of field testing methods, on-site inspection programs, and field reporting documentation ⢠Documented results of independent QA review of QC and QA documents for geotechnical service for completeness ⢠Documented cycle times for geotechnical services from initiation to completion and determine production rates on a per unit basis ⢠Documented number of days early or late in meeting deliverable deadlines ⢠Documented number of corrective actions or audit cycles for geotechnical services to be of acceptable quality ⢠Documented number of data entry errors Areas that are found to be deficient based on the established metric documentation need to be reported, and the State DOT group that oversees the area where a deficiency has been identified needs to develop a QA/QC improvement plan. Additional metrics may be implemented to track the improvement plan and determine if the deficiency has been corrected.
316 References CALTRANS. 2012. Caltrans Geotechnical Manual. Geotechnical Services Quality Management Program. California Department of Transportation. FHWA. 2002. FHWA Regulation 23 CFR 637, âQuality Assurance Procedures for Construction.â Federal Highway Association. Florida DOT. 2018. Soils and Foundation Handbook. Florida Department of Transportation Gainesville, Florida. Minnesota DOT. 2017. Geotechnical Manual. Minnesota Department of Transportation. NCHRP. 2011. Best Practices in Quality Control and Assurance in Design. NCHRP Project 20-68A, Scan 09-01. National Cooperative Highway Research Program. July. NCHRP. 2012. Geotechnical Information Practices in Design-Build Projects. NCHRP Synthesis 429. National Cooperative Highway Research Program. New York State DOT. 2013. Geotechnical Design Manual. New York State Department of Transportation. South Carolina DOT. 2010. Geotechnical Design Manual. South Carolina Department of Transportation. USOPM. 1991. Federal Total Quality Management Handbook, Introduction to Total Quality Management in the Federal Government. U.S. Office of Personnel Management, Federal Quality Institute, Washington, DC. May. Utah DOT. 2014. Geotechnical Manual of Instruction. Utah Department of Transportation. Vermont DOT. 2015. âChapter III - Geotechnical Engineering.â In Manuals of Instruction. Virginia Department of Transportation. Washington State DOT. 2017. Geotechnical Manual. Washington State Department of Transportation. Washington State DOT. 2016. Materials Quality Assurance Program. Washington State Department of Transportation.
317 F A P P E N D I X F Health and Safety F.1 Introduction Improper and unmanaged fieldwork activities during a geotechnical site investigation program may pose risks to human health and safety. For example, working around heavy equipment, such as drill rigs and cone penetration testing rigs, contains safety risks. If these risks are not properly managed, they might cause serious injury, property damage, or even loss of life. Improper use of field equipment can also cause damage to the environment. This appendix provides a summary of commonly accepted safe operating practices to protect human health and the environment. F.2 General Health and Safety Guidelines This section outlines basic safety procedures for personal hygiene, project work site sanitation, and housekeeping practices that should be implemented and followed while at the drilling site. ⢠Use required personal protective equipment (PPE): Level D affords the minimum protection required. ⢠Be aware of potential contaminants. Upgrade PPE and follow appropriate decontamination procedures. ⢠Do not touch or go near moving parts; do not wear loose-fitting clothing or jewelry. Keep long hair tied back. ⢠Know the location of emergency shut off switches. Shut off switches should be tested regularly. ⢠Allow personnel who are properly equipped and protected to respond to an accident. ⢠Do not smoke or use spark-producing equipment around drilling operations. ⢠Do not work around a drill rig during a thunderstorm. ⢠Maintain orderly housekeeping on and around the drill rig. Store tools, materials, and supplies to allow safe handling by drill crewmembers. Proper storage on racks or sills will prevent rolling or sliding. ⢠Keep working surfaces free of obstructions or potentially hazardous substances. ⢠Store gasoline only in containers specifically designed or approved for such use. ⢠Be sure to exchange all information regarding special hazards or ongoing work that may affect the safety of the crew during driller shift changes. ⢠Check rigging material equipment for material handling prior to use on each shift and as often as necessary to ensure it is safe. Defective rigging should be removed from service. ⢠Be sure passengers are only allowed in vehicles designed for passenger use. F.3 Responsibilities Employers must furnish a workplace free from recognized hazards that are causing or are likely to cause death or serious physical harm. Site supervisors are to review any necessary records of field personnel to ensure that all medical and training requirements (e.g., 40-hour HAZWOPER, respirator fit test) have been met. Field personnel should comply with the health and safety procedures and the site safety plan. The drill rig operator is responsible for drill rig safety and maintenance.
318 F.4 Site Investigation Permit Before any investigation can begin, the proper permits need to be obtained, where applicable. State and local regulations may require subsurface drilling permits. Safety-related permits, such as the Occupational Safety and Health Administration (OSHA) hot work permit, should also be considered before drilling occurs. A construction stormwater permit may be required for land clearing activities. A National Pollutant Discharge Elimination System (NPDES) permit may be required for discharges of drilling fluids and cuttings to surface waters. The United States Coast Guard (USCG) Officer in Charge of Marine Inspection should be contacted for floating drilling or barge operations in navigable waters to determine if any permits or restrictions (inspections, marine pollution) exist in the area of proposed work. F.5 Administrative Requirements F.5.1 OSHA Poster Each field office and project site should have the appropriate state or federal OSHA posters1 (e.g., âOSHA Job Safety and Health: It's the Lawâ poster and posters providing information on minimum wage and workerâs compensation) posted in a conspicuous location. Poster requirements vary by state. Be sure to check for the proper state listing. F.5.2 Personnel Safety Certificate Site supervisors should review records of each field personnel assigned to work on projects involving hazardous substances to ensure all requirements pertaining to health and safety (such as medical clearance certificates and training certificates) comply with 29 Code of Federal Regulation (CFR) 1910.120. F.6 Site Inspection Prior to bringing field equipment to the job site, conduct a site walk survey to identify overhead electrical hazards, potential subsurface hazards, and terrain hazards. Document possible hazards and communicate them to the drilling crew. The initial site inspection should address the following criteria: ⢠Are utility plans or maps available on-site for review? ⢠Has any irregular access, including difficult terrain, narrow roads/bridges, steep access roads, tight spaces (e.g., between buildings), water crossings, and soft ground, been described and sketched? ⢠Has the grade and slope of drilling or digging location (e.g., level, gently sloping to the south) been described. ⢠Is the location within 20 feet (ft; 6 meters [m]) of any building or structure? ⢠Are there any locked gates? If so, obtain combination or key location. ⢠Is the location in a roadway, parking lot, or other public/paved area? ⢠Are there any manhole covers, water valve covers, concrete Christy boxes, or other flush-mounted monuments denoting electrical or other utilities in the vicinity? ⢠Are there any fire hydrants, transformers, propane tanks, streetlights, sprinkler systems, backflow prevention devices, or other surface features proximal to the location that may be connected to underground lines? ⢠Are there any visible surveyorâs flags denoting buried natural gas or other pipelines? ⢠Is there old paint on paved surfaces denoting utilities in the vicinity? 1 https://www.osha.gov/Publications/poster.html
319 ⢠Are there visible repaved asphalt or concrete patches, trenches, or other road cuts? If location is in an unpaved area, is there any displaced grass or dirt, or evidence of recent digging? ⢠Are overhead power lines, tree limbs, building eaves, overhangs, or other obstructions within 20 ft (6 m) of the location or access route that may impair access or the ability to raise the mast or cause safety concerns? F.6.1 Utilities and Overhead Utilities When damaged or struck, overhead or subsurface utilities can injure personnel, damage equipment, disrupt community services, or create environmental hazards. The location of overhead and buried utility lines must be determined before drilling begins, and locations should be noted on boring plans. The site supervisor should contact the One-Call Center for the state in which drilling is to be performed to obtain written clearance. All utilities should be identified and communicated to drilling and drill support personnel. Additional utility clearance may be required using geophysical locating services, air knife excavation, vacuum excavation system, or post hole digging. F.6.2 Clearing the Work Area Before a drill rig is positioned to drill, the area should be cleared of removable obstacles, and if the area is sloped, it should be leveled. The cleared or leveled area should be large enough to accommodate the rig and supplies. Field personnel engaged in site clearing should be protected from hazards of irritant and toxic plants and suitably instructed in the first aid treatment available. Mechanized equipment used in site clearing operations should be equipped with rollover guards and overhead and rear canopy guards in compliance with 29 CFR 1926.604(a)(2)(i). Only trained personnel should operate heavy equipment. F.7 Health and Safety Plan The health and safety plan (HASP) should be in writing and detail the site's health and safety hazards, job tasks and operations, and the specific control measures used to safeguard personnel. The HASP should address the siteâs organizational structure, lines of authority, accountability, and communication. Projects performed under 29 CFR 1910.120, HAZWOPER standard incorporate additional elements: site-specific requirements for training, PPE, medical surveillance, air monitoring, site control, decontamination, emergency response plan, and a spill containment program. F.7.1 General Safe Work Practices This section provides general work practices that can be implemented by each of the on-site field personnel to support safe working conditions: ⢠No one shall knowingly be permitted or required to work while field personnelâs ability or alertness is impaired by fatigue, illness, or other causes such that it might unnecessarily expose the field personnel or others to injury. ⢠Anyone known to be under the influence of alcohol, intoxicants, or drugs shall not be allowed on the job while. ⢠Horseplay, scuffling, and other acts that tend to have an adverse influence on the safety or well-being of the field personnel are prohibited. ⢠Work should be preplanned and supervised to prevent injuries while handling materials and working with equipment. ⢠No equipment shall be operated unless all appropriate guards and safety devices are in place and properly adjusted.
320 ⢠To the extent practical, mechanical or powered equipment will be used to handle, lift, or move heavy objects weighing more than 49 lbs. Manual handling of heavy objects shall be kept to a minimum. When field personnel handle heavy objects or awkward lifts, the lifts should be planned, and assistance will be obtained to minimize the risk of injury. ⢠Footwear worn on-site must comply with current American National Standards Institute (ANSI) or ASTM International (ASTM) specifications; ASTM F2413-05 must be indicated in or on footwear. ⢠Field personnel should wash using soap and water thoroughly before eating, drinking, smoking, or leaving the job site. When hazardous materials or hazardous waste are involved, field personnel will go through appropriate decontamination. ⢠All sources of ignition should be eliminated from the work area when using flammable liquids. Gasoline should not be used for cleaning. ⢠Appropriate gloves should be worn when handling materials that may present exposure hazard(s). â Leather work gloves are usually sufficient when handling wood and sharp debris. Special gloves are also available for handling broken glass and other especially sharp objects. â If the materials are contaminated, personnel will wear chemical-protective gloves to protect against the contamination under the work gloves. The chemical-protective gloves must also be protected against puncture wounds to the skin. ⢠If necessary, translations of safety data sheets (SDSs) and the HASP should be provided for non-English- speaking field personnel. F.7.2 Personal Protective Equipment PPE should adhere to 29 CFR 1910.132 â Personal protective equipment. Items listed below should be worn by all members of the drilling team while engaged in drilling activities: ⢠Hard hat ⢠Safety footwear (shoes or boots with safety toesâ¯steel or compositeâ¯and shanks) ⢠Safety glasses ⢠Hearing protection ⢠High-visibility vest Safety harness and lifelines (Safety harness and lifelines should be worn by all field personnel working on top of an elevated derrick beam. The lifeline should be secured at a position that will allow a person to fall no more than 8 ft [2.4 m].) F.7.3 Cardiopulmonary Resuscitation and First Aid At least one person qualified in the administration of first aid and cardiopulmonary resuscitation (CPR) should be present at each field office or work site. The American Red Cross and the American Heart Association are recognized agencies providing training and qualification in first aid and CPR. Provisions should be made prior to commencement of a project for prompt medical attention in case of serious injury, and these provisions should be detailed in the HASP. These provisions should include vehicles for prompt transportation of the injured person to a physician or hospital or a communication system for contacting necessary ambulance service. The emergency numbers should be included in the HASP and posted prominently by the site supervisor especially in areas where 911 service is not available. At a minimum, a Type III first aid kit should be provided at each project and field office. Each kit should be stored in a durable water-resistant storage case and meet the specific performance requirements as specified in Section 5.4.4 of ANSI/SEA Z308.1-2009. Contents of the first aid kits should be checked weekly by the site supervisor in field offices and on job sites.
321 F.7.4 Task Hazard Analysis A task hazard analysis is a technique that focuses on job tasks to identify hazards before they occur. It focuses on the relationship between the worker, the task, the tools, and the work environment and includes the following: ⢠A description of the site and its current condition ⢠A description of the tasks and operations that will be performed at the site ⢠The chemical, physical (e.g., heat and cold stress, fire, traffic, rain, lightning), and biological hazards (e.g., rodents, snakes, insects, poisonous plants) associated with or may be encountered during those tasks and operation Some common hazards are listed below with guidelines to assist in mitigating the outcome or occurrence of the hazards. F.7.4.1 Traffic Hazard There are a variety of traffic-related hazards that should be recognized and addressed to help ensure the safety of jobsite personnel. Routine Work Travel. Use safe and defensive driving practices (seat belts, safe speeds, eyes ahead, no tailgating, limit distractions, safe cell phone use, no texting, clear windows, account for weather and road conditions, adequate sleep, other measures as appropriate). Unfamiliar Location. Plan travel route before driving (assemble maps, enter destination into global positioning system [GPS]) Long Distance or During Sleep Hours. Minimize fatigue: rest breaks, light snacks (avoid heavy meals), stay hydrated, fresh air, no loud music, clean windshield. Unfamiliar Vehicle. Become familiar with vehicle operational controls and handling characteristics before operating vehicle. Special Driving Hazard. Off-road driving or use of nontypical vehicle, heavy vehicle, van, golf or utility cart, all-terrain vehicle (ATV): ⢠For off-road driving, do not exceed capability of vehicle, beware of wet conditions, speed low, avoid unsafe on orientation on slopes. ⢠Follow ATV specific procedures for training, safety equipment, operation, manufacturerâs instructions. Special Skills Required for Vehicle Type. For vehicles requiring special skills (such as windowless van, heavy work vehicle, utility vehicle, similar) ensure operator is provided training and has appropriate operator skills through experience. Work Site Traffic Hazards ⢠Wear reflective vests where exposed to traffic hazards. ⢠Where possible, park vehicles as protective shield from oncoming traffic. ⢠Configure work area and support vehicles to minimize worker exposure to traffic hazards. ⢠Use Department of Transportation (DOT) signal devices to reroute vehicles around work area and site entrances and exits. ⢠Use DOT-trained flaggers or police detail where appropriate or required.
322 F.7.4.2 Manual Materials Handling Handling materials manually can be hazardous, and those hazards are increased if personnel do not follow the right precautions. The following are a list of procedures that personnel should follow to reduce the risk of injury while manually handling materials: ⢠Use proper lifting techniques. Do not lift too fast, too often, or too long; do not lift with back bent or while twisting or reaching too far; do not lift while sitting or kneeling. ⢠Do not manually move material over long distances. ⢠Be sure to take appropriate rest breaks and provide for sufficient recovery time. ⢠Be careful if performing a combination of different handling tasks together (e.g. lifting, carrying and lowering). Site conditions can also contribute to the hazards when manually handling materials: ⢠Walking surfaces can be uneven, sloping, wet, icy, slippery, unsteady, etc. ⢠There can be differences in floor levels or walking surfaces. ⢠If housekeeping is poor, it can cause slips, trips, and fall hazards. ⢠Lighting needs to be adequate. ⢠Work should not be performed at a fast pace. ⢠Movement can be restricted because of clothing or PPE or because the space is small or posture is constrained. F.7.4.3 Fire Hazard Fire hazards at the work site need to be addressed and mitigated in two ways: protection and prevention. ⢠Fire protection â Personnel will report any damaged or spent portable fire extinguishers to appropriate supervisor. â Access to fire extinguishers or other fire protection equipment will not be blocked or restricted. â Personnel will not use fire extinguishers and other fire protection equipment unless they are trained and designated to do so. ⢠Fire prevention â Personnel will be familiar with site procedure for reporting and responding to a fire. â Field personnel and site supervisor will have training that has been approved by the National Fire Protection Association (NFPA) and will know how to recognize and report hazardous conditions and fire hazards associated with the materials and processes to which field personnel are exposed. â Good housekeeping will be practiced in all site areas and vehicles to prevent the accumulation of flammable material. â All flammable liquids will be kept in containers approved by Factory Mutual (FM) or Underwriter Laboratory (UL), properly labeled, and stored in designated cabinets or storage areas away from ignition sources. â Smoking will only be allowed in areas designated by the site supervisor and marked with appropriate signage. â Flammable liquids will not be transferred into containers unless the nozzle and container are electrically interconnected (bonded). â Flammable liquids will not be dispensed by gravity from tanks, drums, barrels or similar containers except through a listed self-closing valve or self-closing faucet. F.7.4.4 Environmental Hazard All personnel working at HAZWOPER sites must meet the medical monitoring and training requirements specified in 29 CFR 1910.120. The medical monitoring and training procedures set forth below meet or
323 exceed those requirements set forth in 1910.120. Additional medical monitoring and training may be required based on site activities. ⢠Medical monitoring â Field personnel with a potential for contact with contaminated materials should have OSHA 40-hour training, current 8-hour refresher. â Specific HAZWOPER medical examination protocols developed to meet the requirements of 29 CFR 1910.120(f). To be medically qualified to perform HAZWOPER work, personnel need to receive the following medical examinations: ï§ Initial (Baseline) Examination: The initial examination is a part of employment requirements and must be completed (with results received) prior to the field personnelâs start of work date. ï§ Biennial Examination â HAZWOPER: Qualified field personnel should complete a medical examination every two years. ï§ Exit Physical: At the conclusion of employment at the company or when reassigned to non- HAZWOPER duties, field personnel should be provided with the opportunity to receive an exit physical examination. ï§ Special Examinations: Determine the need for special examinations due to unusual exposure conditions, in response to possible overexposures, and in response to field personnel health concern(s). The medical professional should determine the medical protocol elements for each of these examinations based on exposure information provided. The medical professional should evaluate the results of each field personnelâs examination and will provide a medical clearance clearly stating medical compliance with the HAZWOPER regulatory standard (29 CFR 1910.120(f)). ⢠Training â All personnel assigned to work at a hazardous waste site must be evaluated by their site supervisor to determine their appropriate training needs and then participate in the applicable training meeting the requirements of 29 CFR 1910.120(e). The training requirements vary depending upon the individualâs activities and duration of those activities at HAZWOPER sites. ⢠Exposure Monitoring â Air monitoring at HAZWOPER sites may be conducted to monitor, control, and document field personnel exposures to chemical contaminants and to regulate controlled work area boundaries for the protection of non-HAZWOPER field personnel and the public. F.7.4.5 Heat and Cold Stress Heat stress is caused by several interacting factors, including environmental conditions, clothing, and workload, as well as the physical and conditioning characteristics of the individual. Cold stress normally occurs in temperatures at or below freezing or under certain circumstances in temperatures of 40°F (4.4°C). However, cold stress can occur at warmer temperatures (especially if it is rainy or windy) if personnel are underdressed and working on or near water or outdoors and inactive for extended periods of time. Heat Stress Instruction. Heat stress can be a significant field-site hazard, especially for field personnel wearing chemically protective clothing. The site supervisor must instruct field personnel on how to recognize heat stress symptoms, what the first aid treatment procedures are for severe heat stress, and how to prevent heat stress injuries. Field personnel must be encouraged to immediately report any heat stress that they may experience or observe in fellow field personnel. Supervisors must use such information to adjust the work-rest schedule to accommodate such problems. Heat Stress Breaks. Wherever possible, a designated break area should be established in an air- conditioned space or in shaded areas if air conditioning is impractical. The break area should be equipped
324 to allow field personnel to loosen or remove protective clothing, and sufficient seating should be available for all field personnel. During breaks, field personnel must be encouraged to drink plenty of water or other liquids, even if not thirsty, to replace lost fluids and to help cool off. Cool water should be available at all times in the break area and in the work area itself unless hygiene or chemical exposure issues prevent it. Heat Stress Signs and Symptoms. Field personnel who exhibit any signs of significant heat stress (e.g., profuse sweating, confusion, irritability, pale, clammy skin), should be relieved of all duties at once, made to rest in a cool location, and provided with large amounts of cool water. Anyone exhibiting symptoms of heat stroke (red, dry skin, unconsciousness) must be taken immediately to the nearest medical facility, taking steps to cool the person during transportation (e.g., remove clothing, wet the skin, expose to air conditioning). Severe heat stress (heat stroke) is a life-threatening condition that must be treated by competent medical authority. Heat Stress Rest Schedule. Heat stress is best prevented through supervisor observation of field personnel and routine heat stress awareness training activities. However, it is also necessary to implement a work routine that incorporates adequate rest periods to allow field personnel to remove protective clothing, drink fluids (vital when extreme sweating is occurring), rest, and recover. The frequency and length of work breaks must be determined by the site supervisor based upon the ambient temperature, amount of sunshine, humidity, the amount of physical labor being performed, the physical condition of the field personnel, and protective clothing being used. Cold Stress Protective Clothing. Workers must be provided adequately insulating, dry clothing to maintain core temperatures above 96.8°F (36°C) if work is performed in air temperatures below 40°F (4.4°C). Wind chill cooling rate and the cooling power of air are critical factors. The higher the wind speed and the lower the temperature in the work area, the greater the insulation value of the protective clothing required. Cold Stress Freezing Tissue. Superficial or deep local tissue freezing will occur only at temperatures below 32°F (0°C) regardless of wind speed. However, older field personnel or field personnel with circulatory problems require special precautionary protection against cold injury. Using extra insulating clothing and reducing the duration of the exposure period are among the special precautions that should be considered. Cold Stress Exposed Skin. For exposed skin, continuous exposure should not be permitted when the air speed and temperature results in an equivalent chill temperature of -25°F (-31°C) or below. At air temperatures of 40°F (4.4°C) or less, it is imperative that field personnel whose clothing becomes wet be immediately provided a change of clothing and be treated for hypothermia. If the available clothing does not give adequate protection to prevent hypothermia or frostbite, work should be modified or suspended until adequate clothing is made available or until weather conditions improve. Cold Stress Work Warming Regimen. If work is performed continuously in the cold at an equivalent chill temperature at or below -15°F (-26°C), heated warming shelters (e.g., tents, cabins, rest rooms) should be made available nearby. The field personnel should be encouraged to use these shelters at regular intervals, the frequency depending on the severity of the environmental exposure. The onset of heavy shivering, minor frostbite (frostnip), the feeling of excessive fatigue, drowsiness, irritability, or euphoria are indications for immediate return to the shelter. When entering the heated shelter, the outer layer of clothing should be removed; the remainder of the clothing should be loosened to permit sweat evaporation, or a change of dry work clothing should be provided. A change of dry work clothing should be provided as necessary to prevent field personnel from returning to work with wet clothing.
325 F.7.4.6 Rain and Lightning Adverse weather conditions, such as rain and lightning, present hazards to the job site. These hazards can include reduced visibility, slippery surfaces, and even being struck by lightning. The following are guidelines for reducing hazards associated with adverse weather. Rain. During periods of rain, fog, or other adverse weather conditions, vehicle headlights should be used. Stop work should be considered due to rain but is at the discretion of the site supervisor and dependent on the severity of the rain. Lightning. Lightning strikes carry up to 100 million volts of electricity and leap from cloud to cloud or cloud to ground and vice versa. Lightning tends to strike higher ground and prominent objects, especially good conductors of electricity such as metal. Because light travels at a faster speed than sound, you can see a lightning bolt before the sound of thunder reaches you. For lightning, follow the guidelines below adapted from the 30-30 rule: ⢠If you count less than 30 seconds between the lightning flash and thunder, stop work and take shelter, preferably in an enclosed building or trailer, an enclosed vehicle, or in a low-lying area avoiding wide open areas or tall isolated objects, such as trees or power poles. ⢠Wait at least 30 minutes after storm has passed or dissipated before resuming work activities. ⢠Note that lightning may strike several miles away from the parent cloud. Precautions should be taken even if the thunderstorm is not directly overhead. If you see a flash or lightning but do not hear the thunder, the lightning was probably too far away to hear. Thunder from lightning discharged 15 or more miles away is not usually heard. ⢠The site supervisor is responsible for monitoring the weather and stopping work when required due to weather. F.7.4.7 Chemical Hazard Each project site should have an identified responsible person to implement the requirements of the Globally Harmonized System (GHS) for the hazard communication program. All hazardous substances found in the workplace should be listed on a hazardous substance inventory (HSI). New hazardous substances entering a workplace (e.g., project-specific materials) should be added to the HSI upon receiving and reviewing the SDSs. Field personnel are required to report any hazardous substance found at the project site that is not on the list of hazardous substances. The report is to be made to the site manager. The HSI includes the following information: ⢠Product name ⢠Chemical name (if different from product name) ⢠Manufacturer's name ⢠Approximate typical quantity ⢠Location of substance (i.e., work area) An SDS should be available for every hazardous substance used or stored on each job site. Copies of all SDSs should be maintained on-site in either a dedicated folder or binder or as part of the project-specific health and safety documentation. Employers must ensure that SDSs are readily accessible to field personnel. All field personnel should be briefed as to where SDSs are kept and should have immediate access to any SDS at any time during their work shift. If no SDS accompanies a hazardous substance, the manufacturer, distributor, or importer should be immediately notified and asked to provide one. For ongoing projects, each SDS associated with a material no longer in use should be marked as obsolete and the date it became obsolete. At the completion of any project, the accumulated SDSs should be maintained as part of the project records. Never destroy SDSs associated with any project.
326 F.7.4.8 Biological Hazards Biological hazards include insects, spiders, ticks, rodents and wild or stray animals, snakes, and poisonous plants. ⢠Insects, spiders, and ticks â Protect yourself from biting and stinging insects by wearing long pants, socks, and long-sleeved shirts. ï§ Use insect repellents that contain DEET or Picaridin. â Treat bites and stings with over-the-counter products that relieve pain and prevent infection. â Avoid fire ants; their bites are painful and cause blisters. Severe reactions to fire ant bites (chest pain, nausea, sweating, loss of breath, serious swelling or slurred speech) require immediate medical treatment. ⢠Rodents and wild or stray animals Dead and live animals can spread diseases (e.g., rat bite fever and rabies). To reduce the hazards associated with animals at the job site, follow these guidelines: â Avoid contact with wild or stray animals, especially those which appear ill, agitated, or disoriented. Report such wildlife sightings to the appropriate local officials, such as Conservation or Wildlife Enforcement Officers. Some wildlife (e.g., foxes, skunks, raccoons, other mammals) commonly contract diseases or illness such as rabies or mange and may lose their natural fear of humans. â Avoid contact with rats or rat-contaminated buildings. â Wear protective gloves and wash your hands regularly if you canât avoid contact. â Get rid of dead animals as soon as possible. â If bitten or scratched by any animal, get medical attention immediately. ⢠Snakes â Wear heavy gloves and watch where you place your hands and feet when removing debris. If possible, donât place your fingers under debris you are moving. â Wear boots that cover ankles and lower calves (at least 10 inches [25 centimeters] high). â Watch for snakes sunning on fallen trees, limbs, or other debris. â Watch for moving snakes as well. If you see a snake, step back and allow it to proceed. â Be aware that a snakeâs striking distance is about one-half the total length of the snake. â Keep bite victims still and calm to slow the spread of venom in case the snake is poisonous and note the color and shape of the snakeâs head to help with treatment. Seek medical attention as soon as possible. â Do not cut the wound or attempt to suck out the venom. â Apply first aid: lay the person down so that the bite is below the level of the heart, and cover the bite with a clean, dry dressing. ⢠Dangerous plants â The most common adverse reactions to plants (e.g., poison ivy, oak, sumac) are skin irritation/inflammation. â The best prevention is avoiding contact with the plants, being aware of local dangerous plants native to the area, and wearing proper PPE and barrier creams. Protective clothing that prevents skin contact should be used when there is unavoidable contact or when working in areas where there is a high likelihood of contact. â About 10 minutes are required for the cutaneous penetration of the allergen. â Washing with running water is recommended but avoid using soap. Soap removes protective skin oils and may cause or hasten penetration of the allergen. â Nonpolar solvents, such as alcohol, should be avoided because they may spread the allergen over a wider area. â Early application of topical steroids minimizes the severity of the dermatitis. â If the face or genitalia are involved, seek professional medical help within six hours of the exposure. â Other objects, such as tools or clothing, may carry the allergen. â Avoid touching the face with unwashed hands.
327 F.7.5 Evacuation Plan An evacuation plan is the site-wide procedure to be executed when an emergency that requires an evacuation occurs. This section provides general guidelines to be referenced when an evacuation is required. When developing an evacuation plan, it is important to determine the following: ⢠Conditions under which an evacuation would be necessary ⢠Conditions under which it may be better to shelter-in-place ⢠A clear chain of command and designation of the person in the workplace authorized to order an evacuation or shutdown ⢠Specific evacuation procedures, including routes and exits ⢠Specific evacuation procedures on construction sites or facilities that are not fixed in place ⢠Designation of which, if any, field personnel will remain after the evacuation alarm to shut down critical operations or perform other duties before evacuating ⢠A process of accounting for workers after an evacuation ⢠Appropriate PPE, including special equipment for field personnel (e.g., appropriate respiratory protection) ⢠Procedures that address special needs workers, such as those that may have physical limitations ⢠Any special actions for evacuation during an active shooter or other workplace violence situation F.7.6 Emergency Action Planning and Prevention This section provides minimum guidelines for immediate actions in case of an emergency. Site supervisor will develop a site-specific emergency action plan (EAP) to be included in the HASP. The emergency preparedness plan assigns responsibilities, accountability, and detailed procedures to be followed in the event of fire, weather, and other natural emergencies. Additional details and information can be found in 29 CFR 1910.38 â emergency action plans. In the event of any emergency incident at a project, the following general requirements apply: ⢠Work activities should cease, and all field personnel should be evacuated from the work location. The evacuation should proceed in a direction opposite the critically affected area, with all field personnel assembling in a predesignated location outside of the site property. ⢠A headcount should be taken of the assembled field personnel, and first aid should be administered to any injured individuals. ⢠If not present at the work location, the site supervisor should be contacted immediately. ⢠In the event of a chemical spill, send the site supervisor to meet the responders outside the area to direct them to the scene and provide information about the conditions that may exist, including appropriate SDSs for hazardous material. The fire department may have spill containment dikes, absorbents, neutralizing chemicals, and other means of mitigating spills or leaks. ⢠Without endangering field personnel, make a quick assessment of the situation. Call the emergency services agency (e.g., fire department) immediately and, if there are injuries, ask for medical assistance. Next, contact the site supervisor. When calling in the emergency, give your location, describe the nature of the emergency, and provide your name. F.7.7 Injury Action Planning and Prevention This section provides guidelines to assist in preventing injuries while performing tasks on the job site. Mechanical equipment or assistance such as dollies, carts, come-alongs, or rollers are to be used whenever possible. Mechanical assistance must be of proper size, have wheels sized for the terrain, and be designed to prevent pinching or undue stress on wrists. Objects to be moved must be secured to prevent falling and properly balanced to prevent tipping. The following guidance should be observed:
328 ⢠General tips for lifting: â Check to see if mechanical aids such as hoists, lift trucks dollies, or wheelbarrows are available. â Be sure that the load is free to move. â Check that the planned location of the load is free of obstacles and debris. â Be sure that the path to the planned location of the load is clear. Grease, oil, water, litter, and debris can cause slips and falls. â Be aware that proper handling and lifting techniques may differ for different kinds of loads or materials being handled. â Do not lift if you are not sure that you can handle the load safely. â Stand close to the load and face the way you intend to move. â Use a wide stance to gain balance. â Be sure you have a good grip on the load. â Keep arms straight. â Initiate the lift with body weight. â Lift the load as close to the body as possible. â Lift smoothly without jerking. Avoid twisting and side bending while lifting. ⢠Hazardous noise â High noise areas should be avoided. Ear plugs or muffs or both should be worn in high noise areas that must be entered or where engineering controls are unable to reduce exposure. F.7.8 Specific Considerations This section provides guidelines that can be referenced when mobilizing the drill rig and some of its smaller components, drilling and sampling, and drilling on water. Driving drill rigs along the sides of hills or embankments should be avoided; however, if sidehill travel becomes necessary, the operator must conservatively evaluate the ability of the rig to remain upright while on the hill or embankment and take appropriate steps to ensure its stability. Logs, ditches, road curbs, and other long and horizontal obstacles should be approached normally and driven over squarely, not at an angle. When close lateral or overhead clearance is encountered, a person on the ground should guide the driver of the rig. Loads on the drill rig and truck must be properly stored or secured while the truck is moving, and the mast must be in the fully lowered position. After the rig has been positioned to begin drilling, all brakes and locks must be set before drilling begins. If the rig is positioned on a steep grade and leveling the ground is impossible or impractical, the wheel of the transport vehicle should be blocked, and other means of preventing the rig from moving or tipping over should be employed. F.7.8.1 Mobilizing Drill Rig Take the following precaution prior to and during mobilization of the drill rigs: ⢠Lower drilling mast before moving rig. ⢠Secure all loads to rig prior to off-road mobilization. ⢠Inspect the route of travel prior to moving the drill rig off-road. Be aware of holes, rocks, trees, erosion, and uneven surfaces. ⢠Remove all passengers from the cab before moving drill rig onto rough or sloped terrain. ⢠Engage multiple drive power trains (when available) on rig vehicle when mobilizing off-road. ⢠Travel directly up or down grade on slopes when feasible. Avoid off-camber traverse approaches to drill sites. ⢠Approach changes in grade squarely to avoid shifting loads or unexpected unweighting. ⢠Use a spotter (person at grade) to provide guidance when vertical and lateral clearance is questionable. ⢠Use parking brake and chock wheels, when applicable, when grades are steep.
329 Raising Derrick (Mast). Prior to raising the derrick, take the following precautions: ⢠The overhead utilities should be located visually prior to raising the mast. ⢠The drill rig mast should not be raised when overhead power lines are close unless the distance between the rig and the nearest power line is at least 20 ft (6 m) for power lines up to 350 kV. Consult OSHA Table A of 1926.1408 for higher voltages where minimum distances may be increased to 45 ft (14 m) for power lines up to 1,000 kV. Additional clearance distances may be needed during high-wind conditions. ⢠The appropriate utility agency needs to be contacted so they can manipulate and deactivate overhead service in areas that interfere with drilling operations. ⢠The derrick must not be raised until the rig has been blocked and leveled (leveling jacks down). ⢠The mast must be secured and locked according to manufacturerâs recommendations prior to drilling. ⢠If required to perform work on the mast at heights above 6 ft (1.8 m), a full body safety harness and lanyard should be worn accordingly. F.7.8.2 Drilling and Sampling Only authorized and trained drill rig operators should operate a drill rig. Drill rigs should be set up and operated according to manufacturerâs specifications. If field personnel perform drilling (e.g., direct push, Geoprobe®), the manufacturerâs operational or field manualâs safety guidelines and specifications should be followed. The following are additional guidelines that should be followed: ⢠Set up and delineate appropriate work zones. This may include an exclusion zone, contamination- reduction zone, and a support zone. When feasible, work zones should be cleared of obstructions and leveled to provide a safe working area. ⢠Establish a communication system between driller, helpers, and other field support personnel for responsibilities during drilling operations. ⢠Instruct all field personnel to stand clear prior to and during startup. Field personnel should stay as far away as possible from operating equipment; especially if rig is located on unstable terrain (drilling operations should not proceed on unstable ground). ⢠Begin auger borings slowly with the drive engine operating at low speed. ⢠Keep hands and feet clear of rotating augers and direct-push equipment. ⢠Do not place hands or feet under auger sections during hoisting over hard surfaces. ⢠Do not remove spoil cuttings with hands or feet. ⢠Ensure drill rig is in neutral and the augers are not rotating before cleaning augers. ⢠Be sure operators and field personnel maintain a safe distance to moving parts. All those working near moving or rotating parts should secure loose equipment. ⢠Guard spinning parts of the rig when possible, avoid wearing loose clothing near the rig. ⢠Pay close attention to foot placement; slow deliberate movementâdonât hurry ⢠Donât overfill sample coolers; consider using the buddy system for lifting heavy items. ⢠Use a five-gallon bucket and a rope to raise equipment, tools, and sample containers up to the work area; ensure hands are free when climbing a ladder. ⢠Wear protective gloves when handling soils. ⢠Use dust masks if site conditions are dusty and windy. F.7.8.3 Drilling over Water Drilling over water is requires special precautions to ensure the safety of jobsite personnel. ⢠Training â Certification Requirements: All boat operators are required to complete a boating safety course and have experience piloting a motorized vessel within the past two years.
330 â Boat safety training and education may be obtained through a recognized outside source such as the United States Coast Guard Auxiliary. â Certified proof of course completion from one of these outside sources must be kept on record. â Before departure, each passenger not holding certification must be briefed by the certified operator or captain as to the safety equipment and procedures onboard the vessel. ⢠Operations on and near water may require some or all of the following PPE: â United States Coast Guard-approved personal flotation device (PFD), sized and adjusted to the wearer, should be worn by all when danger of drowning exists. To be immediately effective in an overboard situation, the straps must be buckled. Vests should have a rescue light during night, low-light, and severe weather conditions. â Foul-weather gear should be available and used, as necessary, during wet conditions. ⢠Rescue line â Ring buoys with at least 90 ft (27 m) of line should be provided and readily available for emergency rescue operations. Distance between ring buoys should not exceed 200 ft (61 m), adapted from 29 CFR 1915.158. â At least one lifesaving skiff or boat should be immediately available at locations where field personnel are working over or adjacent to water. ⢠Transfer between boats â Transferring between boats and barges can be dangerous, particularly in rough weather. Be extremely cautious every time you transfer. Never become complacent about this. Getting caught between vessels, even in calm seas, can be deadly. ⢠Deck hazards â Deck hazards are everywhere on vessels and barges. Rigging, wire, fittings, welding, lead, and stored materials are just some of the many trip and snagging hazards. Also watch for slippery decks particularly when muddy, wet, layered with ice, or if there are any fuel and lubricant spills. This is especially hazardous during rolling deck conditions. ⢠Overhead hazards â Overhead hazards are always a threat. Never stand under a hanging load, empty bucket hook, or crane boom. â Crane operators are not allowed to swing loads over other field personnel. â Personnel need to stand clear of tag lines and other rigging suspended from above. ⢠Weather â Full account should be given to existing weather conditions and forecast during planning for specific project operations. â Boat handling will cease when winds reach sustained speed of 20 knots. Launching, recovering, or otherwise handling a boat is unsafe when wind speed reaches 20 knots. F.7.8.4 Hand Tools and Electrical Devices OSHA regulation 29 CFR 1910.301 regarding hand tools should be observed in addition to the guidelines provided below: ⢠Each tool should be used only to perform tasks for which it was originally designed. ⢠Damaged tools or equipment should be removed from service and tagged "Defective." ⢠Safety goggles or glasses should be worn when using a hammer or chisel. Nearby coworkers and bystanders should be required to either wear safety goggles or glasses also or move away. ⢠Tools should be kept cleaned and stored in an orderly manner when not in use. ⢠Electric cords should not be exposed to damage from vehicles. ⢠Only knives with retractable blades designed for commercial use are to be used for work. Using a personal jackknife or hunting knife is prohibited.
331 ⢠When a knife is not in use, the blade should be retracted and set off to the side. Be cautious of which side is the sharpened side. Make sure the proper gloves are worn to reduce any injury. F.8 On-Site Activities F.8.1 Daily and Weekly Safety Briefing A safety kick-off meeting should occur prior to starting field activities and then daily for the duration of the project. These meetings allow the project field personnel an opportunity to maintain a high degree of safety awareness through timely safety education. This daily safety meeting should be used to discuss specific safety topics and obtain field personnel feedback. Topics to be discussed should include safety hazards noted and explanation of job safety procedures unique to the project. Other items open for discussion may include, but are not limited to the following: ⢠Field personnel PPE and decontamination protocol ⢠Project safety rules, safe work practices, and control measures ⢠Field personnel accidents and incident reviews ⢠Applicable standard operating procedures (SOPs) to job-specific activities Records of attendance at all field personnel safety orientation and training provided as part of this procedure should be documented. F.8.2 Daily Equipment Inspection Equipment that is used regularly should be examined daily for any damage or signs of stress that may impede work tasks. All equipment must be of good construction, adequate strength, and well maintained. F.8.3 Drill Rig Inspection Checklist Prior to the start of site work each day, the drill rig operator should inspect all drilling equipment. The inspection should be documented in the field records, and the records should be maintained at the site. The drilling equipment inspection should be repeated daily. Defective equipment should be repaired prior to use. At a minimum, elements of a good drilling rig inspection should include checking the fluid hose lines (hydraulic system, fuel lines etc.) and control levers for leaks, loose fittings, excessive wear, and kinked or bent hoses, as well as confirming fluid levels are full and controls are operable. The drill rig operator should also check that gauges are functioning and that shear pins and drive chains are in place and are not broken and have no signs of wear or defective links. The derrick should be locked in place, and the drill rig operator should check that hoists are properly spooled and rated to lift loads, necessary safety equipment is accounted for, and vehicle aspects are operational (e.g., back-up alarm, lights, windshield wipers). F.8.4 Stop Work Authority If any hazards exist that poses an immediate danger to life or health, take immediate action to protect the personnel. All field personnel have the right and authority to stop work when conditions are unsafe and to assist in correcting these conditions. Field personnel should implement corrective actions so that operations may be safely resumed, as deemed appropriate by the site supervisor.
332 F.8.5 Communication The site supervisor should ensure that all field personnel have provided the proper contact information and that information is organized into a coherent list that contains field personnel name, cell phone number, emergency contact number, and information to emergency services such as fire, ambulance, and police. Routes and location information to the nearest hospital should be displayed on a map. F.8.6 Housekeeping All work areas should be kept clean to the extent that the nature of the work allows. Every work area should be maintained, so far as practicable, in a dry condition. Where wet processes are used or weather conditions present precipitation, drainage should be maintained, and platforms, mats, or other dry standing places should be provided (where practicable) or appropriate waterproof footgear should be provided. Hazards from protruding objects or materials placed on paths or foot-traffic areas present a problem with slips, trips, falls, and puncture wounds. Field personnel should keep slip, trip, fall, and puncture hazards to a minimum by keeping objects and materials off paths and foot-traffic areas. Excess debris and trash should be collected and stored in an appropriate container (e.g., plastic trash bags, garbage can, roll-off bin) prior to disposal. F.8.6.1 Personal Hygiene Field personnel should wash hands and face after completing work activities and prior to breaks, lunch, or completion of workday (especially prior to eating and drinking). At a minimum, personal cleaning supplies at project sites should consist of soap, water, and disposable paper towels or items of equal use and application (e.g., antibacterial gels, wipes). Eating and drinking should be permitted only in areas that the site supervisor has designated for such activities. While actively engaged in field activities, personnel should not be permitted to smoke, eat, drink, or use smokeless tobacco except during breaks. Water supplies should be available for use on-site and should comply with the following requirements: ⢠Potable Water. An adequate supply of drinking water should be available for field personnel consumption. Potable water can be from an approved well or city water or bottled water. Individual-use cups should be provided as well as adequate disposal containers. Potable water containers should be properly identified to distinguish them from nonpotable water sources. ⢠Nonpotable Water. Nonpotable water may be used for hand washing and cleaning activities. Nonpotable water should not be used for drinking. All containers and supplies of nonpotable water used should be properly identified and labeled as such. F.8.6.2 Toilet Facilities Toilet facilities should be available for field personnel, clients, and visitors. Should subcontractor personnel be located on-site for extended periods, it may become necessary to obtain temporary toilet facilities. Exceptions to this requirement should apply to mobile crews where work activities and locations permit transportation to nearby toilet facilities. Adapted from 29 CFR 1910.141(c)(1)(i), a minimum of 1 toilet should be provided for every 20 site personnel, with separate toilets maintained for each sex, except where there are less than 5 total personnel on-site. For mobile crews where work activities and locations permit transportation to nearby public toilet facilities (e.g., gas station, restaurant, rest stop), on-site facilities are not required.
333 F.8.6.3 Sanitation Work areas should be kept free of dirt and debris that may impact the safety of field personnel and visitors. All trash receptacles should be readily visible, accessible, and routinely emptied. ⢠All food and drink items should be properly covered, sealed, or stored when not in use. ⢠All waste food containers should be discarded in trash receptacles. ⢠All tables, chairs, sinks, and similar surfaces should be kept clean, and food containers stored at all times. F.8.6.4 Additional Requirements The site supervisor should ensure that work area cleanliness and sanitation are evaluated weekly. Based on project-specific activities associated with the work activities and trash or waste generated, additional safety precautions may be required.
334 G A P P E N D I X G Contracting Subsurface Investigations G.1 Introduction A recent trend is that transportation agencies, for a variety of reasons (e.g., reduction in in-house personnel, increased work load), have increased their use of private engineering firms in conducting geotechnical investigations. Therefore, information pertaining to the best practices for contracting geotechnical services is essential to the current operations of the agencies. The references reviewed to develop the guidance provided herein include past solicitations for geotechnical services from North Carolina Department of Transportation (DOT), South Carolina DOT, Virginia DOT, and Louisiana DOT, as well as geotechnical manuals developed by Connecticut DOT (2005), Commonwealth of Kentucky (2005), Federal Highway Administration (FHWA 2002) and Washington State DOT (2013). Agencies typically use two types of contracting methods: on-call (or limited services) contracts and project-specific contracts. The on-call contracts are usually used for the design-bid-build project delivery method, while the project-specific contracts are used for projects that are programmed to be delivered using an alternative project delivery method, such as the design-build or public private partnership. Typically, agencies do not have direct project-specific contracts with the geotechnical firms, because under the alternative project delivery methods, the geotechnical firms usually contract directly with either the prime general contractor or the prime engineering consultant. Therefore, only the on-call contracting method is discussed in greater details in this appendix. The process for an agency to enter into an on-call contract with a firm and assign work to that firm usually consists of the following: ⢠Selecting the firm(s) that will be eligible to receive work from the agency ⢠Negotiating contracts and processing awards ⢠Assigning work orders and executing the contracted tasks Each of the processes identified above is critical to developing a successful contracting relationship between the agency and the firm. Additional information pertaining to each process is presented in the remainder of this appendix. G.2 Selecting Firms The selection process usually starts with the agency solicitating geotechnical services by means of a request for proposal (RFP) or a request for letter of interest (RFLOI). The RFP or RFLOI includes most of the information that the firms needs to successfully respond to the solicitation, but there is usually a provision for the firms to submit questions or seek clarification during the solicitation period. Since the RFP or RFLOI is the only form of communication allowed between the agency and potential firms during the solicitation period, it is important that the RFP and RFLOI be comprehensive to ensure that the firms understand the agencyâs expectations. This section provides information regarding the following topics that can aid the agencies with preparing RFPs or RFLOIs for geotechnical services: ⢠Prequalification requirements ⢠Description of the anticipated scope of services
335 ⢠Requirements for licensing, professional registration, or certification ⢠Permitted roles of subconsultants ⢠Submittal requirements for the RFP or RFLOI ⢠Selection process and selection criteria ⢠Submission schedule and key dates G.2.1 Prequalification Prequalifying private engineering firms is one criteria agencies use to select firms that have the expertise, equipment, and experience to provide the geotechnical services that meet the agencyâs minimum acceptable quality. Prequalification requirements typically specify the following: ⢠Qualification requirements for personnel performing geotechnical investigations, analysis, and reporting: This usually includes the minimum education and experience requirements as well as professional registrations and certifications. ⢠Qualification requirements for the firms performing geotechnical investigations, analysis, and reports: This usually include requirements for the firmâs registration with the secretary of state and applicable professional registration boards. There is also a requirement for the firm to provide a list of similar projects it has worked on during a specified period (e.g., during the previous five years) and a list of professional references with their contact information. ⢠Financial and insurance requirements. ⢠Requirements for the types of in situ and laboratory testing equipment the firm must have and the required minimum quantities of each. G.2.2 Scope of Services The description of the scope of services should be broad and include all the services the agency anticipates it may have a need to contract out in the areas of geotechnical investigations, geotechnical design, performance monitoring, and performance testing. The description of scope of services may also specify the software required for analysis, design, drafting or other activities, as well as quality assurance and quality control (QA/QC) requirements for personnel and equipment. G.2.3 Requirements for Licensing and Registration Licensing and registration requirements for the firm and its subconsultants should be clearly spelled out and can include being registered with the secretary of state and the State boards of registration for engineers and geologists. Additionally, the requirements for professional registration of engineers and geologists with the applicable boards of registration, and certification of drillers and technicians should also be clearly spelled out. G.2.4 Permitted Roles of Subconsultants Agencies will most likely need a diverse scope of geotechnical services. This makes it unlikely that any single firm will have the capability to provide all the services without involving a subconsultant. Therefore, the RFPs and RFLOIs should include provisions allowing the use of subconsultants. If an agency wants to control the use of subconsultants, they should include pertinent stipulations in the contract, such as requiring the prime firm to perform the engineering analysis and design but allowing the firm to subcontract laboratory testing services provided the prime firm is responsible for developing the laboratory testing program and providing oversight during the execution of the laboratory testing program.
336 G.2.5 Submittal Requirements for RFP or RFLOI The submittal requirements for the RFP or RFLOI should, at a minimum, include the following: ⢠The maximum page limitation for the RFP or RFLOI document ⢠The breakdown of the services that will be provided by the prime firm and those that will be provided by the subconsultants ⢠Method of submission of the document (i.e., electronic only, by mail only, or both) G.2.6 Selection Criteria and Selection Process The RFPs or RFLOIs should list the factors the agency will use to evaluate whether the firms that respond to the solicitation meet the minimum requirements listed in the solicitation. The RFP or RFLOI should indicate percentage weight assigned to each evaluation factor. The weighting should reflect the order of importance of the evaluation factor (i.e., evaluation factors the agency considers more important should be assigned a higher percentage than the less important ones). The following are some of the evaluation factors typically included in RFPs and RFLOIs: ⢠Quality of similar work the firm has done for the agency or similar organizations in the past ⢠Experience of the staff that will be working on the project (more weight should be placed on experience that coincides with projects that have scopes similar to the agencyâs projects or similar organizations) ⢠Capabilities of the laboratories in terms of the type of equipment, quantity of equipment, and personnel expertise ⢠Types and quantities of the field exploration and in situ testing equipment ⢠Any specialty expertise the firm may have that will benefit the agency An agency will usually set up a selection committee made up of the agencyâs experienced geotechnical professionals. The selection process starts with each member of the selection committee independently reviewing and scoring each proposal or letter of interest and then submitting their evaluation to the State contracting officer without discussing the results of their review with any other member of the selection committee. The State contracting officer compiles all the evaluations from all the members of the selection committee and ranks the firms in terms of their total scores. The State contracting officer then convenes a meeting of the selection committee members to discuss the overall results of the evaluation and to select the firms they wish to recommend for selection. G.2.7 Submission Schedule and Important Dates The RFP or RFLOI should include a schedule showing important dates, such as the deadline for questions, deadline for submitting the RFP or RFLOI, and the date the agency anticipates notifying the firms whether they have been selected or not. G.3 Contract Once the selection process is completed, the next step is to award the on-call or limited services contract. These contracts are usually set up for a specified contract duration and have a maximum contract dollar value for the contract duration. Work under on-call contracts is usually assigned to the firm based on the agencyâs needs, and no minimum volume of work is guaranteed to the firm. Work is also assigned by work orders that include very specific and detailed scopes of work. While the actual content of on-call contracts will vary from agency to agency, there are certain contract provisions that are common to most on-call contracts. These provisions that are frequently included in most contracts are presented below: ⢠A broad scope of work should be included in on-call contracts to give the agency more flexibility in using these contracts without having to engage too many firms. The scope of work should highlight what
337 services the agency expects the firm to be able to perform in the areas of geotechnical investigations, laboratory testing, geotechnical design, performance monitoring, and performance testing. The general scope of work should also specify the terms and conditions governing the use of subconsultants, work standards that should be followed (e.g., agencyâs geotechnical manual, AASHTO, American Standard for Testing and Materials [ASTM]), required deliverables, and the types of services and data that will be provided by the agency (e.g., a dedicated project manager and available data pertinent to the detailed scope of work). ⢠The contracts should include the maximum not-to-exceed contract dollar value for the contract duration and the types of expenditures that count toward meeting the maximum contract value (e.g., direct salary costs, other direct costs, overhead, operating margin, per diem costs). Since these contracts are for professional services, some of the costs for nonprofessional services (e.g., dozer services for clearing access roads to investigation locations) may not count toward the maximum contract dollar value. ⢠Protocols for managing the project schedule should be included in these contracts. This typically includes requiring the firm to provide progress reports on a specified frequency (e.g., weekly, monthly) depending on the project size. The progress reports should include percentage of tasks completed, current and updated project schedule, outstanding issues, and anticipated problems. ⢠The contract must include payment terms. The payment terms usually stipulate that payments are based on the percentage of work completed as documented in the progress reports, invoices, and other supporting documents (e.g., time sheets, invoices from subconsultants). Payment terms also include the requirement for the firm to pay their subconsultants within a specified period after they are paid by the agency. ⢠Because the duration of these contracts is typically longer than one year, it is good practice to include provisions for inflation adjustments in the contract. The contract should specify the frequency of adjustment (e.g., annual, biennial) depending on the duration of the contract and the required documentation (e.g., amended payroll registers) to justify the request for inflation. ⢠To avoid the possibility of exceeding the contract value in the middle of a project, provisions for supplemental agreements should be included in the contract. Supplemental agreements should be considered when a specified percentage of the contract value is exceeded (e.g., 80 percent). The contract should also include procedures for evaluating the need for a supplemental agreement (e.g., the review of work progress, potential for cost overrun, reevaluation of scope). ⢠Provisions for maintenance of documents by the firm and their subcontractors should be included. The contract should specify the types of documents that must be maintained by the firm and its subconsultants and for how long. ⢠The contract should include a provision for terminating the contract for any reason as well as guidelines regarding the process for terminating the contract while preserving any valuable work that had been accomplished. ⢠The contract should include provisions for dispute resolution and the course of actions available to each party if they cannot resolve the dispute. ⢠The contract should specify laws, ordinances, and regulations that the firm should comply with (e.g., laws pertaining to nondiscrimination in the selection of employees, subconsultants, and overall employment practices). ⢠The contract should include a listing of the nature and types of personal and business relationships that may have the potential for creating conflicts of interest. G.4 Work Order Assignment and Execution of Tasks Once the agency has completed negotiations and awarded the on-call contracts to the firm(s), it is ready to start assigning work to the contracted firm(s). For on-call contracts, work is usually assigned by project- specific work orders. The process for assigning work typically starts with the agency sending out an RFP
338 to the firm they have decided to assign the work to. The RFP usually requires the firm to develop a cost estimate for the anticipated work. The RFP typically highlights issues that may have an impact on the cost (e.g., the need for traffic control during the investigations, required deliverables, project schedule, requirements to attend scoping meetings, property owner contacts, QA/QC). To develop a cost estimate, the firm usually needs to develop and submit a detailed scope of work to the agency. The agency typically reviews the scope of work and cost estimate and either concurs or negotiates a mutually acceptable scope and cost. Once there is an agreement on the scope and cost, the work order assignment phase concludes with the agency issuing a notice to proceed. The notice to proceed typically includes a not-to-exceed dollar amount. During the execution phase, the firm implements the investigation work as specified in their proposal. The role of the agency during the execution phase is to provide oversight, QA, and contract administration. For project-specific contracts used for alternate delivery methods, the agency develops the scope of work that is included in the RFP. The remainder of this section provides guidelines for developing the scope of work by the firm and by the agency, QA/QC, and contract administration. G.4.1 Scope of Work for On-Call Contracts Although it is the firm that develops the scope of work for on-call contracts, the agency usually provides pertinent information to help the firm develop a sound scope of work. This information sharing is necessary to avoid potential contract disputes and will save the agency money because the firm will not have to spend time and energy gathering information that the agency already has. The following are the types of information and data that is valuable for developing a sound scope of work and should be provided by the agency: ⢠The type of feature(s) that need to be investigated (e.g., bridge, retaining wall, embankment) ⢠Site access constraints, if known ⢠Types of permits that will be required ⢠Anticipated project-specific issues that could affect the health and safety of the workers ⢠Available pertinent records (e.g., subsurface investigation reports from nearby projects, preliminary plans, geotechnical investigations, project surveys) ⢠Any known geologic or manmade constraints ⢠Site reconnaissance requirements ⢠Minimum equipment requirements, if any ⢠Any specific drilling, sampling, and testing standards that must be followed (e.g., AASHTO, ASTM) ⢠Types of drilling (exploration) methods that must be used (if the agency has preferences) ⢠Types and minimum quantities of samples that need to be obtained ⢠Types and minimum quantities of in situ and laboratory tests that must be performed ⢠Guidelines for classifying soils and rock ⢠Procedures for managing unanticipated subsurface conditions ⢠Sample transportation protocols and shipping frequency ⢠Minimum qualifications for the project personnel ⢠Guidelines for preparing geotechnical investigation reports and plans ⢠QA/QC requirements ⢠Guidelines for developing cost estimates for subsurface investigations Once the firm and the agency have agreed upon the purpose or objectives of the investigation and the firm has received the pertinent available information from the agency, the firm will prepare a detailed scope of work. The detailed scope of work should identify the types and amount of information and data that is
339 needed to address the anticipated geotechnical issues and the design requirements as outlined in Chapter 3. The detailed scope of work should include the rationale used to make the following decisions: ⢠Selection of the investigation equipment for the anticipated site conditions ⢠Selection of the number of investigation locations ⢠Selection of the depth of investigations at each investigation location ⢠Selection of the required types of samples and the sampling frequency for each type of sample ⢠Selection of the sampling equipment and borehole advancing methods ⢠Selection of the in situ and laboratory testing program ⢠Anticipated project schedule ⢠Estimated cost for performing the investigation In summary, the deliverable for this phase of the work should include a detailed boring plan, sampling and testing program, anticipated project schedule, and estimated cost for performing the investigation. G.4.2 Scope of Work for Alternate Delivery Contracting Method Projects let under the alternative delivery contracting method usually consist of three phases: ⢠Qualification ⢠Proposal ⢠Execution During the qualification phase, firms are required to submit a statement of qualification (SOQ). The SOQ includes information pertaining to the qualification of the team members, experience of the firm in similar projects, etc. The agency will use this information to shortlist the top two to five firms from the list of SOQ submitters. During the proposal phase, shortlisted firms are required to develop a cost and technical proposal. Each proposal is scored separately, and the final selection is based on a combined score of technical and cost proposals. The combined score is calculated using a predetermined formula. Only the selected firm participates in the execution phase. The scope of work is usually prepared by the agency prior to issuing the RFP and is included in the RFP to help the shortlisted firms prepare their technical and cost proposals. Typically, an agency only conducts limited subsurface investigations prior to issuing the RFP for inclusion in the RFP. The limited subsurface investigations are designed to establish the general geologic framework of the site so the proposing firms can determine the most likely geologic and manmade constraints and geotechnical issues they may encounter. Therefore, the purpose of the agencyâs scope of work is to ensure that the proposing firms acquire the minimum amount of data the agency considers acceptable for the project. The types of information that the agency should include in their detailed scope of work are as follows: ⢠Prequalification requirements for geotechnical firms participating in alternate delivery contracts ⢠Professional registration and certification requirements for personnel ⢠Applicable standards of specifications, guidance manuals, policy documents, etc. ⢠QA/QC requirements ⢠Guidelines for selecting the minimum number of required investigation locations, spacing of investigation location, depths of investigations, etc. ⢠Any requirements for the types of software required for processing, analyzing, and presenting data ⢠Performance requirements for each geotechnical feature being investigated ⢠Performance monitoring requirements and the types of instrumentation that are acceptable to the agency ⢠Requirements for performance testing and the types of performance tests that are acceptable
340 G.4.3 Quality Assurance/Quality Control Geotechnical data is used to make decisions that affect the performance of the transportation infrastructure for a very long period. Therefore, it is imperative for the firm to use sound QA/QC practices in executing geotechnical investigations for the transportation infrastructure as discussed in Appendix E. The firm has the primary role for incorporating sound QA/QC practices in their investigation practices; the agency provides guidance and oversight. G.4.3.1 Role of the Private Engineering Firm in Quality Assurance/Quality Control Implementation The engineering firm should establish their QA/QC plan based on ASTM D3740 and the guidelines contained in Appendix E. G.4.3.2 Role of the Agency in Quality Assurance/Quality Control Implementation The following are mechanisms an agency should use to provide QA/QC guidance and oversight during the execution of subsurface investigations by the firm: ⢠Establish field and laboratory equipment calibration requirements. ⢠Conduct random and routine inspections of the field and laboratory equipment. ⢠Arrange random field visits by experienced agency personnel to observe field activities. ⢠Arrange random visits to laboratories by experienced agency personnel to observe laboratory technicians perform tests. ⢠Require laboratories to be accredited by a national accreditation body, such as American Materials Reference Laboratory (AMRL). ⢠Require minimum training and certification for the field and laboratory technicians. ⢠Engage in timely review of submittals provided by the contractor. Consequences for not maintaining acceptable QA/QC practices should be clearly spelled out in the contract. G.4.4 Contract Administration The primary objectives for implementing effective contract administration protocols is to minimize the potential for contract disputes, facilitate prompt resolution of contract disputes, and ensure fairness to both the firm and the agency. The following are some elements of effective contract administration protocols: ⢠Use clear contract language ⢠Choose the appropriate contract type ⢠Select the appropriate methods of compensation ⢠Implement clear processes for resolving contract disputes ⢠Engage in comprehensive invoicing ⢠Conduct random accounting audits G.4.4.1 Compensation The issues regarding compensation usually revolve around whether the payment should be a lump sum or be based on unit of work and when mark ups for subconsultants are allowed. Therefore, the process for determining the following should be very clear from the onset: ⢠Identifying when and what nature of work will trigger payment based on unit of work. ⢠Identify when and what nature of work will trigger payment on a lump-sum basis. ⢠Identify the conditions that will allow mark ups for subconsultants and other direct expenses.
341 G.4.4.2 Invoicing The agency should provide the firm with guidelines for preparing invoices to comply with the agencyâs policies and requirements. The guidelines should spell out the types of documentation (e.g., time sheets, receipts, subconsultantâs invoices) that must be attached to the invoices.
342 References Commonwealth of Kentucky Transportation Cabinet. 2005. Geotechnical Guidance Manual, Frankfort, Kentucky. Connecticut DOT. 2005. Geotechnical Engineering Manual. Connecticut Department of Transportation, Hartford, Connecticut. FHWA. 2002. Subsurface Investigation-Geotechnical Characterization. Publication number FHWA NHI-010131. Federal Highway Administration, United States Department of Transportation, Washington, DC. Washington State DOT. 2013. Geotechnical Design Manual. Washington State Department of Transportation, Olympia, Washington.
343 H A P P E N D I X H Technology Transfer Strategies H.1 Introduction In addition to the guidance provided in this manual, there are numerous resources available to assist geoprofessionals with planning and executing a sound geotechnical site investigation program; using the results to develop a ground model for planning, designing, constructing, and managing assets of a project; and reporting the results in a manner that facilitates peer review, communication with stakeholders, and potential future uses. This appendix provides a comprehensive, but not exhaustive, summary of these resources, including (i) technical manuals and reports from federal and state agencies and professional organizations, (ii) standards and guides, (iii) information on relevant websites, (iv) classroom and web- based training materials, and (v) workshops and conferences. H.2 Technical Manuals and Reports A traditional source of information is the wealth of technical manuals and reports available from federal agencies such as the Federal Highway Administration (FHWA) and National Highway Institute (NHI), as well as individual State Departments of Transportation (DOTs). H.2.1 Federal Highway Administration The FHWA resources listed below are accessible via the following website: https://www.fhwa.dot.gov/engineering/geotech/library_listing.cfm H.2.1.1 Manuals and Guidelines ⢠Geotechnical Site Characterization - Reference Manual - Subsurface Investigations. Federal Highway Administration. Publication No. FHWA-NHI-01-031. NHI course No. 13231. May 2002. ⢠Soils and Foundations â Reference Manual. Federal Highway Administration. Publications No. FHWA NHI-06-088 and FHWA NHI-06-089. NHI Course No. 132012. December 2006. ⢠Geotechnical Aspects of Pavements â Reference Manual. Federal Highway Administration. Publication No. FHWA NHI-05-037. NHI Course No. 132040. May 2006. ⢠Determination of Unknown Subsurface Bridge Foundations. Federal Highway Administration. Geotechnical Guideline No. 16. August 1998. H.2.1.2 Geotechnical Engineering Circulars ⢠Geotechnical Engineering Circular No. 3 â LRFD Seismic Analysis and Design of Transportation Geotechnical Features and Structural Foundations â Reference Manual. Federal Highway Administration. Publication No. FHWA-NHI-11-032. August 2011. ⢠Geotechnical Engineering Circular No. 4 â Ground Anchors and Anchored Systems. Federal Highway Administration. Publication No. FHWA-IF-99-015. June 1999.
344 ⢠Geotechnical Engineering Circular No. 5 - Evaluation of Soil and Rock Properties. Federal Highway Administration. Publication No. FHWA-IF-02-034. April 2002. ⢠Geotechnical Engineering Circular No. 5 - Geotechnical Site Characterization. Federal Highway Administration. Publication No. FHWA-NHI-16-072. NHI Course No. 132031. April 2017. ⢠Geotechnical Engineering Circular No. 6 â Shallow Foundations. Federal Highway Administration. Publication No. FHWA-SA-02-054. September 2002. ⢠Geotechnical Engineering Circular No. 7 â Soil Nail Walls Reference Manual. Federal Highway Administration. Publication No. FHWA-NHI-14-007. NHI Course No. 132085. February 2015. ⢠Geotechnical Engineering Circular No. 8 â Design and Construction of Continuous Flight Auger Piles. Federal Highway Administration. Publication No. FHWA-HIF-07-039. April 2007. ⢠Geotechnical Engineering Circular No. 10 - Drilled Shafts: Construction Procedures and LRFD Design Methods. Federal Highway Administration. Publication No. FHWA-NHI-10-016. NHI Course No. 132014. May 2010. ⢠Geotechnical Engineering Circular No. 11 - Design and Construction of Mechanically Stabilized Earth Walls and Reinforced Soil Slopes. Federal Highway Administration. Publications No. FHWA-NHI-10- 024 and FHWA-NHI-10-025. NHI Courses No. 132042 and 132043. November 2009. ⢠Geotechnical Engineering Circular No. 12 - Design and Construction of Driven Pile Foundations. Federal Highway Administration. Publications No. FHWA-NHI-16-009, FHWA-NHI-16-010, and FHWA-NHI-16-064. NHI Courses No. 132021 and 132022. July 2016. ⢠Geotechnical Engineering Circular No. 13 Ground Modification Methods Reference Manual. Federal Highway Administration. Publications No. FHWA-NHI-10-027 and FHWA-NHI-10-028. NHI Course No. 132034. April 2017. ⢠Geotechnical Engineering Circular No. 14 - Assuring Quality in Geotechnical Reporting Documents. Federal Highway Administration. Publication No. FHWA-HIF-17-016. August 2016. H.2.2 Transportation Research Board ⢠Transportation Research Record - Journal of the Transportation Research Board: https://trrjournalonline.trb.org/loi/trr â Geological, Geoenvironmental, and Geotechnical Engineering. Volumes 2578 (2016), 2579 (2016), 2580 (2016), 2655 (2017), 2656 (2017), 2657 (2017). â Geology and Properties of Earth Materials. Volumes 1755 (2001), 1786 (2002), 1821 (2003), 1874 (2004), 1913 (2005), 1957 (2006), 2016 (2007), 2053 (2008), 2101 (2009), 2170 (2010), 2253 (2011), 2282 (2012), 2349 (2013), 2433 (2014), 2510 (2015). ⢠National Cooperative Highway Research Program (NCHRP) Synthesis Reports. http://www.trb.org/Publications/PubsNCHRPSynthesisReports.aspx H.2.3 State Departments of Transportation Alabama: https://www.dot.state.al.us/mtweb/Testing/testing_manual/testing_manual_geotechnical.html ⢠ALDOT Guidance for Preconstruction Activities. Alabama Department of Transportation. Procedure No. 398. February 2005. ⢠Procedure for Conducting Soil Surveys and Preparing Materials Reports. Alabama Department of Transportation. Procedure No. 390. February 2012. Alaska: http://www.dot.state.ak.us/stwddes/dcspubs/index.shtml ⢠Alaska Geotechnical Procedures Manual. Alaska Department of Transportation and Public Facilities. May 2007.
345 Arizona: https://www.azdot.gov/business/standards-and-guidelines ⢠Guidelines for Geotechnical Investigation and Geotechnical Report Presentation. Arizona Department of Transportation. December 1991. Arkansas: https://www.arkansashighways.com/manuals/manuals.aspx ⢠Manual of Field Sampling and Testing Procedures. Arkansas Department of Transportation, Materials Division. April 2018. ⢠Design-Build Guidelines and Procedures. Arkansas State Highway and Transportation Department. September 2015. California: http://www.dot.ca.gov/hq/esc/geotech/geo_manual/manual.html ⢠Caltrans Geotechnical Manual â Geotechnical Investigations. California Department of Transportation. Revised July 2017. ⢠Caltrans Geotechnical Manual â Borehole Location. California Department of Transportation. Revised March 2012. ⢠Soil and Rock Logging, Classification, and Presentation Manual. California Department of Transportation. 2010. Colorado: https://www.codot.gov/business/designsupport/matgeo/manuals/cdot-geotechnical-design- manual ⢠Geotechnical Design Manual. Colorado Department of Transportation. April 2017. Connecticut: http://www.ct.gov/dot/lib/dot/documents/dpublications/gtman_3-05.pdf ⢠Geotechnical Engineering Manual. Connecticut Department of Transportation. Revised February 2009. Delaware: https://deldot.gov/Publications/manuals/mat_research/index.shtml ⢠Materials and Research Manual. Delaware Department of Transportation. March 2005. ⢠Bridge Design Manual. Delaware Department of Transportation. 2017 District of Columbia: https://ddot.dc.gov/page/design-and-engineering-manual ⢠Design and Engineering Manual. District Department of Transportation. July 2017. Florida: http://www.fdot.gov/geotechnical/publications.shtm ⢠Soils and Foundations Handbook. Florida Department of Transportation. 2018. Georgia: http://www.dot.ga.gov/PS/DesignManuals/DesignGuides ⢠Bridge Foundation Investigationsâ Drilling, Sampling and Special Notes. Geotechnical Engineering Bureau Foundation Drilling and Sampling Guidelines. Department of Transportation State of Georgia. Revised January 2012. ⢠Soils Surveys â Drilling, Sampling and Special Notes. Geotechnical Engineering Bureau Foundation Drilling and Sampling Guidelines. Department of Transportation State of Georgia. Revised February 2012. ⢠Retaining Wall Foundation Investigations â Drilling and Sampling. Geotechnical Engineering Bureau Foundation Drilling and Sampling Guidelines. Department of Transportation State of Georgia. Revised November 2017. Indiana: https://www.in.gov/indot/2804.htm ⢠Geotechnical Design Manual. Indiana Department of Transportation. 2018.
346 Idaho: http://apps.itd.idaho.gov/apps/manuals/manualsonline.html ⢠Materials Manual. Idaho Transportation Department. January 2018. ⢠Design-Build Manual. Idaho Transportation Department. January 2014. Illinois: http://www.idot.illinois.gov/doing-business/material-approvals/soils/index ⢠Geotechnical Manual. Illinois Department of Transportation. December 2015. Iowa: https://iowadot.gov/design/design-manual ⢠Design Manual â Chapter 200 â Geotechnical Design. Iowa Department of Transportation. January 2014. Kansas: https://www.ksdot.org/bureaus/burStructGeotech/default.asp ⢠KDOT Geotechnical Manual. Kansas Department of Transportation. 2007 Kentucky: https://transportation.ky.gov/Organizational-Resources/Pages/Policy-Manuals-Library.aspx ⢠Geotechnical Guidance Manual. Commonwealth of Kentucky Transportation Cabinet. June 2005. Maine: http://www.maine.gov/mdot/bdg/ ⢠Bridge Design Guide. Maine Department of Transportation. August 2003 (Revised July 2017). Maryland: http://www.roads.maryland.gov/Index.aspx?PageId=43 ⢠Standard Specifications for Subsurface Explorations. Maryland State Highway Administration. Massachusetts: http://www.massdot.state.ma.us/highway/DoingBusinessWithUs/ManualsPublicationsForms/LRFDBridg eManual2013Edition.aspx ⢠LRFD Bridge Manual â Chapter 1 â Bridge Site Exploration. Massachusetts Department of Transportation. June 2013. Michigan: https://www.michigan.gov/mdot/0,4616,7-151-9623_26663_27303-111063--,00.html ⢠Geotechnical Investigation and Analysis Requirements for Structures. Michigan Department of Transportation. March 2004 (updated December 2017). Minnesota: http://www.dot.state.mn.us/materials/geotmanual.html ⢠Geotechnical Engineering Manual. Minnesota Department of Transportation. January 2017. Mississippi: http://sp.mdot.ms.gov/Materials/Pages/Material's-Division-Administration.aspx ⢠Materials Division Inspection, Testing, and Certification Manual. Mississippi Department of Transportation. April 2010. Missouri: http://epg.modot.org/index.php?title=321.2_Geotechnical_Guidelines ⢠Engineering Policy Guide â Chapter 321.2 â Geotechnical Guidelines. Missouri Department of Transportation. Montana: http://www.mdt.mt.gov/publications/manuals.shtml ⢠Geotechnical Manual. Montana Department of Transportation. July 2008. Nebraska: https://dot.nebraska.gov/business-center/materials/
347 ⢠Geotechnical Policies and Procedures Manual. Nebraska Department of Roads. April 2002. Nevada: https://www.nevadadot.com/doing-business/about-ndot/ndot-divisions/operations/materials- section/materials-test-manual ⢠Materials Tests Manual â Aggregates and Soils. Nevada Department of Transportation. Numerical Sequence T102H-T239B. ⢠Materials Tests Manual â Geology Foundation Products. Nevada Department of Transportation. Numerical Sequence T600B. https://www.nevadadot.com/doing-business/about-ndot/ndot-divisions/engineering/structures/structures- manual ⢠Geotechnical Policies and Procedures Manual. Nevada Department of Transportation â Geotechnical Division. February 2005. ⢠NDOT Structures Manual. Nevada Department of Transportation â Structures Division. 2008. New Hampshire: https://www.nh.gov/dot/org/projectdevelopment/highwaydesign/specifications/index.htm ⢠Standard Specifications for Road and Bridge Construction. New Hampshire Department of Transportation. 2010. New Jersey ⢠Soil Boring Data Submission Standards. State of New Jersey Department of Transportation. November 2005. http://www.state.nj.us/transportation/refdata/geologic/download.shtm ⢠Design Manual for Bridges and Structures, Sixth Edition. New Jersey Department of Transportation. 2016. http://www.state.nj.us/transportation/eng/documents/BSDM/ New Mexico: http://dot.state.nm.us/content/nmdot/en/Infrastructure.html ⢠Design Manual, Chapter 600: Investigation of Soils, Rock, and Surfacing Materials. New Mexico Department of Transportation. October 2016. New York: https://www.dot.ny.gov/divisions/engineering/technical-services/geotechnical-engineering- bureau/gdm ⢠Geotechnical Design Manual, Chapter 4: Geotechnical Field Investigation. New York State Department of Transportation. Revised December 2013. ⢠Geotechnical Design Manual, Chapter 5: Soil and Rock Classification and Logging. New York State Department of Transportation. June 2013. ⢠Geotechnical Design Manual, Chapter 6: Engineering Properties of Soil and Rock. New York State Department of Transportation. June 2013. North Carolina: https://connect.ncdot.gov/resources/Geological/Pages/Geotech_Requirements_References.aspx ⢠Geotechnical Investigation and Recommendations Manual. North Carolina Department of Transportation. March 2016. North Dakota: https://www.dot.nd.gov/manuals/design/designmanual/designmanual.htm
348 ⢠Design Manual â Chapter VII â Geotechnical Studies and Design. North Dakota Department of Transportation. 2018. Ohio: http://www.dot.state.oh.us/Divisions/Engineering/Geotechnical/Geotechnical_Documents ⢠Specifications for Geotechnical Explorations. Ohio Department of Transportation. July 2017. Oklahoma: https://www.ok.gov/odot/Doing_Business/Pre-Construction_Design/Consultant_Contract/ ⢠Geotechnical Specification for Roadway Design. Oklahoma Department of Transportation. June 2011 (revised July 2015). Oregon: http://www.oregon.gov/ODOT/GeoEnvironmental/Pages/Geotech-Manual.aspx ⢠Geotechnical Design Manual, Chapter 3: Field Investigation. Oregon Department of Transportation. December 2016. ⢠Geotechnical Design Manual, Chapter 4: Soil and Rock Classification and Logging. Oregon Department of Transportation. December 2016. ⢠Geotechnical Design Manual, Chapter 5: Engineering Properties of Soil and Rock. Oregon Department of Transportation. December 2016. Pennsylvania: http://www.penndot.gov/_layouts/pa.penndot.formsandpubs/formsandpubs.aspx ⢠Geotechnical Investigation Manual. Pennsylvania Department of Transportation. Publication 222. April 2018. ⢠Geotechnical Engineering Manual. Pennsylvania Department of Transportation. Publication 293. April 2018 Rhode Island: http://www.dot.ri.gov/about/who/research_studies.php ⢠Guidelines for Geotechnical Site Investigations in Rhode Island. University of Rhode Island, Narragansett, and Rhode Island Department of Transportation. Final Report RIDOT Study â 0103. March 2003. South Carolina: ⢠Geotechnical Design Manual. South Carolina Department of Transportation. June 2010. http://www.scdot.org/business/geotech.aspx ⢠Bridge Design Manual. South Carolina Department of Transportation. June 2006. http://www.scdot.org/business/structural-design.aspx South Dakota: http://www.sddot.com/business/certification/forms/default.aspx ⢠Materials Manual. South Dakota Department of Transportation. 2016. ⢠Earthwork Manual. South Dakota Department of Transportation. 2016. Tennessee: https://www.tn.gov/tdot/materials-and-tests/geo-technical-operations.html ⢠TDOT Geotechnical Manual. Tennessee Department of Transportation. Version 2.0. October 2016. Texas: http://onlinemanuals.txdot.gov/txdotmanuals/geo/index.htm ⢠Geotechnical Manual. Texas Department of Transportation. March 2018. Utah: https://www.udot.utah.gov/main/f?p=100:pg:0:::1:T,V:4977, ⢠Geotechnical Manual of Instruction. Utah Department of Transportation. September 2017.
349 Vermont: http://vtrans.vermont.gov/highway/construct-material/geotech/engineering ⢠Geotechnical Guidelines for the Subsurface Investigation Process. Vermont Agency of Transportation. Publication MREI 11-01. March 2011. ⢠Geotechnical Engineering Instruction on Soil Slope Stability Investigation and Evaluation. Vermont Agency of Transportation. Publication GEI 14-01. October 2014. Virginia: http://www.virginiadot.org/business/materials-download-docs.asp ⢠Manual of Instructions, Chapter 3: Geotechnical Engineering. Virginia Department of Transportation. July 2016. Washington: ⢠Design Manual, Chapter 610: Investigation of Soils, Rock, and Surfacing Materials. Washington State Department of Transportation. Publication M 22-01.10. July 2013. https://www.wsdot.wa.gov/Publications/Manuals/M22-01.htm ⢠Geotechnical Design Manual. Washington State Department of Transportation. Publication M 46- 03.11. May 2015. http://www.wsdot.wa.gov/Publications/Manuals/M46-03.htm West Virginia: https://transportation.wv.gov/highways/engineering/Pages/Manuals.aspx ⢠Bridge Design Manual, Chapter 2.3 - Geotechnical Investigations. West Virginia Department of Transportation. March 2016. Wisconsin: ⢠Geotechnical Manual. Wisconsin Department of Transportation. March 2017. http://wisconsindot.gov/Pages/doing-bus/eng-consultants/cnslt-rsrces/geotechmanual/default.aspx ⢠Bridge Manual, Chapter 10 - Geotechnical Investigation. Wisconsin Department of Transportation. January 2017. http://wisconsindot.gov/Pages/doing-bus/eng-consultants/cnslt-rsrces/strct/bridge- manual.aspx Wyoming: http://www.dot.state.wy.us/home/engineering_technical_programs/manuals_publications/road_design_m anual.html ⢠Road Design Manual. Wyoming Department of Transportation. December 2017. H.3 Standards and Guides AASHTO and ASTM provide standards and guides to assist geoprofessionals with performing many geophysical, in situ, and laboratory tests in a manner that helps to ensure accurate, reproducible results. H.3.1 American Association of State Highway Transportation Officials ⢠AASHTO Standard Specifications for Transportation Materials and Methods of Sampling and Testing, and AASHTO Provisional Standards. https://bookstore.transportation.org H.3.2 ASTM International ⢠ASTM Geotechnical Engineering Standards. https://www.astm.org/Standards/geotechnical- engineering-standards.html
350 H.4 Geotechnical Websites Websites maintained by federal agencies and organizations, and State DOTs also contain valuable information to assist geoprofessionals plan and conduct geotechnical site investigations. H.4.1 Federal Agencies and Organizations ⢠Federal Highway Administration â Geotechnical Engineering https://www.fhwa.dot.gov/engineering/geotech/ ⢠Transportation Research Board (TRB) http://www.trb.org ⢠Transportation Research Board â Geotechnical Site Characterization http://www.trb.org/AFP20/AFP20.aspx ⢠Transportation Research Board, Strategic Highway Research Program â Geotechtools http://www.geotechtools.org/ H.4.2 State Departments of Transportation ⢠Alabama Department of Transportation â Geotechnical Division https://www.dot.state.al.us/mtweb/geotechnical_division.html ⢠Alaska Department of Transportation â Geotechnical Services http://www.dot.state.ak.us/stwddes/desmaterials/mat_geotech_services/mat_gam.shtml ⢠Arizona Department of Transportation â Geotech Service https://www.azdot.gov/business/engineering- and-construction/bridge/guidelines/geotech-service ⢠Arkansas State Highway and Transportation Department â Materials Division â Geotechnical Section https://www.arkansashighways.com/materials_division/geotechnical_section.aspx ⢠Colorado Department of Transportation â Soils and Geotechnical Program https://www.codot.gov/business/designsupport/matgeo/programs/geotech/drilling-operations.html ⢠Connecticut Department of Transportation â Soils and Foundations http://www.ct.gov/dot/cwp/view.asp?a=3195&q=300866 ⢠Florida Department of Transportation â Geotechnical Engineering http://www.fdot.gov/geotechnical/ ⢠Hawaii Department of Transportation â Materials Testing and Research Branch http://hidot.hawaii.gov/highways/other/materials-testing-and-research-branch/ ⢠Illinois Department of Transportation â Soils http://www.idot.illinois.gov/doing-business/material- approvals/soils/index ⢠Indiana Department of Transportation â Geotechnical Services https://www.in.gov/indot/2804.htm ⢠Kansas Department of Transportation â Bureau of Structures and Geotechnical Services https://www.ksdot.org/bureaus/burStructGeotech/default.asp ⢠Kentucky Transportation Cabinet â Materials Division â Geotechnical Resources https://transportation.ky.gov/StructuralDesign/Pages/Geotechnical-Resources.aspx ⢠Louisiana Department of Transportation and Development â Pavement and Geotechnical http://wwwsp.dotd.la.gov/Inside_LaDOTD/Divisions/Engineering/Pavement_Geotechnical/Pages/defa ult.aspx ⢠Massachusetts Department of Transportation â Geotechnical Section http://www.massdot.state.ma.us/highway/Departments/GeotechnicalSection.aspx ⢠Mississippi Department of Transportation â Geotechnical Operations http://sp.mdot.ms.gov/Materials/Pages/Geotechnical-Operations.aspx ⢠Nevada Department of Transportation â Geotechnical Section https://www.nevadadot.com/doing- business/about-ndot/ndot-divisions/operations/materials-section/geotechnical-section ⢠New York State Department of Transportation â Geotechnical Engineering Bureau https://www.dot.ny.gov/divisions/engineering/technical-services/geotechnical-engineering-bureau
351 ⢠North Carolina Department of Transportation â Geotechnical Engineering https://connect.ncdot.gov/resources/Geological/Pages/default.aspx ⢠Ohio Department of Transportation â Office of Geotechnical Engineering https://www.dot.state.oh.us/Divisions/Engineering/Geotechnical/Pages/default.aspx ⢠Oklahoma Department of Transportation â Bridge Division Geotechnical Branch https://www.ok.gov/odot/Doing_Business/Pre- Construction_Design/Bridge_Design/GeoTech_Services/ ⢠Pennsylvania Department of Transportation. GINT Library and Data template (software to manage report, and database geotechnical information) http://www.penndot.gov/ProjectAndPrograms/Construction/Pages/gINT.aspx ⢠South Carolina Department of Transportation â Geotechnical Design http://www.scdot.org/business/geotech.aspx ⢠Tennessee Department of Transportation â Geotechnical Operations https://www.tn.gov/tdot/materials- and-tests/geo-technical-operations.html ⢠Texas Department of Transportation â Geotechnical Field Testing https://www.txdot.gov/inside- txdot/division/bridge/specifications/geo-testing.html ⢠Utah Department of Transportation â Geotechnical https://www.udot.utah.gov/main/f?p=100:pg:0:::1:T,V:2643, ⢠Vermont Agency of Transportation â Geotechnical Engineering http://vtrans.vermont.gov/highway/construct-material/geotech ⢠Washington State Department of Transportation â Geotechnical Services https://www.wsdot.wa.gov/Business/MaterialsLab/GeotechnicalServices.htm ⢠West Virginia Department of Transportation â Geotechnical Group https://transportation.wv.gov/highways/engineering/geotech/Pages/default.aspx H.4.3 Professional Organizations and Associations ⢠ASTM International â Geotechnical Engineering Standards https://www.astm.org/Standards/geotechnical-engineering-standards.html ⢠ASTM International - Committee D18 on Soil and Rock https://www.astm.org/COMMIT/SUBCOMMIT/D18.htm ⢠American Society of Civil Engineers (ASCE) â Geo-Institute https://www.geoinstitute.org/ ⢠American Society of Civil Engineers (ASCE) â Transportation and Development Institute http://www.asce.org/transportation-and-development-engineering/transportation-and-development- institute/ ⢠American Society of Civil Engineers (ASCE) â Geotechnical Engineering https://www.asce.org/geotechnical-engineering/geotechnical-engineering/ ⢠International Society for Soils Mechanics and Geotechnical Engineering (ISSMGE) https://www.issmge.org/ H.5 TRAINING Classroom and web-based training courses and numerous workshops and conferences are available to geoprofessionals who would like to further develop their professional skills with respect to geotechnical site characterization.
352 H.5.1 Classroom and Web-based Training ⢠National Highway Institute (NHI): Web-based and instructor-led training: https://www.nhi.fhwa.dot.gov/course-search ⢠American Society of Civil Engineering (ASCE) â Geo-Institute: Webinars, Seminars, Online Courses, Exam Reviews, and Certificate Programs: http://mylearning.asce.org/diweb/catalog H.5.2 Workshops and Conferences ⢠Federal Highway Administration (FHWA) â State Geotechnical Workshops and Conferences: https://www.fhwa.dot.gov/engineering/geotech/conferences.cfm â Southeastern Transportation Geotechnical Engineering Conference (STGEC) â Highway Geology Symposium (HGS) â Northeast States Geotechnical Engineers (NESGE) Workshop â Northwest Geotech Workshop (NWGW) â Southeast Transportation Geotechnical Engineers Conference (STGEC) â Southwest Geotechnical Engineers Conference (SWGEC) ⢠American Society of Civil Engineering (ASCE) â Geotechnical Conferences and Events http://www.asce.org/geotechnical-engineering/conferences-and-events/ ⢠International Society for Soil Mechanics and Geotechnical Engineering (ISSMGE): https://www.issmge.org/events â International Conferences on Geotechnical and Geophysical Site characterization â International Conferences on Geotechnical Research and Engineering â International Conferences on Unsaturated Soils â European Conferences on Soil Mechanics and Geotechnical Engineering â International Conferences on Earthquake Geotechnical Engineering â Panamerican Conferences on Soil Mechanics and Geotechnical Engineering
